1978 Royale Update and Restoration

  • Please note, the forum recently had a problem with outbound emails for notifications, registrations, etc. A new email provider has been set up which should resolve all email issues. If you have any further trouble, please DM Christo or reach out via the Contact Us link in the website footer.
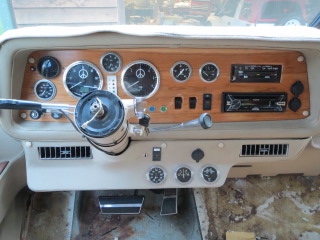
This thing is nearly complete! The bezel around the tell tales (box in the middle) is still unattached. That will need a little finesse still. I need to trim the bezels around the gages as well, since cutting perfect circles in engine turned aluminum foil is VERY tough. I had done it before, but peeled it off when I started building this bezel. Obviously, I still need to wrap the dash padding in upholstery as well. But...this still feels like a milestone.

1761790929438.png


Some close ups (where you can see boo-boos in the applique). I also have new lenses for the gages. Was using the old ones so I didn't scratch the new ones. That is why the fuel and voltage gages look so "dim"


1761791321475.png


1761791333818.png


1761791348613.png
 
  • Love
Reactions: tmsnyder
My 56' Studebaker Golden Hawk has a dash like yours. Inspiration for my GMCMH dash came from it. Just FWIW.

 
  • Like
Reactions: Mike_H
If you wanted to clean up the lines (circles?) around the gauges, I think a 3D printed black bezel could snap into the gauge and have a flange the goes onto the face of the bezel. It doesn't look like those gauges had much of a flange, so adding on with a bigger flange could make the setup a little more forgiving. If it's printed in ABS it could even be vapor smoothed so it doesn't look printed at all.

My '55 Roadmaster has a wrap-around engine turned dash that goes all the way down the door panels too. Such a great look for a factory vehicle. It really boosted my affinity for engine turned dashes.

1761840082752.webp
 
If you wanted to clean up the lines (circles?) around the gauges, I think a 3D printed black bezel could snap into the gauge and have a flange the goes onto the face of the bezel. It doesn't look like those gauges had much of a flange, so adding on with a bigger flange could make the setup a little more forgiving. If it's printed in ABS it could even be vapor smoothed so it doesn't look printed at all.

My '55 Roadmaster has a wrap-around engine turned dash that goes all the way down the door panels too. Such a great look for a factory vehicle. It really boosted my affinity for engine turned dashes.

View attachment 16984
Paul, the bezels there are ABS and I did print them. I planned on doing exactly as you suggest, printing a thin, small trim piece to cover up the poor cuts.
 
  • Like
Reactions: pvfjr
Paul, the bezels there are ABS and I did print them. I planned on doing exactly as you suggest, printing a thin, small trim piece to cover up the poor cuts.
Oh, I had to zoom in further! I thought those were just part of your gauges. They look good! Just needs a bigger lip.

As my dad always told me, "Trim and paint will cover a multitude of sins"

I do like that combo of the engine turned applique and the black bezels. Looks sharp, great contrast. It's somehow simultaneously modern and retro, at least in my mind. That product has a great appearance on camera too--does it look that good in person? It seems like it really catches the light and has good depth; I've seen a lot of them that look more subdued. What brand is it?
 
  • Like
Reactions: Mike_H
Oh, I had to zoom in further! I thought those were just part of your gauges. They look good! Just needs a bigger lip.

As my dad always told me, "Trim and paint will cover a multitude of sins"

I do like that combo of the engine turned applique and the black bezels. Looks sharp, great contrast. It's somehow simultaneously modern and retro, at least in my mind. That product has a great appearance on camera too--does it look that good in person? It seems like it really catches the light and has good depth; I've seen a lot of them that look more subdued. What brand is it?
It looks pretty good in person too. Its a "sticker" but way fancier than that. It feels almost like aluminum foil...and its pretty fragile. It will tear pretty easily. Its not vinyl, it doesn't stretch. It was actually kind of a pain to apply. I hope it stays "stuck." Its designed for automotive use...but it IS amazon, LOL.

 
It looks pretty good in person too. Its a "sticker" but way fancier than that. It feels almost like aluminum foil...and its pretty fragile. It will tear pretty easily. Its not vinyl, it doesn't stretch. It was actually kind of a pain to apply. I hope it stays "stuck." Its designed for automotive use...but it IS amazon, LOL.

Ah, so it's probably a real foil film then. That explains why it looks better, but is so much harder to work with. Sounds like a tricky operation.
 
Been working on the dash cover and its almost done. Gotta finish gluing to the bezel. Going through the rest of my parts to finish the dash resto-mod, I noticed that one of my HVAC vent deflectors was broken...The adjustment flap was moving around vs moving all the parts and one of the pins that hold the whole deflector assembly was broken off. I modeled it up and printed them out.

1764339471740.webp

1764339583359.webp

After LOTS of trial and error, I just couldn't get the vent assembly back together. Not sure how it was done at the factory but I couldn't get things stable enough to reassemble.

So, because you can make things with a 3d Printer that you can't do with some other methods...I made an assembly that captures the little bar that pivots the deflector flaps (that was the issue trying to reassemble) and printed it out.

Circled is the "plug" to capture the link bar.

1764339734334.webp

And the assembly
1764339818624.webp

Giving enough clearance (I think I did 0.010 on the diameters) I printed the whole thing and once it was done, the link bar is now captured on the deflectors and it pivots perfectly. I don't currently have any pictures...Have to grab one later.

I will be posting these files on Makerworld for any who are interested. I'll post the link once I figure out the part numbers and stuff. Want to make it easy for people to find.
 
FYI,
I found by accident that removing the vent louvers dramatically increased the air flow from the vent. So I ended up removing them and storing them in the glove compartment.

JWID
 
  • Like
Reactions: Keith V
More Progress

I hauled all the dash IP stuff back to the motorhome yesterday. Feels like its been FOREVER since I've worked on it in the motorhome.

Getting the dash mounted...Had to adjust and drill a couple new holes, since I replaced the steel IP. Couldn't help myself, had to put the gages in and make sure the steering wheel was going to work.

1764591189552.png


1764591216239.png


Haven't posted it before, but I got the padded bezel covered too. I'm not even an amateur upholstery guy at best, but I'm happy with how it turned out. Sewing that was a whole ordeal...requiring me to tear the bottom end of the sewing machine apart, clean, and retime it. But, it works WAY better now. Gave me the confidence to try a top stitch. Its actually pretty straight, but the seam wandered on me a bit when I glued the fabric down. Like I said, less than amateur.

I have LOTS of wiring to do in the next couple days. I wired up the telltales and the horn. Still need to get the gages all wired in, the new stereo, and then reinstall everything else. My goal is to get the dash finished this week. We'll see how much time I get to work on it. December is always a busy month.

A couple pictures of my repaired dash vent too.

This is the factory vent. Two pics to show range of motion on the adjuster.
1764591614138.png

1764591653290.png


This is the one I made. The chrome is still the factory part, but all the "guts" are new. The biggest issue with it comes down to range of motion. It will physically go the same distance, but not with the adjuster. I played around with it last night and got it better, but its still not perfect. Good enough for me, but its not something I would want to market or anything. I took apart the factory one and don't see any major design differences, so I'm thinking its just the way the print came out. I could probably do something in my print settings to make it better, but like I said, it works well enough for me. I'm not going down that particular rabbit hole!
1764591714965.png

1764591731854.png
 
EDIT: This post is from Last Saturday...It will make more sense when you see the next post that came through today as well, in which I've fixed problems discussed in this post.

Hasn't been much lately worthy to post. Just working on wiring, and that's boring, even for the guy doing it. I am to the troubleshooting stage though, and I'm happy to report, I haven't let any of the magic smoke out yet! Most everything works...I had to open the fuse panel back up and re-route a couple terminals...but that is honestly to be expected as much of this thing I re-wired. I can turn it over, the headlights and taillights work. Dash lights come on, Radio works, blower works, Fuel switch works (and fires the solenoid).

The last big piece I have is my Turn Signal/Hazard/Brake circuit. None of them work, and they are blowing fuses. I haven't had the inclination lately to work on it...if ya'll haven't been paying attention, The midwest is kind of in the middle of a disgusting pattern of terrible cold temps, snow 24/7, and wind strong enough to blow you over. It sucks to leave the house. When I am in the mood, the turn signals have been on my mind, but I still need to test Mirrors again, make sure I have power back at the compressor, and then the little niggling telltales. Those are LED, so not only do I have the issue of, "Is it wired correctly?" I have the, "is the polarity correct?" problem. I just need to take the time to hit those with a test signal though and make sure when I give it 12 V on the signal wire, the light comes on.

Troubleshooting this stuff is one of those things you gotta be in the mood for too. I'm excited to have it this close but I don't want to rush through and miss something. So, I take my time and step away when I get irritated or bored.

I was pretty excited to see this happen when I shifted the transmission into reverse though...This is going to be a REALLY nice feature going forward. Needs a little aiming (since its mounted high up), but honestly, if that is the final position, that should work too. You can't see the bumper, but the ladder in the foreground on the RH red line is the Ladder to get on the roof, so its close.

1769137337288.webp
 
Last edited:
I figured out the turn signal, brake, and hazard flasher problem...as with most electrical problems on this rig, there is a direct path to the previous owner :rolleyes:.

Troubleshooting started with me tracing circuits and making sure connectors were seated fully and pinned properly. I focused on the column to harness connector first. Traced wires back to the fuse block, and everything was good there. Replaced fuses and systemically tried things. First was the hazards. Snap goes the fuse. Ok...Well, I replaced the fuse and I tried the DRIVERS signal this time. Previously, I had only tried the pass signal. Driver's side worked. Hmmmm....now we're getting some where. So, I started checking continuity to ground, and ID'ed the Front Pass signal wire had a short. Dug into the wiring on that side of the coach, and looked at all the splices they use to make the side markers, front signal lights, and the aftermarket lights on my mirrors work. Didn't see anything obvious there....I popped the lens off the mirror light and there is was. The dummy used a WHITE wire to ground...and black as the signal. I couldn't believe it! Go back inside, and sure as shit, when I connected those wires, I assumed black was ground and white was signal. So, I disconnected that dumb white wire and everything works. Hazards, Turn signals, Brake Lights, running lights, dash lights, etc.

I also plugged in my mirrors and those work (still, thank goodness).

Another good day!
 
  • Like
Reactions: dsmithy
I figured out the turn signal, brake, and hazard flasher problem...as with most electrical problems on this rig, there is a direct path to the previous owner :rolleyes:.

Troubleshooting started with me tracing circuits and making sure connectors were seated fully and pinned properly. I focused on the column to harness connector first. Traced wires back to the fuse block, and everything was good there. Replaced fuses and systemically tried things. First was the hazards. Snap goes the fuse. Ok...Well, I replaced the fuse and I tried the DRIVERS signal this time. Previously, I had only tried the pass signal. Driver's side worked. Hmmmm....now we're getting some where. So, I started checking continuity to ground, and ID'ed the Front Pass signal wire had a short. Dug into the wiring on that side of the coach, and looked at all the splices they use to make the side markers, front signal lights, and the aftermarket lights on my mirrors work. Didn't see anything obvious there....I popped the lens off the mirror light and there is was. The dummy used a WHITE wire to ground...and black as the signal. I couldn't believe it! Go back inside, and sure as shit, when I connected those wires, I assumed black was ground and white was signal. So, I disconnected that dumb white wire and everything works. Hazards, Turn signals, Brake Lights, running lights, dash lights, etc.

I also plugged in my mirrors and those work (still, thank goodness).

Another good day!
Good find. I hate to say it, but even the big coach manufacturers use black as a hot wire and white as a ground depending on the 12v circuit. Country Coach out here in Oregon used that often. No idea if the harnesses were designed by someone used to house wiring or what.... :ROFLMAO:
 
It's not quite finished, but its DAMN close. Had it all together to figure out what little things are left and the list is pretty short.

  • Clearance some of the support for my USB port nut (backside)
  • Figure out the transmission indicator cable. Something is just off a little. Its a bit further away from the column now, so I had to make a new "cable." The throw seems a bit off though...which shouldn't have changed. Might explain why it never really lined up well before. Have to look as the bushings in the linkage maybe.
  • Finalize a couple of wire routing issues.
  • Clearance glovebox door for turn signal and hazard flasher relays.
  • Reprint the three dash tags I need and route my EL wire.
So, my bezel will need to come off at least one more time...but I couldn't resist putting all together and looking at the real life version of the vision that's been in my head for SO long!IMG_1495.webp
 
It's not quite finished, but its DAMN close. Had it all together to figure out what little things are left and the list is pretty short.

  • Clearance some of the support for my USB port nut (backside)
  • Figure out the transmission indicator cable. Something is just off a little. Its a bit further away from the column now, so I had to make a new "cable." The throw seems a bit off though...which shouldn't have changed. Might explain why it never really lined up well before. Have to look as the bushings in the linkage maybe.
  • Finalize a couple of wire routing issues.
  • Clearance glovebox door for turn signal and hazard flasher relays.
  • Reprint the three dash tags I need and route my EL wire.
So, my bezel will need to come off at least one more time...but I couldn't resist putting all together and looking at the real life version of the vision that's been in my head for SO long!View attachment 17722


That looks really great!
 
  • Like
Reactions: Mike_H
Well, I thought I was done with disassembly on this old girl, but I found a little bit more rotten floor under the driver's side rear wheel well. Makes sense, as I've already had to replace the floor under the toilet and Shower...A bit of a bummer, but at least its a relatively quick tear out and replacement

1771872996080.webp

Took the opportunity to "fix" all the patches, and just put new floor in the bathroom. Here it is, ready to insulate and install

1771873045663.webp

I have the hole in the aluminum covered, and my plywood is cut and ready to install. Unfortunately, I ran out of time this weekend and didn't get it done. Shouldn't take too much more time to get it all fixed up though.
 
Got the floor reinstalled. I routed a rabbet in the OE floor and the new piece to make a Half Lap. This was the best way I can think of to support the long edge. Then I ran a bead of PL Adhesive along the plywood edge and some 1" drywall screws to hold the pieces together. Everywhere I could hit the aluminum frame, I used #12 Wood screws. Its solid and squeak free.

I'm planning on installing the wheel well tonight. Its clean and ready to go, I just needed to wait for some more weatherstripping to arrive. I also have some Sikaflex to go around the perimeter once everything is installed.

1772129390528.webp
 
Looks like a fine job to me. I agree, the rabbet seems like the best way to go. That sure looks a lot better than the patches you replaced.