Sealant for the roof rails

B1gflip

Active member
Feb 18, 2023
149
27
28
50
Cleona Pa
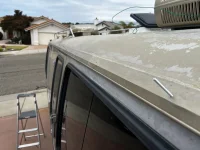
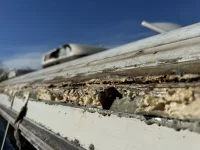
Hi guys, I pulled the roof rails off without a stripped screw, (the awning screws were a different story). I’m wondering if people are using butyl tape to seal them. Also what’s the best thing to use on the front and rear seam. I was thinking Eternabond?
Thanks
 
Last edited:
Yes. You can order a roll of 1” butyl tape from McMaster that is more than enough to cover both sides.

Installation notes:
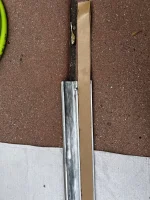
1. Clean the backside of the rail with a wire wheel.
2. Install tape on the upper rail length at top edge but don’t attempt to peel the backing off especially on a hot day - it will turn into Gumby (ask me how I know).
3. Keep the backing on during installation then peel it off as you install the screws.
4. I tapped all of the screw holes for a stainless steel screw that allows a stainless washer with a rubber seal. I then inserted 10-24 threaded studs into 4 holes to guide the cap back in place and pulled the tape as the last step. Worked like a charm.

Update: Use a 10-24 tap. 18-8 Stainless Steel Button Head Hex Drive Screw, 10-24 Thread Size, 5/8" Long

Metal-Bonded Sealing Washer with Neoprene Seal, 18-8 Stainless Steel, for Number 10 Screw Size, 0.200" ID, 0.375" OD

Rubber Sealing Tape, Butyl Rubber, 1" Wide, 50 Feet Long

IMG_4677.jpeg
IMG_4679.jpeg
 
Last edited:
  • Like
Reactions: pvfjr
Yes. You can order a roll of 1” butyl tape from McMaster that is more than enough to cover both sides.

Installation notes:
1. Clean the backside of the rail with a wire wheel.
2. Install tape on the upper rail length at top edge but don’t attempt to peel the backing off especially on a hot day - it will turn into Gumby (ask me how I know).
3. Keep the backing on during installation then peel it off as you install the screws.
4. I tapped all of the screw holes for a stainless steel screw that allows a stainless washer with a rubber seal. I then inserted 10-24 threaded studs into 4 holes to guide the cap back in place and pulled the tape as the last step. Worked like a charm.

Update: Use a 10-24 tap. 18-8 Stainless Steel Button Head Hex Drive Screw, 10-24 Thread Size, 5/8" Long

Metal-Bonded Sealing Washer with Neoprene Seal, 18-8 Stainless Steel, for Number 10 Screw Size, 0.200" ID, 0.375" OD

Rubber Sealing Tape, Butyl Rubber, 1" Wide, 50 Feet Long

View attachment 12041
View attachment 12042
Amazing. I’m gonna do it that way exactly. I’ve seen someone caulk the top as well as butyl. Seems kind of redundant to me. Also do you recall how many screws you ordered? Thanks so much.
 
Amazing. I’m gonna do it that way exactly. I’ve seen someone caulk the top as well as butyl. Seems kind of redundant to me. Also do you recall how many screws you ordered? Thanks so much.
I am still fighting the front cap seam and I have tried just about everything except butyl. I think butyl would be very messy especially when it gets hot and I doubt you can paint over it.
 
I am still fighting the front cap seam and I have tried just about everything except butyl. I think butyl would be very messy especially when it gets hot and I doubt you can paint over it.
I have some leftover Eternabond from an avion. I’ll probably use it and see what happens.
 
To fix leaks I removed my rails, applied butyl tape, reassembled, and then applied a bead of Dicor sealant along the entire upper edge of each rail. That stopped the leaks. Dicor has a reputation for lasting many years on an RV. I was able to find a matching color (they have several).
 
  • Like
Reactions: EricS and B1gflip
I did my rails in my build thread and used White Dicor, if anybody needs some Dicor I think I have about a 1/2 case of it left (12 tubes), if anybody needs some let me know, I will get it to you cheaper than you can buy it online.
 
  • Like
Reactions: Kendra and B1gflip
I did my rails in my build thread and used White Dicor, if anybody needs some Dicor I think I have about a 1/2 case of it left (12 tubes), if anybody needs some let me know, I will get it to you cheaper than you can buy it online.
Is that what you used in the front and rear roof seam?
 
I am still fighting the front cap seam and I have tried just about everything except butyl. I think butyl would be very messy especially when it gets hot and I doubt you can paint over it.
When I installed my CR Lawrence windows a dozen years back I used butyl rubber to seal them to the coach. So far the rubber has not been "very messy especially when it gets hot". I have not tried to do any painting so I don't know about that. I think butyl would work under the rails.
 
  • Like
Reactions: B1gflip
Yes. You can order a roll of 1” butyl tape from McMaster that is more than enough to cover both sides.

Installation notes:
1. Clean the backside of the rail with a wire wheel.
2. Install tape on the upper rail length at top edge but don’t attempt to peel the backing off especially on a hot day - it will turn into Gumby (ask me how I know).
3. Keep the backing on during installation then peel it off as you install the screws.
4. I tapped all of the screw holes for a stainless steel screw that allows a stainless washer with a rubber seal. I then inserted 10-24 threaded studs into 4 holes to guide the cap back in place and pulled the tape as the last step. Worked like a charm.

Update: Use a 10-24 tap. 18-8 Stainless Steel Button Head Hex Drive Screw, 10-24 Thread Size, 5/8" Long

Metal-Bonded Sealing Washer with Neoprene Seal, 18-8 Stainless Steel, for Number 10 Screw Size, 0.200" ID, 0.375" OD

Rubber Sealing Tape, Butyl Rubber, 1" Wide, 50 Feet Long

View attachment 12041
View attachment 12042
Does the butyl tape extend down to the screw holes, or do you have to trim around it to install the screws?
 
As I recall, the screws are just below the 1” butyl tape. Some butyl sealant will squish out near the screws but that wasn’t an issue on my installation.
Ok, in my mind, I had to trim the butyl around the holes. The threaded studs you used for alignment. Did you drill the holes large enough that the trim piece just slides over the studs? Thanks again. Just want to get this worked out in my head before the screws and washers arrive.
 
Ok, in my mind, I had to trim the butyl around the holes. The threaded studs you used for alignment. Did you drill the holes large enough that the trim piece just slides over the studs? Thanks again. Just want to get this worked out in my head before the screws and washers arrive.
I believe you are asking if the side rail (trim piece) will slide over the threaded studs - Yes. You should not make the holes on the side rail larger. Just focus on tapping each screw hole in the top for the 10-24 stainless screws. Just be sure to match the same angle of the top when tapping the holes or the screw will not sit flush on the side rail.
 
I believe you are asking if the side rail (trim piece) will slide over the threaded studs - Yes. You should not make the holes on the side rail larger. Just focus on tapping each screw hole in the top for the 10-24 stainless screws. Just be sure to match the same angle of the top when tapping the holes or the screw will not sit flush on the side rail.
Any tips on accurately tapping the holes?