The Ferrigno Family's 1976 Palm Beach

You said...."I cleaned up the intake with my blast cabinet and repainted it." So, you sand blasted it? If so, I hope you covered the intake runners and the carburetor mount holes. IF not, you must thoroughly flush the intake runners and area below the carb mount to make sure there is no abrasive that could make it's way into the cylinders. I had a friend that blasted his valve covers clean and repainted. Looked nice, but, ten minutes into the break-in, things started to knock. Disassembly found all bearing surfaces abrated and destroyed. He speculated that abrasive material got under the valve cover baffles and oil knocked it loose taking the motor out. Just a cautionary note...

Otherwise, NICE job!! Probably the best way to block the crossover.
 
  • Like
Reactions: dsmithy
You said...."I cleaned up the intake with my blast cabinet and repainted it." So, you sand blasted it? If so, I hope you covered the intake runners and the carburetor mount holes. IF not, you must thoroughly flush the intake runners and area below the carb mount to make sure there is no abrasive that could make it's way into the cylinders. I had a friend that blasted his valve covers clean and repainted. Looked nice, but, ten minutes into the break-in, things started to knock. Disassembly found all bearing surfaces abrated and destroyed. He speculated that abrasive material got under the valve cover baffles and oil knocked it loose taking the motor out. Just a cautionary note...

Otherwise, NICE job!! Probably the best way to block the crossover.
Ugh, yeah, valve cover baffles are sure to have some hidden gunky sludge somewhere. Thankfully this manifold has been nice and hot, and cooked out anything clingy/gunky/sticky. It has come out very clean and dry. I've got good access to all ends of the runners, and a nice long, flexible bottle brush to snake through them. I've also blasted a truckload of air through it at all angles with a long-nozzle blow gun, and then again, then a solvent wash, then more air.

I'm glad I did, as the media blasting actually dislodged a bunch of crusty stuff that was there when I got started. This was a "new" engine that was presumably ready to rock, but someone had missed stuff in that intake.

Fortunately the block looked like it was pristine. I think the shop did the block/heads, and the owner did the intake.
 
  • Like
Reactions: dsmithy
I think, perhaps, the muffin tin fared even worse than you imagined. :oops: I won't be using those again...
Back to the drawing board for ingot pouring.

Try a short piece of angle iron facing upward like a V, undercut the ends at a slight angle, and weld a plate on each end. Make it into a trough. Works good as an ingot mold.
 
Last edited:
  • Like
Reactions: dsmithy
In lots of decades of engine inspection, I have never seen a lot of what was shown here. I am still trying to figure out what happened to cause a lot of it.....
So what seems the oddest to you? The wear patterns on the outside of the rod bearings? Broken rocker bridge? I'd be curious to hear your opinions/pontifications.
 
After a two-week hiatus with family things, camping in the Glenbrook, etc, I'm back at it. I devised a method for unbolting the body hold-down brackets from underneath. I used a crow foot socket extension and breaker bar to hold the nut. Then I used a coupling nut with a full-thread bolt inside it, set to a depth that left about 4 female threads inside. I threaded those onto the end of the offending free-spinning carriage bolts, and used the impact to spin them clockwise up through the nut. It worked!

Pads were worn down to nothing in places.
PXL_20240503_022416657.webp

Jacking was fun. I used three jacks, with spreader boards, so each jack could support two cross members at a time.
PXL_20240502_041837967.MP.webp

Stall mat is a huge improvement.
PXL_20240503_022103903.MP.webp

Found the frame VIN. Looks like they actually screwed it up! Mixed up a 6 and a 9, then X'd it out. Cost of stamping numbers upside down I suppose. 😆
PXL_20240503_022305994.MP.webp


Now that the body is back where it belongs, I can focus on the tanks. They are ridiculously clean inside!
PXL_20240503_045229405.MP.webp. PXL_20240503_050402869.webp

Each has a crack where the vent nipple is attached. Time for brazing--before and after:
PXL_20240503_042825372.MP.webp PXL_20240503_052849197.MP.webp


All the while, some shenanigans were had.
PXL_20240502_032803960_exported_330_1714620530565.webp
 

Attachments

  • PXL_20240503_021903349.MP.webp
    PXL_20240503_021903349.MP.webp
    635.5 KB · Views: 19
  • Like
Reactions: dsmithy and Kendra
What was the issue with free spinning carriage bolts?

Thanks for posting the horse mat upgrade of the body pads, this is on my to-do list!

Boys will be boys! there's a reason our insurance is so much higher LOL That's totally something my boy would have done before I gave him an iphone and he disappeared :(
 
  • Like
Reactions: pvfjr
@tmsnyder Ah, so this can be a real trouble point. There's four hold-down straps that hold the body down to the frame. You can unbolt the brackets from the frame, or you can unbolt the straps from the deck. I needed to move my coach up about 5/8"+, so unbolting from the frame wouldn't be adequate.

The body straps are held with what I assume are carriage bolts, dropped into the wood subfloor from above. Mine were understandably rusty, and I couldn't back the nuts off because the carriage bolts would spin. Access to the top of the bolts was non-existent. Some are under the floor, under the furnace, inside the cabinet. Others are under the bunk, under the dinette, and right in the doorway. I didn't want to move all the obstacles and take up the flooring, so had to I find another way.


PXL_20240331_052847804.jpgPXL_20240331_052906446.jpg
 
  • Like
Reactions: tmsnyder
I've been messing with the TBI adapter a bit. It seems the Chevy spread-bore pattern is different from the Oldsmobile spread-bore pattern, so that's swell. The Chevy manifolds have straighter sides, and the Olds manifold dips way in on the sides between the primary and secondary sides. You can see the gap it leaves. I may have to make an adapter for the adapter. I don't want to use a simple plate with abrupt transitions from the two-barrel and four-barrel patters. I like the way this adapter adapts the large 2" bores to the spread-bore pattern. The fronts and backs of the patterns match very well--it just needs a little help in the middle. I may throw something together in CAD and see how it goes.
1714970169948.webp
I also want the coolant heated base plate functionality. I figure if they deemed it necessary in the Chevy trucks, it can't hurt to have it functioning on the motorhome.

I did a lot of cleaning on the transmission and final drive as well. It'll make replacing the seals a more pleasant job. Those things were NASTY! I may throw some paint on them while I'm at it. I don't really want the thin sheet metal pans to continue rusting.
1714970284877.webp1714970332854.webp


I cleaned up the differential cover and got it sealed back up. I did not use the gasket from the parts list. I didn't like the big cutouts it had in the mating surface. Permatex Ultra Grey has always worked just fine for me on differential covers anyway.
1714970475107.webp
 
  • Like
Reactions: Blur911 and Kendra
I've been messing with the TBI adapter a bit. It seems the Chevy spread-bore pattern is different from the Oldsmobile spread-bore pattern, so that's swell. The Chevy manifolds have straighter sides, and the Olds manifold dips way in on the sides between the primary and secondary sides. You can see the gap it leaves. I may have to make an adapter for the adapter. I don't want to use a simple plate with abrupt transitions from the two-barrel and four-barrel patters. I like the way this adapter adapts the large 2" bores to the spread-bore pattern. The fronts and backs of the patterns match very well--it just needs a little help in the middle. I may throw something together in CAD and see how it goes.
View attachment 10710
I also want the coolant heated base plate functionality. I figure if they deemed it necessary in the Chevy trucks, it can't hurt to have it functioning on the motorhome.

I did a lot of cleaning on the transmission and final drive as well. It'll make replacing the seals a more pleasant job. Those things were NASTY! I may throw some paint on them while I'm at it. I don't really want the thin sheet metal pans to continue rusting.
View attachment 10711View attachment 10712


I cleaned up the differential cover and got it sealed back up. I did not use the gasket from the parts list. I didn't like the big cutouts it had in the mating surface. Permatex Ultra Grey has always worked just fine for me on differential covers anyway.
View attachment 10713
The cut outs in the differential cover gasket are there to provide a vent.final drive gasket.webp
 
Last edited:
  • Like
Reactions: tmsnyder
Well, there goes another grand (B.O.A.T. style). I ordered the HD torque converter from Applied (I'm going to keep calling it that I guess). I also ordered a Ragusa triple battery tray. I considered robbing it from my Glenbrook, but I figured I should let the new owner enjoy it instead. That keeps me from needing to spend time rewiring the Glenbrook anyway. While I was spending so much money, it seemed like nothing to throw $25 at a chance to get full-height cockpit sliding windows, so I added that to the cart as well. Add in some new tune-up parts from Rock Auto to finish dressing up the new engine, and we're at another $1k gone.

Funny, my actual boat has never required me to bust out another thousand. It's actually been downright cheap! Maybe I should switch over to AMUs since there are so many aviation guys here.

I digress...
Back to the work: I've started carving up a complete Delphi fuel pump and sender module. It's for some TBI application, and was one of the less expensive ones. If I find a clever way to make it all fit, I'll post part numbers and details (sadly, I think multiple STLs will be involved).

1715715340930.png

More fiddling with the TBI...
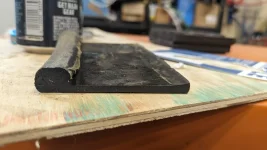
The factory Chevy 454 TBI adapter does a good job adapting from 2-barrel to dual-smushed-pears, but it doesn't adapt well to the Olds 4-barrel IMHO. If you look at the Chevy intake from this application, it has the wide-open spread bore pattern that you often seen on aftermarket intakes, rather than the 4 individual ports.
The Olds pattern also dips inward on the exterior between the primary and secondary, while the Chevy pattern has straighter sides. You can see where this would cause a vacuum leak. I'm also not a fan of those blunt faces in the air stream.
1715715297062.png1715716541784.webp

So it looks like I'm making an adapter for the adapter. I could just do the easy thing and drill the two bolt patterns into a piece of plate, forgo the Chevy adapter, and focus on lining up the secondaries. But, looking at things in-hand, I can't help but feel the front cylinders would balance just a bit better if I can make a smoother airflow transition. Plus, using the Chevy adapter comes with the added benefit of having engine coolant piped all around the throttle body area. Chevy did that for a reason, and with my exhaust crossover 110% blocked off, it sounds like a good idea. So I put craft paint on the carb mounting surface, pressed it into a manila folder, scanned it on a flatbed scanner with a precise ruler, adjusted for scaling errors, modeled up a thin plate in Onshape and printed it out in PETG. It fits pretty good!
1715715184539.png 1715715250124.png
The bolt holes lined up, and the front of the primary and rear of the secondary ports lined up with the Chevy adapter too. Now to do some extruding/lofting/drafting/whatever to make the two patterns transition better. I think I'll target about 1/2-5/8" total thickness depending on how all the angles look. I might cast it out of aluminum later, but I'm curious to see how the PETG fares.
 
  • Like
Reactions: Kendra and dsmithy
I'm thinking about switching to a TBI also.

I worry that a TBI would be less accepting of interruption of its fuel supply.

Might use a surge tank between the tanks and the TBI.
 
I'm thinking about switching to a TBI also.

I worry that a TBI would be less accepting of interruption of its fuel supply.

Might use a surge tank between the tanks and the TBI.
One other reason I prefer the gm based systems…. You are talking 12psi on my gm rochester 2” TBI…. No surge tank needed. Proven by others with same system running for decades….

A proper surge tank might be fine, but adds more complexity to what can be a fairly. simple fuel delivery system.


Fitech, sniper I think both need need 5x the fuel pressure maintained.
 
  • Like
Reactions: tmsnyder
Fitech, sniper I think both need need 5x the fuel pressure maintained.
Wow, I didn't realize they ran such high pressures on those. That's MPFI territory.

I'm feeling pretty confident my fuel setup will work pretty well. I've had TBI 454s in the past that always ran well. I'll even have two fuel pumps to choose from, as I'm going with in-tank setups. I'll be monitoring fuel pressures with the WinLog setup, so we'll see.
I had to verify my claim…. Holly sniper requires 58-60 psi fuel pressure. So I am off. 4x what my gmc tbi runs.

In the tank pumps is probably best. I always say “close as practical to the fuel”. Mine are not in the tanks, and have worked well since 2019 now.

When I did my efi, manny was making adaptors, so I am using one of his between the intake and tbi. Yours looks to be a little better thought out…. Not that anything wrong with the one I have.

The main complaint I have is my air filter intake. I have a spetre system and open air filter. My 75 has the air compresor up where I should install a better air cleaner system. It is on my round-to-it to change. I get air noise in cab from what I have.. would like a better filter and a box to help with the sound.
I think I'll have some drawbacks, and some of them it seems you're familiar with. My adapter should flow very nicely and work well in very cold winter temps. But, it will be tall! There will need to be a cutout in the hatch. To minimize the size of the cutout, and keep it hidden by a console, I'll have to switch over to one of those plenums ("carb hat") and an intake tube with remote filter. I have that on my Glenbrook currently. I'll rob it from there, and return the Glenbrook to a factory filter housing.

On the Glenbrook, that aluminum Spectre plenum has been pretty loud. I also had a lot of trouble starting the Glenbrook after sitting a few weeks at a time in the winter. It would act very cold-blooded. One day I started working on the motor before trying to start it (I forget why) and I discovered the cause. That aluminum plenum was completely full of water! Every square millimeter inside that thing had a drop of water condensed on it. If you disturbed it at all, the water dripped everywhere and gushed into the carb. No wonder!

For reference, my winter conditions consist of 75 inches of rain from October to May, and temp cycling between 35 to 45 degrees on a typical day. Commonly down to 30, infrequently down to 25, and very rarely less than 20. But, more importantly, no matter what temperature we get, the humidity stays around 99% for much of the time! So the aluminum plenum was serving as a passive humidity/moisture pump. I'm not sure how I'll address this. Perhaps a plastic one would serve me better and condense less.
 
Best advice, whether carb or EFI is to run on the top half of the tank. Our tanks are only 5" high, so at 1/4 tank you have only 1.25" of fuel on the bottom of the tank. Add to that the fuel is sloshing around, the pickup is going to get uncovered once you get that low. Carbs do have a bit of a reserve so EFI will notice it first. We had a Club member "run out of gas" with over a 1/4 tank left going down the long hill into Watkins Glen NY losing power steering and brakes.

In the 15 years I've had a GM based EFI, I've contemplated adding a surge tank, but my rule of filling at the 1/2 mark has served me well. That's about 200-250 miles and by then I need to stretch and empty my tank too.

Remember that the front tank usually ends up with more fuel once to get down below 1/2 tank if you are in a hilly area or used the brake to slow down. These diagrams should be required reading for all GMCers.


That's terrifying, those hills around the finger lakes are no joke. At the bottom of the hills is usually a town or intersection.

A surge tank with a low level alarm switch would be good, if it went off at 1/2 gallon it would leave plenty of time to get pulled over safely.