The Ferrigno Family's 1976 Palm Beach

We got things all put back together and wanted to lift the assembly up onto the transmission jack. My friend pulled his skid steer in, shut it off so we could mess with chains, and then fired it back up. It wouldn't move--dumb thing got stage fright for the second time. It did this when we went to unload the engine too! He had to get a service call, get it reprogrammed, have them out a second time to do it right, and it cost an arm and a leg. Since then, he's logged 5 hours on the darn thing! Remind me to stay away from any modern JD equipment...
1717537462424.png

Thankfully we had enough room to reach in around it with the mini excavator. Got the job done. I guess I should've just brought my cherry picker with me!

1717537496934.png


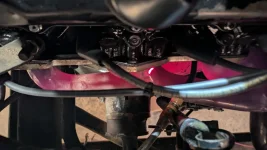
Before we installed the drivetrain, I looked at the brake booster hose one more time, and decided I didn't like it. It's a long piece of hose, hard as a rock, developing some cracks, and would be difficult to neatly replace with everything installed. I replaced it with some steel tubing, strategically bent, and flared with clamping bulges on each end. I think there were 6 bends? Anyway, it fits very nicely in place, and really gets itself out of the way. I'm attempting to have things a little more tidy than they were before, to make it easier to reach/see through openings and work on things.

1717537717172.png
 
  • Like
Reactions: Russell
Things are moving along. Summit got a torque converter to me in 2 days flat. I cancelled my order with Applied--that was nothing but a waste of time. I think I'll stick to ordering things from them for winter projects, when time isn't of the essence. I love what they do, but sometimes a small operation has limitations.
2024-06-06_20-54-01.jpg


Transmission is installed! Starting to dress up the motor now.
2024-06-07_23-14-26.jpg

Originally, the flywheel cover fell out in two pieces. Fasteners were missing, and I was a little puzzled about what the intended strategy was there. I cleaned it up, saw wear marks for a sheet metal screw for joining the two pieces. I figured they were supposed to be attached and installed together, and the little piece could then be swiveled into place. I drilled out the screw holes for a 3/16 stainless rivet from the inside out. Easy to swivel, and won't fall out. Installation was a breeze this way.
PXL_20240605_041656377.jpg

The final drive support bracket had trouble building to the engine. Holes were full of crud the air compressor wouldn't remove. I had to make a custom thread chaser to remedy the situation in place. That worked well, and it was satisfying to finally feel the bolt go in smoothly.

PXL_20240608_040736298.MP.jpgPXL_20240608_040712965.MP.jpg

The $10 eBay 307 distributor got some new seals, cleanup, and lubrication. It's in fantastic condition; that was a big win.
PXL_20240608_053201657.MP.jpg

Time to start planning all the wiring! This seemed like a good place to start. I'm impressed by the condition of the subfloor on this coach.
PXL_20240608_212200487.MP.jpg
 
That's a good idea. I didn't do anything on mine. I also couldn't source smooth stall mat, but ended up with the raised circles. I tried to orient them so the circle would sort of hug the frame rail or crossmember edges. I'll be monitoring them closely to see if they shift around. That's the beauty of having this access to a lift. I'll really enjoy just walking around under the coach to find little issues before they cause a problem.
 
A lot has happened since the last update, but I've not been good about taking pics of the progress. I'll probably forget a lot of it.
We're approaching our 6/27 deadline for camping. It's coming up fast! I'm starting to list out which tasks can be deferred, and which are crucial. I also didn't want to deal with a bunch of stops and starts for cam break-in, which is what hooking up TBI for the first time would likely result in. Cam MFGs suggest running 20-30 minutes on the first startup if possible, so the trusty old carb sounded like a good idea at least temporarily.

One non-essential function for the first trip is dual fuel tanks. So, this freeze plug does well to block off the filler tube.

1718669888647.png

The exhaust didn't fit back together the same way it came apart. It fought us for some reason. I had to trim a couple pieces, eliminate a short extension that provided two lap joints and use a stainless band clamp for a butt joint instead. That' s WAY easier to assemble. I also discovered this wear in the aforementioned extension piece. Weird.
1718669897889.png

The heater hoses got revamped a bit as well. This tee was completely crushed and distorted. The hoses, similarly, were severely overclamped and distorted--no doubt to compensate for the disfigured tee. To their credit, it didn't leak.
1718669908846.png

I finally made a block off plate for the fuel pump. I put that off for a bit too long.
1718669927635.png

I built some wires from a Moroso kit--pic shows mocking it up. Measure 17 times, cut once, screw it up. It was pretty tedious, but I'm really trying to focus on getting everything out of the way to make service easier. I swear, every single hose, wire, line, tube etc was just run point-to-point, always taking the diagonal path through an open space. You end up with nowhere to move your arms and tools around. It was driving me nuts. This thing is going to be WAY easier to work on when I'm done with it.
1718669964274.png

Also not pictured: transmission is installed, axles are connected, engine accessories are installed, belts are installed, transmission hard lines are replumbed and rerouted, original engine harness is reorganized and put into place, starter is installed and hooked up, temporary boat tank and electric pump is hooked up for cam break-in, and much more.
 

Attachments

  • 1718669939318.png
    1718669939318.png
    653.1 KB · Views: 6
One of the obstacles encountered during reassembly was the alternator. It had been working before teardown, but I'd noticed the output terminal was fried, and I don't mean maybe. Completely roasted! The plastic isolator bushings just crumbled out. The metals were affected too. That thing had been getting very hot, and couldn't even be disassembled. Parts stores didn't have any repair parts on hand. I didn't want to roll the dice on a rebuilt unit, so I decided to improvise.
1718670680868.png

I hammered a piece of 5/16 Ni-Copp brake tubing flat, and used it to replace the steel power output bar that rusty and overheated. I bent a tab up to help hold the bolt in place during reassembly (this is in lieu of the square bushing in a square hole as originally designed). A square-head 1/4x1" bolt would have been better for this tab retention, but I could only get a hex-cap. A 1/4" nylon bushing with a shoulder will insulate the output bolt from the case.
1718670693385.png


On the outside, a thick 5/16 nylon washer fits snugly on the far end of the 1/4" bushing (which needed to be trimmed to length. I didn't want to tighten the round nylon washer against a big square hole in the case, so I put a steel washer under it for support.
1718670698817.png


Nuts with the integrated lock washers were used to hold everything together. It mocked up nicely with a ring terminal, which was also roasted and due for replacement.
1718670705594.png
 
You camping cottage grove again? I will be at dorena lake over forth of july in a tent next to my brothers gmc. His needs some help so you may pass it on i-5.

Absolutely you need to run cam in on carb! Running it in right is important!
 
One of the obstacles encountered during reassembly was the alternator. It had been working before teardown, but I'd noticed the output terminal was fried, and I don't mean maybe. Completely roasted! The plastic isolator bushings just crumbled out. The metals were affected too. That thing had been getting very hot, and couldn't even be disassembled. Parts stores didn't have any repair parts on hand. I didn't want to roll the dice on a rebuilt unit, so I decided to improvise.
View attachment 11099

I hammered a piece of 5/16 Ni-Copp brake tubing flat, and used it to replace the steel power output bar that rusty and overheated. I bent a tab up to help hold the bolt in place during reassembly (this is in lieu of the square bushing in a square hole as originally designed). A square-head 1/4x1" bolt would have been better for this tab retention, but I could only get a hex-cap. A 1/4" nylon bushing with a shoulder will insulate the output bolt from the case.
View attachment 11100


On the outside, a thick 5/16 nylon washer fits snugly on the far end of the 1/4" bushing (which needed to be trimmed to length. I didn't want to tighten the round nylon washer against a big square hole in the case, so I put a steel washer under it for support.
View attachment 11101


Nuts with the integrated lock washers were used to hold everything together. It mocked up nicely with a ring terminal, which was also roasted and due for replacement.
View attachment 11102
That insulated output terminal is a very poor design as is the steel jumper from the rectifier to the terminal.
I did something similar, but I put a nut to tighten against the jumper on the inside so the insulator has no "squeeze" on it. I used two short strips of copper pipe strapping as my jumper.
 
It was finally time to fire up the new engine after topping off all the fluids. We had to tighten a couple coolant hose clamps. I eyeballed a little bit of advance with the rotor position relative to #1, and man did that thing start easy! It's nice having things primed with an electric pump.
1718671474626.png

The new fan clutch did it's job after a few minutes. It roared to life, and inflated my shirt with scalding hot air. That was fun.
1718671482685.png

Then I we realized what I'd screwed up. It had to be something, right? When I put the trans lines in I only hand-threaded them, because I was just mocking them up. I was hand-forming hard lines in hard to reach places, and thought they'd come in-and-out a few times. Well, they didn't. We got them fully installed, routed, clamped, etc. I never revisited the flare fittings at the transmission with a wrench. So, we got ourselves a puddle. I didn't want to interrupt the cam break in procedure, so I grabbed a wrench so I could stop the bleeding.
1718671511230.png

Oh and guess what? These headers will burn you real good when you bump into them while fumbling with a wrench while fiddling with transmission lines. Who'd have thought? Anyway, I was surprised they were so hot (though the camera does exaggerate it a lot). After doing some reading, it seems that's pretty normal during a cam break-in unless you run lots of extra timing. Now I know.
1718671553349.png


In the end, she runs! Nothing exploded. No bad noises were heard. It didn't overheat. We didn't have to do any unscheduled shut downs or interrupt the cam break in. It got awful hot and smoky inside the cabin, and it was not pleasant! I wouldn't want to do this every day, but it's done and it's worth it. I'll work on running it at an idle and tuning it now. It's so nice not to have those awful exhaust leaks anymore (not to mention the knocking).
View attachment PXL_20240617_054805774.TS.mp4
 

Attachments

  • 1718672021255.png
    1718672021255.png
    1.6 MB · Views: 10
  • Like
Reactions: EricS and tmsnyder
You camping cottage grove again? I will be at dorena lake over forth of july in a tent next to my brothers gmc. His needs some help so you may pass it on i-5.

Absolutely you need to run cam in on carb! Running it in right is important!
Yes, we'll be at Pine Meadows starting on the 27th! Either in the Palm Beach, or the Glenbrook. One way or another, we'll be there.
 
I would be terrified if I looked down and saw my headers that bright red Paul. I hope the camera exaggerated it as much as you say. Yikes!
 
I would be terrified if I looked down and saw my headers that bright red Paul. I hope the camera exaggerated it as much as you say. Yikes!
Yeah, there was a faint, dull red glow in one spot, even with the dim lighting. I was thinking, "I wonder if the camera will pick it up?" Ha! Did it ever!
 
I've been watching Gold's Garage on youtube , he's a veteran engine builder. In one of his builds, he states the 20 minute cam break in period is important, but doesn't need to be done all at once. If you have a problem you can shut it down and fix it. Doesn't help you now but maybe will help someone else out.

7:36 here:
 
Last edited:
  • Like
Reactions: pvfjr
It's been a while since I updated, but I really have been trying to make progress. It's tough with all the camping, boating, father/daughter backpacking, motorcycle trips, and countless other summer activities going on. There's always something. Plus, my wife's job largely consists of after-hours extracurricular type things, so our schedules are offset which leaves me tied up much of the time. It's tough with the coach at someone else's house, I can't leave if the kids need watched. But I digress...

The black tank was crushed and had a 5-way crack above the port-side strap. I had to use a heat gun to reshape the pie-slice flaps and get the edges to meet up again. Then a bunch of plastic welding to seal up the fractured PP. Didn't take many pics of the process or the original damage. Here I'm starting to work some mesh into the surface. I start in the middle and work my way outward in a star pattern, sorta like applying a decal. It keeps the reinforcement taut and flat, which I believe is good since mesh only works in tension.
1723277108510.png


Previously, turning on the water pump just made the kitchen faucet gush out the handle and base. A new cartridge off Amazon fixed that right up. This thing was not winterized before going to the auction yard, so I figure it was freeze damage. It's nice to see that flowing. Now I can leave the water pump turned on. That's good, right? More on this later...
1723277129504.png

Back on the black tank, the flange was cracked on its lower face, and the mounting bosses were all busted up.
1723277152738.png


The sender obviously leaked like a sieve. So stinking rusty, and the float was completely seized. It serves no purpose in my mind, and was cracked at every single screw hole.
1723277163191.png

So the tank leaked from the fracture on the left, from the outlet, and from the sender. But I'm a cheapskate, so onward with the repairs!
1723277174728.png


I shaved off the sender "bung".
1723277193096.png

I melted out the crack in the flange face (where the o-ring is supposed to make its seal) and filled it with fresh black PP rod. Then I scraped it flat with a nice scraping edge, and I think this worked better than sandpaper would've. It came out pretty flat and smooth despite the contrasting plastic colors.
1723277207646.png

A faithful old trashcan of 20 years found a higher calling. I had lots of totes that were PP, but they were all thinner. The trash can was nice and thick, so it got carved up.
1723277225997.png


And now the sender hole is patched. It got cracks grooved out, welded up, patch welded on, mesh melted in (shown below), then another skim coat to seal everything an additional time (not pictured).
1723277250092.png


Jumping around a bit, I replaced all the dry, cracked rubber lines on the vapor lines. Nylon was used for most of it, and I relocated the tee so it's not hidden between the body and frame. That was annoying.
1723277261776.png

The kids got to experiment on some ni-copp scraps with their hammers and do a little metal working. They were fascinated to realize you could stretch metal, and make it grow by pounding it flat. It's nice when I can actually come up with a way to keep them entertained.
1723277274301.png
 
The old sway bar bushing strap was smashed in the accident, so it was time for replacements. The end links had seen better days too. I can now confirm that these part numbers do indeed fit, so here they are for your reference.
1723278210707.png
 
Then disaster struck. We were sitting and admiring our progress, when I noticed the black tank appeared to be dripping into it's "drain pan" on the floor again. Huh, that thing had been dried out for months. I'd looked inside and verified it was dry recently too. When I ran the faucet, I ran it into a tub so nothing would go down the drains. What gives? Well, it wasn't coming from inside the black tank. It was dripping off the TOP of the black tank! So, I went inside, and the floor planks started squishing water up between their joints. Ugh. Had to pull the floor out of half the coach! Traced it up to the galley area where it went dry again. Dried everything up, and it started to wet out again from the port side. So we pulled apart cabinetry, drawers, closet, etc. Turns out, it was coming from the darned tee from the city water connection.

1723278583888.png1723278594611.png

The tee in question is shown buried in the wire looms. It's a little tough to reach, and the electrical cabinet must be dismantled to gain access. I'm not a fan of city water connections anyway, so I replaced the tee with a sharkbite elbow. Easy peasy.
1723278637027.png

For some reason I switched over to troubleshooting the Onan. I could make it run by jumping pins 9 to 5 (enter Dolly Parton). But alas, no AC output. We ran through the troubleshooting steps and determined the rectifier was suspect. Flashing the field did not help output. Field coil seems great though, definitely plenty of inductance for sending sparks around! I pulled the rectifier and ohmed it out in all directions. I've never seen one fail in so many ways all at once. Worst test results I've ever seen! Ordered a new one on Amazon--of course, the pin arrangement will be different.
1723278653948.png1723278669464.png

As to why 9 to 5 was necessary, I found the K3 relay to be busted. Also one trace was newly severed by corrosion, and an old one had been repaired in a fashion that left something to be desired. It probably worked at some point, but it could stand to be a bit more tidy.
1723278687829.png1723278711998.png

And for some reason I snapped a pic of the starboard side. I guess I hadn't seen it in a while since my friends tall trailer normally lives in that space.
1723278764745.png

I decided to finish up my little welding projects so I could take my welder back home again. Buzzed the O2 bung into place, and also patched up the aftermarket radiator guard. It was busted up from the accident.
1723278774678.png

I grabbed a relay with a workable pinout from a dead Hyundai in my driveway (mother-in-law's crank bearings went out). The leads got customized a bit so I could scab it onto the Onan board. If it tests out OK, I'll pot it in place with an appropriate adhesive.
1723278797000.png1723278861856.png1723278870161.png

I redid the old trace repair, and repaired the second trace as well. Most of the board got resoldered and tinned to protect what was left of all the traces.
1723278884687.png

The main control harness was VERY hard to unplug. Two pins had corroded, overheated, and basically welded together. Luckily I've got the necessary old Molex pins in my kit already.
1723278899438.png
 
Last edited:
It seems I'm getting behind on my updates again, so here goes...

I used the old motor to mock-up the wire harness for the ECM. The donor RV didn't have one, so I had to build the whole thing from scratch. I got fresh connector shells off ebay, and two bags of 25 pins each. I had a bunch of GM wire I'd harvested, but needed more. I went over to a Passat carcass around the side of the shop and hacked out a few pounds of wire. No shortage of wire on those Euro cars. They used twisted pairs for weird things too, like lights and speakers. Some of those came in handy.
1725610430427.png1725610483070.png1725610533961.png

Adding more wires....and more wires. I was able to mostly match the colors on the EBL ECM wiring diagram.
I broke out the power wires and labeled them for later connection. I've got a 6-fuse, 6-relay power box to connect everything to. It'll go under the passenger seat with the ECM, and run off the battery with a couple fusible links.
1725610558400.png1725610594805.png


I had to get some Weatherpack connector kits and crimpers for some of the sensor and distributer connections. It was about time I got set up for doing those.
1725610647775.png

I tore the ECM apart to identify the unused pins. I don't want to fish individual wires in and out of the ECM for the ADC connection, so I wanted to tap into the unused pins on the baord and use the main connectors. Looks like they employed the same strategy for the serial data.
1725610679729.png
 
Power distribution wiring in progress.

1725611227319.png

Got the $10 ebay distributor off the Olds 307 swapped in. Installed new module, cap, rotor, custom cut some wires, etc. Rigged up the fuel system with a temporary mechanical gauge, and fired things up! It ran fine until it warmed up, then deteriorated. Turns out I looked at the wrong diagram when hooking up the vacuum lines.
1725611256541.png

Once I got the MAP plugged into the right vacuum port, it was drivable enough for some VE learning. It died a few times on the way to the gas station, every time I hit the brakes going downhill. I guess we used up all the gas during the cam break-in.
1725611362340.png