The Ferrigno Family's 1976 Palm Beach

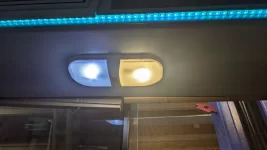
The PO had installed LED bulbs that were awfully blue. They were "omnidirectional" and didn't shed heat well either. Their plastic bases were getting quite crusty as well. I got some panel style replacements. Supposedly 3300K I think.
PXL_20230413_025242777.webp

The old ones were so blue, they throw off my camera's white balance, making the new ones appear more yellow than they really are. I can't say what the true CRI is or was, but I can see colors a lot better now.
PXL_20230413_025218243.webp

I got a 20 pack for around $21, and I think I used about 15 of them. I need to get some 1156 style bulbs to finish off the bathroom and floor fixtures.
 
  • Like
Reactions: Mike_H
I finally got my warm white 1156 type LED bulbs. They fit great and were a nice upgrade to the original fixtures.
PXL_20230422_031820698.MP.webp

We got a rare, dry day today. I decided to jack up the parts coach and get the wheels off. I checked the bogies for slop: absolutely zero! This'll save me some time and money.
PXL_20230422_213223631.MP.webp


This parts coach definitely had some work done to it before it got parked 30 years ago. I wonder if these Bilstein shocks still work?
PXL_20230422_213233030.webp

Brake pads were brand new too. Tires have 100% tread, though they're falling apart. It's a shame it got parked forever.
 
After camping in the Glenbrook, it was time to get back to the Palm Beach. I had pulled the CVs out of the donor motorhome, and figured I should get one torn down and see how they look. These are much, much better overall. One had an aged boot, the other looked pretty good. The old grease dribbled out like a gray, split pea soup. I think it was time for some fresh stuff.
PXL_20230505_055236685.jpg
PXL_20230505_055208875.jpg

Tomorrow I'll start the reassembly with the new Dorman boots. I haven't made up my mind whether I want to use the included grease or not. It's simply labeled as a mineral-based grease, and is made in England. Obviously it's intended for CVs, but would a full synthetic be better?
@Matt Colie , you ever use Valvoline Synpower for CVs?
PXL_20230505_055311900.MP.jpg
 
Paul,
To answer your question, Yes.
The long answer for those that care.
Many years back (I seem to have a surplus of these), I read that VW was have warranty issues with the drive axle joints. (They only had one per side and it was a simple plate and pivot joint.) The final cure was to coat the parts with a synthetic molybdenum sulfide (moly) grease. This lead me to repack CVs of several vehicles with either Valvoline Synpower (VV985) or equivalent. Yes, this grease is nasty and expensive, but it is cheaper than parts. I have some very specific successes with this grease, but these are not related to GMC. If you want some of the green grease that comes with CV boots, I probably still have some on my junk shelf.
Matt_C
 
  • Like
Reactions: pvfjr
Paul,
To answer your question, Yes.
The long answer for those that care.
Many years back (I seem to have a surplus of these), I read that VW was have warranty issues with the drive axle joints. (They only had one per side and it was a simple plate and pivot joint.) The final cure was to coat the parts with a synthetic molybdenum sulfide (moly) grease. This lead me to repack CVs of several vehicles with either Valvoline Synpower (VV985) or equivalent. Yes, this grease is nasty and expensive, but it is cheaper than parts. I have some very specific successes with this grease, but these are not related to GMC. If you want some of the green grease that comes with CV boots, I probably still have some on my junk shelf.
Matt_C
Thanks for the reply, Matt. The new Dorman boots did come with that grease, but it only says it's mineral based, and without any other specs given, I suspect it's on the cheaper side of things. I've got a couple tubs the Synpower on hand already (it's not too terribly pricey from Zoro.com). I think I'll give it a go. I like the idea of just using the same grease everywhere on the coach if appropriate, and I've already selected Synpower for the wheel bearings, so I'll probably use it on the chassis parts as well.
 
All cleaned up, reassembled, greased, banded, and installed. I think tomorrow I just might start putting the knuckles/bearings/hubs back together.

PXL_20230506_034808874.webp
 
The wife got a wild hair and came out to help. While I worked on drilling the knuckles for grease zerks, she actually replaced shocks with some new KYBs I had laying around. Then she started dismantling the rear suspension for the big bogey swap. Removed the loaded back plates from the bogey arms, removed the shock bolts as much as she could, but the studs started spinning. We'll save that problem for another day. I'm going to have to reclaim some jack stands I have on loan so I can get this thing up high enough to work under it better.

PXL_20230507_013628840.jpg
PXL_20230507_014125239.jpg


I don't have the drilling jig, so I had to eyeball drilling the grease hole. I almost hit the mark, but had to grind out a little depression to make sure the grease passages would line up okay. Then I ground a small circumferential groove in the outside of the spacer. I found old instructions that showed plunging a disc all the way through the spacer from outside the inside but I didn't want to do that. That just seemed like it would leave a decent spongy region where the spacer wouldn't hold axial loads very well.

PXL_20230507_003025844.jpg
PXL_20230507_014440332.jpg
PXL_20230507_003042409.MP.jpgPXL_20230507_003051709.jpg

I made a cut in the old races to make them springy. This way, I could remove and insert them easily to check the fit of things, take measurements and whatnot.
PXL_20230507_003123554.jpgPXL_20230507_003007695.jpg
 
Last edited:
  • Like
Reactions: Mike_H
The PO had installed LED bulbs that were awfully blue. They were "omnidirectional" and didn't shed heat well either. Their plastic bases were getting quite crusty as well. I got some panel style replacements. Supposedly 3300K I think.
View attachment 8310

The old ones were so blue, they throw off my camera's white balance, making the new ones appear more yellow than they really are. I can't say what the true CRI is or was, but I can see colors a lot better now.
View attachment 8309

I got a 20 pack for around $21, and I think I used about 15 of them. I need to get some 1156 style bulbs to finish off the bathroom and floor fixtures.


I agree, getting the lower temperature LEDs is the way to go. It's a much warmer light vs the bright white higher K lights
 
The PO mounted a nice TV bracket, but the TV was too close to the wall and was unable to click into place in the secured travel position. I needed to make an offset bracket to get it remounted on the bracket.

PXL_20230513_025434788.MP.webp

PXL_20230513_031327718.webp

PXL_20230513_031529506.webp
 
Well I finally got back at it. The front wheel bearings have been reassembled on BOTH sides now. I had to make a inner grease seal installer with a friend that had lathe access.
PXL_20230509_192240729.webpPXL_20230510_070722390.webp

It's nice to know the CV seal depth is correct now. I'd better get my own lathe sometime soon...

Everything is torqued, greased, new EBC brake pads, etc.
PXL_20230510_070659166.webp

I even swapped the Alcoas and wheel spacers from the old Glenbrook, so the new Palm Beach is now sitting on 33% of her wheels! It's the first time it's sat on any amount of rubber since it first pulled into the shop 2.5 months ago. Ugh, it shouldn't have taken so long.
PXL_20230523_074216207.MP.webp
 
Last edited:
  • Like
Reactions: kbeefy
I'm not sure if I mentioned it before, but one of the things that made this coach hard to start/drive was the shifter setup. Something was very wrong when I picked it up. It wouldn't go into park, the shifter had a terrible feel (loose and ambiguous). If you started it in "park" it was actually in reverse, so it was pretty difficult to get the thing started and warmed up on a snowy day. If you put the trans in neutral, the NSS thought you were in drive, so that was a no-go.

I discovered the cable mounting bracket at the base of the column was tweaked, and lacking the locking clip. The cable sheath was just sorta jammed in there, but had some play. Straightening the bracket required squeezing the two sides back together as well since it was stretched out. I used my hydraulic wire crimper for this, until the cable sheath fit snugly in its hole again. Then I disconnected the adjustable linkage rod from the trans. I put the shifter against the neutral stop, and put the trans in neutral. Holding the rod up near the shift lever, the darn hole was nearly 1/2" away from the pin! Sure enough, things were adjusted off by an entire "gear". I think maybe they were trying to adjust the linkage to compensate for all the shift cable slop, but it would change any time the cable moved around. Yikes. Anyway, it's adjusted according to the manual now, and feels much better. I just need to install an entire rear suspension and I can test it out.
 
  • Love
Reactions: tmsnyder
I needed to start pulling bogies from the parts coach, and wanted to use the tractor to make things easy. I had to move the painted desert to get straight-on access. I added air fittings to the bags and got them aired up so I could scoot her back about 20 feet.

PXL_20230528_035656355.NIGHT.webp


Crawling around in the dirt and sticks is always fun. Thankfully the tractor made the heavy lifting nice and easy. None of the bolts were rusty or challenging to get out. The drums, however, won't rotate by hand. Hopefully that doesn't turn into a nightmare. One down, three to go!

PXL_20230528_035512996.webp
 
I just recalled that exhaust was pouring out of the wheel well when I drove it in March, so I got under there to inspect. That'll explain it. Wow, that is one long, straight, uninterrupted pipe! It must be the original. How do folks go about swapping it out?

PXL_20230528_051644164.webp

Right now it looks like a solid piece from mufflers to tail pipe. I think I'll have to make separate pieces for the front elbow and tail pipe. That's the only way I can see to slide a long straight piece all the way through those cross members and get it connected up.
 

Attachments

  • PXL_20230528_051809009.webp
    PXL_20230528_051809009.webp
    632.6 KB · Views: 9
I just recalled that exhaust was pouring out of the wheel well when I drove it in March, so I got under there to inspect. That'll explain it. Wow, that is one long, straight, uninterrupted pipe! It must be the original. How do folks go about swapping it out?

View attachment 8583

Right now it looks like a solid piece from mufflers to tail pipe. I think I'll have to make separate pieces for the front elbow and tail pipe. That's the only way I can see to slide a long straight piece all the way through those cross members and get it connected up.

If you cut it apart, and loosen the exhaust bearings, the straight piece will slide back and out.

I sliced my silicone exhaust bearings so they didn't fight with me the whole way, they are held in place by brackets anyway.

They make butt joint pipe clamps that wrap around and squeeze both pipes, SS, on amazon for fitting it back together, just an idea.
It kinda looked like all one piece, which I don't know how they got in there, so cutting it was the plan. I'm thinking maybe I'll just cut the elbow off and use one of those SS butt clamps to put in a replacement straight section. I saw the bracket on one of the cross members, but there was no rubber present. I'm now wondering if my pipe is over-sized, as it looked like a pretty tight fit going through the cross members. Hmm, I supposed I've got to take a better look and do some measuring.

I think I'll tape off the leaks I've already discovered, then do a smoke test on the whole system. I don't want to fix this multiple times this year, so I want to find all the leaks the first time.
 
I think if you remove the rear bumper you can put a full length pipe in.

Gosh I don't remember removing the bumper honestly.... seems like the straight length slid in without hitting the bumper? Easy enough to find out I guess, try it and find out if it will slide straight out the rear without removing the bumper first.
 
  • Like
Reactions: kbeefy
It kinda looks like it should slide straight out.

PXL_20230530_042934682.webp

The elbow is welded to the straight section with nowhere to unbolt. I think the Y pipe and mufflers look ok.
PXL_20230530_042959556.webp


I took a second look and there actually is still rubber one the exhaust bearing. How much should I expect that to fight me on the way out?
PXL_20230530_043110827.webp

PXL_20230530_043253913.webp PXL_20230530_042947256.webp
There's an interesting "hanger" around the y pipe. Each muffler has a hanger though, so I won't worry about it for now.
 
Yikes, someone tried to make a repair here, and had a pretty rough time with it! Yeesh. That's going to need redone someday.

PXL_20230530_043034503.webp

I got the second bogie set removed from the parts coach. That was a real pain with the exhaust in the way. Luckily I've got a good reason to get the exhaust out of my way on the Palm Beach.
PXL_20230530_015615011.MP.webp

I got a better look at the floor and insulation. It does have the sheet metal with foam above it. It seems to have bulged and buckled though. Is this normal? Could it just be from the original foam expansion, or is this something that's probably slowly worsening?

PXL_20230530_043058571.webp