Sailor Man's Coach: Then & Now

  • Please note, the forum recently had a problem with outbound emails for notifications, registrations, etc. A new email provider has been set up which should resolve all email issues. If you have any further trouble, please DM Christo or reach out via the Contact Us link in the website footer.
IMG_1210.webp
When I bought the coach there was a small fire extinguisher in a tube mounted in front of the wheel on the driver's side. I don't know how that was supposed to work and I don't think that it would be much use to control and engine compartment fire.
IMG_3348.webp
IMG_3350.webp
I purchased this automatic fire suppression unit which will go into action when the temperature hits 286°. There is a fuseable link stay head that I can position in the most advantageous location.

I fabricated a very robust extinguisher holder to protect it.

IMG_3298.webp
I will probably install it when I complete the new air ram unit.
 

Attachments

  • IMG_3299.webp
    IMG_3299.webp
    319.5 KB · Views: 0
View attachment 17243
When I bought the coach there was a small fire extinguisher in a tube mounted in front of the wheel on the driver's side. I don't know how that was supposed to work and I don't think that it would be much use to control and engine compartment fire.
View attachment 17244
View attachment 17245
I purchased this automatic fire suppression unit which will go into action when the temperature hits 286°. There is a fuseable link stay head that I can position in the most advantageous location.

I fabricated a very robust extinguisher holder to protect it.

View attachment 17247
I will probably install it when I complete the new air ram unit.
Jacob Payer is back in Florida and may be here for many months and I will use him for as long as he stays in Florida. We should be completing many of the projects that are in a holding pattern.
He has had a tough time with his coach and the rebuilt transmission that was rebuilt by Barry Owens in NC and installed by Jeff Sirum. Jacob drove the coach back to Barry who rebuilt the tranny again. Now it is great.
Barry is 74 years old and is working alone. Jacob stayed there for a number of weeks and helped Barry out. (by the way, Barry offered me only $250 of my old running 455 -- just to save it form the dump).
Jacob is becoming a great resource. He has worked with Barry, worked on his coach at Sirum and been in extensive contact with Jim Bounds.
 
IMG_0948.webp
When I bought the coach, storage was need for hoses to pump out the black ink.
Replacing the standard toilet with a composting toilet, eliminated the pump out problem, so
IMG_2492.webp
Goodby hose storage.
IMG_3131.webp
I finally cut the water tank in half, so I can now start fabricating the enclosure for the two YMGI mini-splits.
1770114540025.webp
It is almost impossible to get paint to stick to this material. I am thinking that it might be OK to eliminate the paint and just use the natural color if I clean it up and buff it. This material is totally resistant to almost anything, that is why it is used for water tanks. Maybe I could just buff it up to a shine. I think that the color would not be too bad against the coach's cameo white.
 
Last edited:
  • Like
Reactions: pvfjr and Kendra
IMG_2778.webp
I couldn't stand the way that the nasty dual exhausts looked like coming out on the passenger side under the forward lpg compartment.
IMG_0146.webp
So I started experimenting with various shaped polished stainless steel exhaust tips. I didn't know that there were so many varieties and they do not extend further out than the folded up Ragusa step.
 
  • Like
Reactions: Kendra
View attachment 17688
When I bought the coach, storage was need for hoses to pump out the black ink.
Replacing the standard toilet with a composting toilet, eliminated the pump out problem, so
View attachment 17689
Goodby hose storage.
View attachment 17690
I finally cut the water tank in half, so I can now start fabricating the enclosure for the two YMGI mini-splits.
View attachment 17691
It is almost impossible to get paint to stick to this material. I am thinking that it might be OK to eliminate the paint and just use the natural color if I clean it up and buff it. This material is totally resistant to almost anything, that is why it is used for water tanks. Maybe I could just buff it up to a shine. I think that the color would not be too bad against the coach's cameo white.
I have some questions.

The diagram shows something that looks to be a cover/screen for the vertical sides - nothing on top of the units, right? The units don't look bad at all as is, and they're designed to live outdoors, so why cover them?

Polyethylene water tanks are not typically living an outdoor life and UV degrades polyethylene unless it's a stabilized PE. Have you contacted the tank manufacturer to find out what PE formulation they used?

What is the purpose of the Ragusa bumper steps on the sides of the cover?

I very much enjoy your posts and seeing you make your GMC your own!
 
The units don't look bad at all as is, and they're designed to live outdoors, so why cover them?
I'd guess it's to keep the heat exchangers cleaner. Though they're made to live outdoors, they're not designed to deal with road spray. The fins are often finer and closer together than most automotive heat exchangers, so they'd probably start fouling rather quickly and lose efficiency. I think a travel cover is a good idea for keeping them clean.
 
I have some questions.

The diagram shows something that looks to be a cover/screen for the vertical sides - nothing on top of the units, right? The units don't look bad at all as is, and they're designed to live outdoors, so why cover them?

Polyethylene water tanks are not typically living an outdoor life and UV degrades polyethylene unless it's a stabilized PE. Have you contacted the tank manufacturer to find out what PE formulation they used?

What is the purpose of the Ragusa bumper steps on the sides of the cover?

I very much enjoy your posts and seeing you make your GMC your own!
GMC 26 Rear Elev w: Thule 031324.webp

I liked the way that the enclosure seemed to extend the coach's belt line. I also wanted to keep the wind resistance to a minimum but I had the units painted to match the coach as an interim step.

I also think that the enclosure would provide some protection from road hazards. There now is wiring and quite small refrigerant lines unprotected.

IMG_2500.webp

Most mini-split manufacturers recommend against dynamic environments and I am hoping the the Motorhome's air suspension would sufficiently dampen the road shocks that could cause damage to the more delicate components.

I actually considered installing motion damping mounts between the mini splits and the custom mounting frame fastened directly to the chassis.

The roof mounted air conditioning units already have protective enclosures.

The sketch was done after I removed the ladder to the roof and I decided that I should devise a way to climb up on to the roof and cut the original ladder short. Therefore I located the Ragusa steps on the passenger side of the enclosure, so I could climb to the top of the enclosure.

I then planned to add Treadmaster antislip material to the top of the enclosure, so I could stand on it.

(I still have Treadmaster to add to the top of the bumper covers to clean the windshield & rear window).

I also realized that the current configuration meant that at least one of the taillights would be blocked from the rear from some vehicles trailing the coach on the road. Therefore, I added two tail lights to the enclosure and the led strip light above the rear window.

Even if the Thule box, with its lights were not mounted, you still would not see one of the tail lights.
IMG_2500.webp

The strip light will brighten as a brake light and 1/2 will flash as turn signals. They are connected to the tail light tow hardness via a Y split harness.

The tank is a 300 gallon Ace Roto-Mold Low-Profile Tank from Den Hartog Industries in Hospers, Ia. They say,

"Constructed from FDA-approved, BPA-free polyethylene, the 300RT tank ensures safe handling of consumable and sensitive liquids. Its rectangular footprint makes it ideal for space-limited environments where vertical tanks may not be feasible. The tank's UV-stabilized resin provides long-term resistance to sun exposure, making it perfect for permanent or semi-permanent outdoor use."
 
Last edited:
  • Like
Reactions: Richard RV
GMC 26 Rear Elev w: Thule 031324.webp

I liked the way that the enclosure seemed to extend the coach's belt line. I also wanted to keep the wind resistance to a minimum but I had the units painted to match the coach as an interim step.

I also think that the enclosure would provide some protection from road hazards. There now is wiring and quite small refrigerant lines unprotected.

View attachment 17721

Most mini-split manufacturers recommend against dynamic environments and I am hoping the the Motorhome's air suspension would sufficiently dampen the road shocks that could cause damage to the more delicate components.

I actually considered installing motion damping mounts between the mini splits and the custom mounting frame fastened directly to the chassis.

The roof mounted air conditioning units already have protective enclosures.

The sketch was done after I removed the ladder to the roof and I decided that I should devise a way to climb up on to the roof and cut the original ladder short. Therefore I located the Ragusa steps on the passenger side of the enclosure, so I could climb to the top of the enclosure.

I then planned to add Treadmaster antislip material to the top of the enclosure, so I could stand on it.

(I still have Treadmaster to add to the top of the bumper covers to clean the windshield & rear window).

I also realized that the current configuration meant that at least one of the taillights would be blocked from the rear from some vehicles trailing the coach on the road. Therefore, I added two tail lights to the enclosure and the led strip light above the rear window.

The strip light will brighten as a brake light and 1/2 will flash as turn signals. They are connected to the tail light tow hardness via a Y split harness.

The tank is a 300 gallon Ace Roto-Mold Low-Profile Tank from Den Hartog Industries in Hospers, Ia. They say,

"Constructed from FDA-approved, BPA-free polyethylene, the 300RT tank ensures safe handling of consumable and sensitive liquids. Its rectangular footprint makes it ideal for space-limited environments where vertical tanks may not be feasible. The tank's UV-stabilized resin provides long-term resistance to sun exposure, making it perfect for permanent or semi-permanent outdoor use."
Okay, sounds good. Thanks.

Dampening mounts for the units would probably extend their life considerably.
 
Okay, sounds good. Thanks.

Dampening mounts for the units would probably extend their life considerably.
IMG_2500.webp
I initially rejected installing the dampening mounts because the refrigerant lines would probably crack if the mini-splits could move independently from the body and/or chassis. This connection is hard piped.

However, the body itself can move independently from the chassis. In fact, when we lifted the coach to install the 70 gal aluminum gasoline tank, we may have unintentionally torqued the refrigerant lines and I think that one is now cracked and the refrigerant has leaked out.

The refrigerant copper tubes are very small, similar to the refrigerant lines for the Indel refrigerator/freezer. Some of of the Indel products allow you to separate the compressor from the refrigerated box and I have done that twice. Despite me being very careful I wound up kinking the smallest copper refrigeration pipe. Think it was about 1/8" dia. In both situations, the kinked line had to be replaced.

I am now thinking that this may be a weak spot that should be eliminated. Just jacking up the coach to change or rotate a tire might cause a failure.

1770723661676.webp
These are small hoses, about 7" long, to recharge air conditioning system. I think that I should use them to eliminate the kinking of the refrigerant lines due to the differential movement between the coach's body and chassis.

I could eliminate the valves as there are already valves there.
 
View attachment 17727
I initially rejected installing the dampening mounts because the refrigerant lines would probably crack if the mini-splits could move independently from the body and/or chassis. This connection is hard piped.

However, the body itself can move independently from the chassis. In fact, when we lifted the coach to install the 70 gal aluminum gasoline tank, we may have unintentionally torqued the refrigerant lines and I think that one is now cracked and the refrigerant has leaked out.

The refrigerant copper tubes are very small, similar to the refrigerant lines for the Indel refrigerator/freezer. Some of of the Indel products allow you to separate the compressor from the refrigerated box and I have done that twice. Despite me being very careful I wound up kinking the smallest copper refrigeration pipe. Think it was about 1/8" dia. In both situations, the kinked line had to be replaced.

I am now thinking that this may be a weak spot that should be eliminated. Just jacking up the coach to change or rotate a tire might cause a failure.

View attachment 17728
These are small hoses, about 7" long, to recharge air conditioning system. I think that I should use them to eliminate the kinking of the refrigerant lines due to the differential movement between the coach's body and chassis.

I could eliminate the valves as there are already valves there.
I wonder if you could use Nicopp lines, and maybe put a couple of coils in them like it's done at the Master Cylinder.

1770757994933.webp
 
Okay, sounds good. Thanks.

Dampening mounts for the units would probably extend their life considerably.
I should have thought about the damping mounts earlier.
1771152428374.webp
It appears that it is now standard practice to do this. There are so many of them on Amazon and are specifically for mini-splits.
One of the complains that are addressed is the reduction of the sound of the units that were bugging people. Hadn't thought about that.
One of the reasons I installed the mini-splits was the incredibly loud noise from the roof units.

These four only cost $15.99 on Amazon. Damm!
 
Last edited:
I wonder if you could use Nicopp lines, and maybe put a couple of coils in them like it's done at the Master Cylinder.

View attachment 17736
I don't like coils for fear of creating a trap in the refrigerant lines. However, I have seen photos of installations with refrigerant lines coiled behind the units to deal with the excess length of copper. I don't like this practice. They should have just shortened the lines but most folks are just lazy.
 
I don't like coils for fear of creating a trap in the refrigerant lines. However, I have seen photos of installations with refrigerant lines coiled behind the units to deal with the excess length of copper. I don't like this practice. They should have just shortened the lines but most folks are just lazy.
This is an early photo of what the coach looked like before we got really started.
IMG_1103.webp
By this time, I was trying to figure out how I could use SeaSuckers to mount a iPad for GPS Routing and directions.
IMG_1118.webp
I am now focusing on having only one functional eye (the left) and how to drive a GMC Motorhome when I could only see through the left half of the hugh windshield. If I turn my head to the right to see ahead and the passenger side mirror, I could not see anything directly ahead of me.
So, i am installating a lot of cameras and monitors.
IMG_1190.webp
I bought these seats on eBay for $1,500/ea because they had 3 point built in safety belts and were 6 way electric. They move front to back, down and up, rotate 360°, recline back, tilt seat and an adjustable foot rest.
IMG_1196.webp
It was really tricky on how to install them and locate so that they will easily rotate.
IMG_1193.webp
The driver's seat is narrower.
I also bought two matching dining table seats but they were too large to get in the coach.IMG_2992.webp
This is the set up when we are on the road and....
It transforms into a cosy home when we stop.
IMG_0211.webp
So here we are now!
We are having some trouble wither there foot rest of the driver's seat.
They are super comfy.
I guess we could easily sleep in the very reclined seats.
Te sofa on the right sizzors into a double bed.
The table of the left retracts and the gap between the seats bridged with a filler and cushion to form another double bed.
The pair of Black & Decker coffee will be mounted under the wall cabinet next to the window. Claude drinks caffeinated and I drink decaf.
There are more Black and Decker components that will run back to the cooktop featuring lighting, can opener/knife sharpener, toaster oven and range hood.
The old skylight will become a nice square ceiling light. Further back, where the old roof mount air conditioning unit used to be,a drop down 12vdc Jensen TV will be mounted. IMG_3142.webp
With the bar, ice and cold drinks behind the tv, I think that will be a great gathering place for GMCers.
 
  • Like
Reactions: dsmithy
IMG_2653.webp
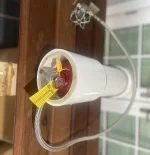
This was the functional electrical fuel pump that I inherited and there was no fuel filter in sight. Can you imagine depending on that wire nut (able to catch water) to keep gasoline flowing to the 455?
IMG_2754.webp

This was my initial solution to at least provide clean fuel to the COOP 455.

When I showed it to Jim Bounds, he said "Hose clamp salesman must love you!"

I always use double clamps to protect against hose clamp failure and leakage.

All fasteners, clamps and plumbing fittings are stainless steel. Minimum corrosion.

However, it did not address what to do if the filter fouled or the electric fuel pump failed, If I had to replace the filter, there would be gasoline on the ground and on me.

I needed to protect against the failure of either element and eliminate being stuck on the side of the road. I have heard so many horror stories about this. Jim Bounds told me about one of his deliveries or picks ups when he had to change the fuel filter every 150 miles.

IMG_2956.webp
This is my solution to avoid being stuck because it has a pair of redundant fuel delivery systems.

Initially, ethanol fuel will pass through one of these filters with before and after shut off valves. If that filter becomes fouled, it does not need to be immediately replaced. Just shut off the valves inline line before and aft of the fouled filter.

Open up the valves in front and aft of the 2nd pristine filter and I am back in business.
IMG_2957.webp
But what happens if the fuel pump fails!

IMG_2958.webp
Well there are a pair of pumps to suck gasoline through the active filter from the tank, but which one is doing it?
IMG_2961.webp
This is the fuel supply center to the left of the steering wheel. The waterproof black toggle switch has 3 positions. In the center position, neither pump gets electricity. The green led indicator light shows one of them is getting electricity and is functional. If that pump fails, I throw the switch all the way and the red light comes on and the back up pump take over.

If neither light is on, no fuel flows. This is my antitheft position.

Each pump has its own fuse and there is a stand by fuse to the left.

With a 75 gallon aluminum gasoline tank, it is better to have an expanded fuel tank gauge.

IMG_1678.webp
The nasty pair of 25 gallon original gasoline tanks that have contained 10% ethanol gasoline for decades are infant of the "black tank". I had them removed ad]nd replace by a new pristine 75 gallon aluminum tank that will never see ethanol.
IMG_2763.webp
Here it is ready to be installed.
IMG_2855.webp
and now it is going in.

We all know that most of use are getting 8 to 9 miles per gallon on ethanol gasoline. With non ethanol gasoline we will get 3.5% better mileage.

We can count on 45 gallons from the original tanks and at 8 to 9 miles per gallon, we have a range of 360 to 405 miles.

Since we can use all 75 gallons from the new aluminum tank and benefit from 3.5% higher efficiency of non ethanol gasoline, we can expect an increased range of 621 to 699 miles.

This does not factor in the higher efficiency of a COOP 455 vs the standard 455 or the elimination of multiple parasitic loads on the new COOP 455.

Before and after: Better efficiency, reliability, serviceability and range. Forgot to add theft protection without alarms.
 
Last edited:
  • Like
Reactions: tmsnyder
This is what the galley looked like when I bought the coach.

View attachment 17000
The dropped in lpg range with gas oven and burners was not there and there was a hole in the cabinet where the the oven once was.
View attachment 17001
View attachment 17002

View attachment 16999
This is the current situation with the new stainless steel Bosch 4 burner cooktop but the countertop will require substantial renovation. The counter never continued in front of the cooktop.
View attachment 17003

This range has powerful burners so there is a fire issue made worse with the close proximity of the dark brown Formica cabinet to the left. I plan to laminate a brushed stainless steel sheet over the laminate. At least the most powerful burner is on the right and side.

I also plan to laminate cypress veneer over all of the rest exposed dark brown Formica.

In the place of the range is a new 3 in 1 Breville microwave. It is a stainless steel microwave, air fryer and convection oven.

The previous owner added solid cypress doors and drawer fronts but he neglected to install cypress veneer over the exposed dry brown laminate. I will have to do that.

I planned to laminate 1/4" thick Cameo White Dupont Corian over the old formica countertop and replace the large stainless steel sink. I finally chose to go in another direction.
View attachment 17004
This is an integrated, molded in glass sink in a 1" thick tempered glass countertop. I am already purchasing 3 of these tops for new vanities for our house. We have had similar installations in our New Jersey condo and loved them. They were so easy to keep clean with zero joints.
Anyway, here is the plan for my coach's galley.
View attachment 17005


I also plan to fashion a laminated maple or oak cutting board to set in the sink and set a Nutone blender in the counter.

This is what I am planning to install.
This is where the kitchen was when we bought it.
IMG_0920.webp
IMG_0927.webp
IMG_0929.webp
IMG_1596.webp
The transformation has begun with the new 3 in 1 microwave & cooktop.
IMG_1445.webp
IMG_0321.webp
IMG_0322.webp

IMG_0309.webp
This is the first scheme of the installation of the Black & Decker SpaceMaker system. However, the two coffee maker installation over the dining table was just too intrusive. After consultation with Claude, we agreed that a single coffee maker with separate decaf and caffeine carafes is more appropriate.

Removal of the plugmold behind the under cabinet appliances will allow them to be pushed further back.

I have also decided to laminate 1/4" thick Cameo White sheets to the countertop with a matching Corian sink molded in.

Getting there.
 

Attachments

  • IMG_1254.webp
    IMG_1254.webp
    1.1 MB · Views: 1
This is where the kitchen was when we bought it.
View attachment 18063
View attachment 18064
View attachment 18065
View attachment 18066
The transformation has begun with the new 3 in 1 microwave & cooktop.
View attachment 18067
View attachment 18069
View attachment 18070

View attachment 18062
This is the first scheme of the installation of the Black & Decker SpaceMaker system. However, the two coffee maker installation over the dining table was just too intrusive. After consultation with Claude, we agreed that a single coffee maker with separate decaf and caffeine carafes is more appropriate.

Removal of the plugmold behind the under cabinet appliances will allow them to be pushed further back.

I have also decided to laminate 1/4" thick Cameo White sheets to the countertop with a matching Corian sink molded in.

Getting there.
AS I keep think about hoot make the kitchen area the most useful, I have come up with the latest version.
1774192930159.webp
This version is using a very large Dupont Corian Farmers Sink in Cameo White fused in with the Corian countertop.
In order to maximize the counter surface, I plan to sever the bottom of the caress seat back next to the sink so It can swing up and extend the countertop surface, even reaching the surface of the dining table.


1774193186900.webp
If I can make this all work, the kitchen area will be much larger during food preparation and cooking times.

The hugh farmer sink will have a matching cameo white cover that is hinged in the middle to allow sink access while also expanded the counter top surface.

Maybe Claude & I could cook together to prepare a feast to be served in the coach or outside.
 
  • Like
Reactions: Kendra
I installed a large single-bowl sink sideways and love it.
Fit without modifying the GM stock cabinet below.

Delta Lorelai 23-inch Kitchen Sink, model# 95B9132-23S-SS.
Outer dimensions: 23”L 19”W 9-1/2”D
Bowl dimensions: 21”L 16"W 9”D
 
Last edited:
IMG_1406.webp
The dark brown vertical panel under the black plastic milk box was used to span the distance between the the two dining table benches.

We had to remove the electrically powered operable skylight because it was in the way of the future SUnPower semi flexible solar panels.
IMG_0311.webp
The new aluminum plate on the coach's roof seals the opening but I needed a way to cover the resulting hole in the overhead without having to do any work on the material.
IMG_0370.webp
My solution is to purchase these (3) flat LED light fixtures which will completely seal the hole and overlap all of the overhead that was previously affected.

Positioning them lengthwise, front to back, will compensate for the gentle curvature of the overhead.

Each fixture can be dimmed in (5) stages: 0 -20% - 40% - 60% - 80% - 100%.They also can be Kelvin color adjusted from warm to white to daylight.

I could also choose to activate 1 or 2 or all 3 fixtures, so there is a great deal flexibility.

I also purchased a 4th fixture, so a replacement is available in case of a failure.

Luckily, the is a 12vdc wire already in this location to power the original fan but its power draw was likely more than the maximum power use if all of these fixtures were lighted to full power at the same time.

I will provide an installed photo when they are operational.
 
  • Like
Reactions: pvfjr
View attachment 18093
The dark brown vertical panel under the black plastic milk box was used to span the distance between the the two dining table benches.

We had to remove the electrically powered operable skylight because it was in the way of the future SUnPower semi flexible solar panels.
View attachment 18094
The new aluminum plate on the coach's roof seals the opening but I needed a way to cover the resulting hole in the overhead without having to do any work on the material.
View attachment 18095
My solution is to purchase these (3) flat LED light fixtures which will completely seal the hole and overlap all of the overhead that was previously affected.

Positioning them lengthwise, front to back, will compensate for the gentle curvature of the overhead.

Each fixture can be dimmed in (5) stages: 0 -20% - 40% - 60% - 80% - 100%.They also can be Kelvin color adjusted from warm to white to daylight.

I could also choose to activate 1 or 2 or all 3 fixtures, so there is a great deal flexibility.

I also purchased a 4th fixture, so a replacement is available in case of a failure.

Luckily, the is a 12vdc wire already in this location to power the original fan but its power draw was likely more than the maximum power use if all of these fixtures were lighted to full power at the same time.

I will provide an installed photo when they are operational.
What an eloquent solution. I'd been keen to see the end results when all done.
 
IMG_0326.webp
This is the empty storage box under the dining table seat. Both seat have lap safe belts installed.
IMG_0336.webp
Under the sink, I have removed the old non functioning furnace. We got it out by cutting that large square hole to move the furnace into the box under the seat. I still have to take that bottom plate out.
IMG_0337.webp
In the back is the vent to the outside that provided combustion air to the furnace. I plan to alter its function to provide outside makeup air to the cooktop exhaust fan.

I might install a small match fan at the outside air intake that turns on when the cooktop exhaust fan does.

By running a small flat duct yo the existing register under the cooktop, air will flow up in front of the 3 in 1 microwave and exit via the cooktop exhaust hood.

If this works as designed, the cooktop exhaust hood will not be pulling out the cooled or heated air in the coach. It can also exhaust the heat generated by the 3 in 1 microwave and the toaster oven.

I am replacing the existing base and air vents with a continuous ilinear aluminum register to space up the kitchen.
IMG_0297.webp
Getting back to the empty storage box under the seat, I plan to install this slide out garbage/recycling tray to eliminate the nasty free garbage can.
1774347661270.webp
The garbage issue always bothered me. I even thought of a compactor buy no.
 
Last edited: