RollingWithWalter

AmosDriskill

New member
Nov 29, 2023
14
9
3
Hello all,
my name is Amos. My friend Connor and I bought a 1973 glacier around 2 months ago and have been renovating it for a cross country trip. We have been documenting our journey on social media and have gained some traction on Instagram.

Check it out!

Instagram


We are getting close to embarking on a journey in this coach but still have a few things that we could use some advice on.

1. What type of screws do I use to reinstall my ladder as previous owner removed it and then had holes covered with a new paint job

2. Our Quadrjet doesn’t like to leave high idle even after pushing pedal down multiple times. Also recently it’s started to make a sucking sound.

3. Overall the engine is solid and original. Previous owner replaced alternator. I’ve added an aftermarket coolant reservoir and also oil change but other than that haven’t done much as it’s run overall well. Is there anything that would be essential to do before a substantial trip. Engine has 55,000 on it.


We have no problem putting the time and elbow grease to keep this thing running correctly but are lacking experience as we are 22 and 23 and have no previous background with Motorhomes.

Instagram

Thanks for reading and any help is greatly appreciated!
 
Last edited:
Lookin good, guys! I'll bet that's VIN TZE166v102058. If so, please update the registry. If not, please update it anyway. ;-)

For the purpose of locating and keeping track of all Classic GMC Motorhomes.
Please fill out and submit the online form at www.gmcmhregistry.com/contact/form.html
(There are currently over 8,990 GMCs accounted for)

Find the VIN tag is on the firewall behind the passenger side hood.
Or on the inner glove box door tag.
Or on the title.

* Note about the Build Date of your GMC: From the decal on the inside of the glove box door - look for a number on the top line just left of center, similar to "032174". This example indicates the build date as March 21st, 1974. *

I'll reply with history I know about your GMC.

Thank you
Billy Massey
The GMC Motorhome Registry
www.gmcmhregistry.com
 
Check fluid levels at every fill-up, and tire / hub temperatures

If it's not coming off high idle, then it could be the choke mechanism isn't adjusted correctly or something is wrong with it. Is it electric choke or original? Post a picture of that part of the carb. It's on the passenger side of the carb.
 
Lookin good, guys! I'll bet that's VIN TZE166v102058. If so, please update the registry. If not, please update it anyway. ;-)

For the purpose of locating and keeping track of all Classic GMC Motorhomes.
Please fill out and submit the online form at www.gmcmhregistry.com/contact/form.html
(There are currently over 8,990 GMCs accounted for)

Find the VIN tag is on the firewall behind the passenger side hood.
Or on the inner glove box door tag.
Or on the title.

* Note about the Build Date of your GMC: From the decal on the inside of the glove box door - look for a number on the top line just left of center, similar to "032174". This example indicates the build date as March 21st, 1974. *

I'll reply with history I know about your GMC.

Thank you
Billy Massey
The GMC Motorhome Registry
www.gmcmhregistry.com
Screen Shot 2024-01-13 at 2.46.04 PM.webp
VIN says TZE063V

looks like manufacture date says 03/28/73

Hope this is all you need!
 
I will post a picture of carb choke soon. Thanks for replies, does Anyone have any suggestions for screw type for the rear ladder this is something I'm looking to get taken of ASAP
 
I will post a picture of carb choke soon. Thanks for replies, does Anyone have any suggestions for screw type for the rear ladder this is something I'm looking to get taken of ASAP
The original mounting instructions say to use #10 3/4" phillips panhead self-tapping screws.
(I would make sure they are stainless steel screws)
 
  • Like
Reactions: tmsnyder
If they are stripped out there is an easy way to fix that. Get some foam ear plugs, epoxy, and throw away rubber gloves. Roll up the ear plugs as tightly a possible and stick them dry in the screw holes. Trim or cut them in half as necessary to get them in the holes. Then remove the plugs and soak the by hand in the epoxy. Squeezing and releasing them as necessary to get the epoxy into the foam. Then insert the soaked plugs into the holes so the outsides are flush with the body. Leave them set up for 24 hours. You now can install the latter with your new stainless screws into the holes with earplugs and epoxy.
 
  • Like
Reactions: Luke and Wally
If they are stripped out there is an easy way to fix that. Get some foam ear plugs, epoxy, and throw away rubber gloves. Roll up the ear plugs as tightly a possible and stick them dry in the screw holes. Trim or cut them in half as necessary to get them in the holes. Then remove the plugs and soak the by hand in the epoxy. Squeezing and releasing them as necessary to get the epoxy into the foam. Then insert the soaked plugs into the holes so the outsides are flush with the body. Leave them set up for 24 hours. You now can install the latter with your new stainless screws into the holes with earplugs and epoxy.
The first time I heard of this was when the great Dale Ropp presented this method at one of our GMCMI conventions. Dale, a former Industrial Arts instructor, as the educator he was, presented this as one of the many methods when using fiberglass as a restorative when fixing body parts on our GMC motorhomes. One of the best presentations I have seen. IIRC Dale only used the "West System" fiberglass products.
 
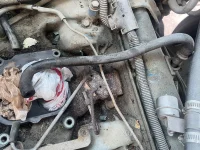
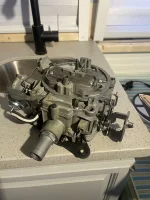
Thanks for the tips. Ladder is on successfully and I’m currently having the carburetor rebuilt. However when taking it out, two metal hoses snapped from rust and I’m wondering if anyone knows a good website to buy some! Also the rubber hosing pictured as well would like to get all of these replaced asap. E6165CA8-8FCC-47EE-AB84-9AC83D9BB701.webpDBEB29B9-E489-4EDE-BC7F-20D5F7D5BBCB.webp
 
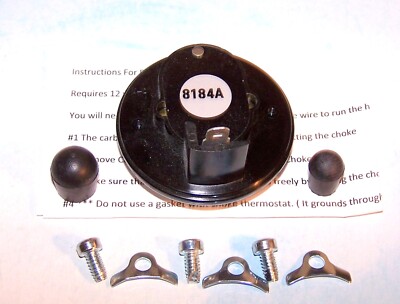
You can get rid of those metal tubing and install an electric choke.


As far as the rubber hoses goes take them to an auto parts store.
 
Electric choke or you could fabricate a 'farmer' choke, which is that same size steel or copper tubing down to an exhaust downpipe and wrapped around to heat the air in the tube after successfully starting the engine.

If you really want to stick with the OEM choke setup, I just pulled that setup off an engine that's out for rebuild. It sat under a bench for 40 years and is in great shape if you want it.
 
The first time I heard of this was when the great Dale Ropp presented this method at one of our GMCMI conventions. Dale, a former Industrial Arts instructor, as the educator he was, presented this as one of the many methods when using fiberglass as a restorative when fixing body parts on our GMC motorhomes. One of the best presentations I have seen. IIRC Dale only used the "West System" fiberglass products.
There are several very good reasons why Dale used West System stuff.
- They were good neighbors to him.
- They make great stuff and support the products.
- Epoxy is the best material to repair the SMC of out coaches.
Matt_C
 
If they are stripped out there is an easy way to fix that. Get some foam ear plugs, epoxy, and throw away rubber gloves. Roll up the ear plugs as tightly a possible and stick them dry in the screw holes. Trim or cut them in half as necessary to get them in the holes. Then remove the plugs and soak the by hand in the epoxy. Squeezing and releasing them as necessary to get the epoxy into the foam. Then insert the soaked plugs into the holes so the outsides are flush with the body. Leave them set up for 24 hours. You now can install the latter with your new stainless screws into the holes with earplugs and epoxy.
I remember Dale said the earplugs have soft wax that lets them stay compressed while you're putting them in your ears, then your buddy heat softens the wax and they expand.

Dale said to wash the earplugs in hot water to remove the wax and let them dry before doing the epoxy soaking part.
 
Richard,
This wax thing is a new one on me. I have used compressed foam for years including ear plugs. Mostly used them on fiberglass airplane.

Would it work i if I threw the plugs in some boiling water with some dish soap soap like Dawn? Upon removal from the soap and water, squeeze them again in fresh water ad a rinse to get the soap out, and then squeeze them in the air. 30 second in the microwave might also accelerate the drying time.

This is all just brain storming. .
 
Richard,
This wax thing is a new one on me. I have used compressed foam for years including ear plugs. Mostly used them on fiberglass airplane.

Would it work i if I threw the plugs in some boiling water with some dish soap soap like Dawn? Upon removal from the soap and water, squeeze them again in fresh water ad a rinse to get the soap out, and then squeeze them in the air. 30 second in the microwave might also accelerate the drying time.

This is all just brain storming. .
Hey Ken. Yeah it was news to me too when Dale said it. I didn't think soap was necessary and I just used hot water, not boiling, washed a couple and the foam expansion latency went to zero.

The way that the epoxy soaked foam plug mushrooms out on the back inaccessible side is wonderful. Lots more material depth to hold the screw.

R
 
  • Like
Reactions: pvfjr
Electric choke or you could fabricate a 'farmer' choke, which is that same size steel or copper tubing down to an exhaust downpipe and wrapped around to heat the air in the tube after successfully starting the engine.

If you really want to stick with the OEM choke setup, I just pulled that setup off an engine that's out for rebuild. It sat under a bench for 40 years and is in great shape if you want it.
B5B0AE18-62E1-4DCE-84C1-00C1FEA62F23.webp8B0EB862-D30A-4DD4-B643-4B68524A5D47.webp

That would be great if you could send the original set up! Was lucky enough to find a rebuilder by the name of Sparky in my local Milwaukee, WI area that did an amazing job rebuilding and would like to use the original set up as it should work well now. I can pay however much and pay express shipping to get it out as soon as possible!
 
Hey Ken. Yeah it was news to me too when Dale said it. I didn't think soap was necessary and I just used hot water, not boiling, washed a couple and the foam expansion latency went to zero.

The way that the epoxy soaked foam plug mushrooms out on the back inaccessible side is wonderful. Lots more material depth to hold the screw.

R
Thanks. I will keep that in mind if / when I do another one.


Ken
 
Lookin good, guys! I'll bet that's VIN TZE166v102058. If so, please update the registry. If not, please update it anyway. ;-)

For the purpose of locating and keeping track of all Classic GMC Motorhomes.
Please fill out and submit the online form at www.gmcmhregistry.com/contact/form.html
(There are currently over 8,990 GMCs accounted for)

Find the VIN tag is on the firewall behind the passenger side hood.
Or on the inner glove box door tag.
Or on the title.

* Note about the Build Date of your GMC: From the decal on the inside of the glove box door - look for a number on the top line just left of center, similar to "032174". This example indicates the build date as March 21st, 1974. *

I'll reply with history I know about your GMC.

Thank you
Billy Massey
The GMC Motorhome Registry
www.gmcmhregistry.com