Entry Door - Best option for easy closing.

billvv

Well-known member
Oct 5, 2015
1,141
253
83
82
My '76 Royale has a door that is somewhat hard to convince to reach the second latch.. A few years ago I found it didn't reach the second latch at all because the bottom of the door hit first, so I recurved it (2x4 in opening and PUSH). I also elongated the latch bolt holes on the door to help the second latch engage. The coach suffers from Middle Age Spread (1/2" or so at the latch, based on the cabinetry).

At the Cascaders' Rolling Rally this September I jealously watched a few folks give their doors a slight push and close with no drama, so i thought I'd look at again and consider moving the strike plate outward (and moving the latch back to its origional position on the door). Applied sells a replacement strike that, I believe, moves the strike pin 1/8" outward.

But here's the question.... if middle age spread moves the strike plate/pin outward, why did I have to move the latch inward (or pin outward) to reach the second position? Is there something else going on with the hinge, or door, or other sidewall movement that would cause that? It's possible that a PO recurved the door at some point, since the cabinet/coach gap has been there since we purchased the coach, but that should have put more curve into the door
 
What you need is a solid striker pin. The factory striker pin is a thin steel shell over a rubber bushing. By now the rubber bushings have collapsed and the latch won’t close around the pin.

Bill Bramlett was making them using a solid steel pin welded to the mounting plate. The owners of those enjoy one finger closure.

Applied is listing them (search on “striker”) for a higher price than Bill used to charge, but this is one of those things you’ll thank yourself for buying even if the price seems a reach. I’ve certainly paid more for less in my GMC journey.

Rick “never a moment’s regret” Denney
 
  • Like
Reactions: Carl Stouffer
What you need is a solid striker pin. The factory striker pin is a thin steel shell over a rubber bushing. By now the rubber bushings have collapsed and the latch won’t close around the pin.

Bill Bramlett was making them using a solid steel pin welded to the mounting plate. The owners of those enjoy one finger closure.

Applied is listing them (search on “striker”) for a higher price than Bill used to charge, but this is one of those things you’ll thank yourself for buying even if the price seems a reach. I’ve certainly paid more for less in my GMC journey.

Rick “never a moment’s regret” Denney
I do have the OEM striker pin with steel shell and no rubber, but the latch does close around the pin. And I saw the Applied striker. I guess without the rubber, the latch/door has to move further inboard to engage it. Or the pin needs to be larger. I thought I read that the pin was moved 1/8" outboard in Bramlett's version. Is that true of the Applied pin as well?
 
I’m sure the Applied version is identical to Bill’s—they credit his design.

Rick “they just work” Denney
 
I just went through this and have a pretty good understanding of whats going on.
There are 2 big issues. I am sure this was a problem from the factory.
The magical solid pin is a non issue. I would bet Bill made them solid because the OEM design was too hard to reproduce.

Issue 1. The striker pin is too far inward, it needs to be moved outward, about 1/8 inch OR SO, test and adjust for your coach

Issue 2. The striker plate sticks out too far, It hits the door and prevents it from closing. Some people have cut the gasket away to help with this, but thats not necessary once the plate is right.
It needs to be cut down so it's flush with the door jamb. on my coach it's cut into the countersink for the bolts. I had to remove a good 1/4"

Here my photo album

Here's the modified plate
Latch11.jpg
 
  • Like
Reactions: Kendra
I just went through this and have a pretty good understanding of whats going on.
There are 2 big issues. I am sure this was a problem from the factory.
The magical solid pin is a non issue. I would bet Bill made them solid because the OEM design was too hard to reproduce.

Issue 1. The striker pin is too far inward, it needs to be moved outward, about 1/8 inch OR SO, test and adjust for your coach

Issue 2. The striker plate sticks out too far, It hits the door and prevents it from closing. Some people have cut the gasket away to help with this, but thats not necessary once the plate is right.
It needs to be cut down so it's flush with the door jamb. on my coach it's cut into the countersink for the bolts. I had to remove a good 1/4"

Here my photo album

Here's the modified plate
I assume you slotted the holes behind the plate as well.

But if the coach pooched out, wouldn't that bring the striker plate closer to the latch? Or was the OEM distance between the latch and strike too large to begin with? It's hard to believe that the door didn't latch from the factory.

Or was the door overstretched in the process of recurving for middle age spread at some point?

I'm sure there's something I'm missing.
There is no need to slot the holes behind the plate. the back 2 have enough wiggle room and the front two don't need to move.
Although you could accomplish the same thing by slotting the door frame not the plate I suppose.

If the coach 'pooched out' it wouldn't really affect the latch, the door gap would change at the top and bottom
 
Last edited:
There is no need to slot the holes behind the plate. the back 2 have enough wiggle room and the front two don't need to move.
Although you could accomplish the same thing by slotting the door frame not the plate I suppose.

If the coach 'pooched out' it wouldn't really affect the latch, the door gap would change at the top and bottom
That's what I meant, and what I believe some previous posts suggested; slotting the holes in the door frame for the outboard fasteners. In my coach, the bottom of the two outboard holes in the frame is smaller than the top; it's almost as if a washer was fixed to the inside of the frame somehow. I'll take a pic tomorrow.

I didn't realize you slotted the outboard holes in the plate, but realize now that's what I was seeing in your photos.

I see what you mean about just the door gap at top and bottom of door only, not at the latch. So what causes the need to move the strike closer to the latch?
 
I didn’t measure the location of Bill’s striker relative to the original, but I believe there is no difference. My recollection of the discussion when he first made them was that all of the difference was the solid pin. Of course, the solid pin retains its position during door closure while an original pin pushes inward against the worn-out rubber bushing at its center.

Moving the original pin outward might compensate for the collapsed rubber bushing. But that seems to me a bandaid and it’s certainly no easier to do.

Rick “thinking we are over-thinking this” Denney
 
If someone will measure their original, I’ll measure mine which was made by Bill. Then neither of us will be making an assumption. Measure from the outboard edge of the mounting plate to the outboard surface of the pin.

But you have to make sure the pin shell is where the factory put it, and not where it has ended up after the internal rubber bushing has collapsed. It should be straight and centered on the round flange that forms the head of the pin.

I do know that the gap at the bottom of my door didn’t change when I installed it. But I’m happy to be corrected by actual measurements.

Rick “gotta recurve that door someday” Denney
 
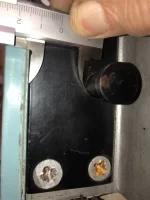
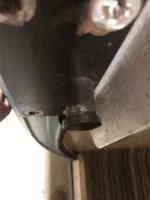
My OEM pin has the shell over the solid pin. It's slightly bigger than the pin. The rubber bushing is gone.here's a bulge next to the pin on the left side (forging deformation)

I went out and took a few measurements based on the shell centered on the pin. The distance from the edge of the plate to the pin was roughly 24mm. I
 
Last edited:
Great thread guys! I'm following this as My door needs excessive pressure, slamming, to make sure it hooks the second latch. It's on my winter list to make sure the door closes much easier and smoother. I'm happily waiting to see what you guys come up with. Hopefully I can use whatever knowledge you guys share to fix mine. Take care and stay healthy.
 
I actually do possess a Mitutoyo metric vernier caliper, consistent with my usual expectation of finding a dead battery in digital calipers. :)

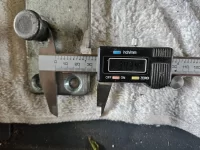
My Bill Bramlett plate positions the outboard striking surface of the pin 31mm back from the gasket surface of the door jamb. That edge of the plate is within a millimeter of that surface. See pic. Door opening is to the left. Note that the angle needed to see past the head of the pin introduces a parallax error when viewing the caliper anvil on the left. But is all within a millimeter.

IMG_1051-dsqz.webp

You measured from the back edge, away from the door opening, which may not say much, given that your plate is about 7mm wider than mine.

On mine, the pin is 15.20mm (5/8”) in diameter.

IMG_1052-dsqz.webp

Rick “too late to do arithmetic” Denney
 
Last edited:
Lots of great measurements, but I think the one that is needed is the distance from the center of the front screws to the front of the pin. The front, towards the outside, screws are what set the position of the plate.
The front only needs to be flush or below the jamb, the back only needs to not hit the door frame.

My factory plate
The front edge of the screw hole is .350" from the front of the plate
The screw hole is 0.350" in diameter

The distance from the front edge of the plate to the center of the screw hole is 0.350 + (0.350/2) = 0.525

My striker pin has 0.030" play

The distance from the front of the plate to the pin is 1.286" - (0.03"/2) = 1.27"

the distance from the center of the front screw holes to the front of the pin is 1.27" - 0.525 = 0.745

My modified plate
The distance from the front edge of the plate to the center of the screw hole is 0.40" (eyeballed)

My striker pin has 0.011" play

The distance from the front of the plate to the pin is 1.16" - (0.011"/2) = 1.155"

the distance from the center of the front screw holes to the front of the pin is 1.155" - 0.400 = 0.755

therefore the pin has moved back 0.745" - 0.755" == 0. 01" ??

That math isn't mathing. I know the pin moved closer. I must have measured the screw centers wrong.
I'll look again in the daylight
 
Rick,
Here's a similar photo to yours.

Pin shell has .83mm of play (.03" which matches Keith's factory plate)

Distance strike to plate reads 34.34mm (1.35") This measurement is pushing the shell to the left if the shell were centered the measurement would be 33.9mm (1.33"). Keith's factory plate is 1.27"

Your Bramlett plate measures .31mm or 1.22"
Pin to plate distance .jpg

Bill
 
Last edited:
Lots of great measurements, but I think the one that is needed is the distance from the center of the front screws to the front of the pin. The front, towards the outside, screws are what set the position of the plate.
The front only needs to be flush or below the jamb, the back only needs to not hit the door frame.

My factory plate
The front edge of the screw hole is .350" from the front of the plate
The screw hole is 0.350" in diameter

The distance from the front edge of the plate to the center of the screw hole is 0.350 + (0.350/2) = 0.525

My striker pin has 0.030" play

The distance from the front of the plate to the pin is 1.286" - (0.03"/2) = 1.27"

the distance from the center of the front screw holes to the front of the pin is 1.27" - 0.525 = 0.745

My modified plate
The distance from the front edge of the plate to the center of the screw hole is 0.40" (eyeballed)

My striker pin has 0.011" play

The distance from the front of the plate to the pin is 1.16" - (0.011"/2) = 1.155"

the distance from the center of the front screw holes to the front of the pin is 1.155" - 0.400 = 0.755

therefore the pin has moved back 0.745" - 0.755" == 0. 01" ??

That math isn't mathing. I know the pin moved closer. I must have measured the screw centers wrong.
I'll look again in the daylight
I agree about the measurement from the line through the screw holes to the pin--I'll do some layout when I get a chance. Might be next week.

Rick "busy days upcoming" Denney
 
I agree about the measurement from the line through the screw holes to the pin--I'll do some layout when I get a chance. Might be next week.

Rick "busy days upcoming" Denney

We are camping this weekend with the Tidewater Crabs, but I had a chance to throw a rule on it. On the Bramlett striker pin, the outboard edge of thd pin is 3/4” inboard from the centerline of the outboard screws.

Bill, are you sure the sleeve isn’t shifted over because the rubber bushing is collapses? I can’t tell from the pic.

Rick “suspecting the tolerance is fairly wide” Denney
Rick,
I assume the rubber bushing is outside of the shell; if so, it's gone on my coach. The steel shell is loose and slightly larger than the steel pin (or whatever's behind it).
 
Rick,
I assume the rubber bushing is outside of the shell; if so, it's gone on my coach. The steel shell is loose and slightly larger than the steel pin (or whatever's behind it).
No, the bushing is inside the shell. If the steel shell is loose it’s because the rubber has rotted and collapsed.

Rick “common to all the original pins by this time” Denney