I'm glad you saved yourself some unnecessary work. Send some of your good luck my way!Cleaned off and had a good look at the back side of the boot today and felt all around. The boot is OK. No need to do the job. Returned replacement boot but kept the bands and banding tools.
Thanks for all the help and advice, knowing what to do if the issue comes up again and now thoroughly understanding the system? Priceless.
thanks
Larry
CV joint ripped boot
- Thread starter boybach
- Start date
You are using an out of date browser. It may not display this or other websites correctly.
You should upgrade or use an alternative browser.
You should upgrade or use an alternative browser.
Interesting. I think I've been looking at this from the wrong angle. First off, the torque specification.Back to an earlier unanswered question: the effect of Loctite.
Well, there is some sort of consensus that "the Loctite people recommend 20% reduction in torque spec", or others that say there's no effect. A snippet from their threadlocking guide:
View attachment 18292
This acknowledges a lubricating effect, but contradictorily says no on-torque adjustments needed. Clear as mud.
Here's one Allis Chalmers forum thread where a member reportedly wrote to Henkel and received a response. In summary, they acknowledge there is an effect, but claim it is small compared to the overall variance in the K factor. As such, they provide no data or rule of thumb anymore, but are willing to do lab tests for you (for a nominal fee, I'm sure).
Torque adjustment for Loctite
I've seen several postings stating torque should be reduced by 20% per Loctite. It sounded a bit...www.allischalmers.com
As listed in an earlier post the Toronado torque spec for the inner CV to output shaft bolts was 65 ft-lbs. It turns out that the 1973 X7425 maintenance manual for the TZE, one that I had never seen, had the same 65 ft-lbs spec and did instruct to use NEW bolts when reassembling. The 'NEW' could only mean they knew they were pushing the limits of the bolts from the beginning. Increasing the torque specification could only mean that 65 ft-lbs wasn't doing it. I'm not aware of a recall or service bulletin, so the problem wasn't catastrophic - the bolts were loosening. This
 confirms it.
The later ubiquitous maintenance manual X7525 upped the torque to 75 ft-lbs and also required NEW bolts but no longer mentions the inboard flange bolts loosening in the Troubleshooting section. It seems like GM thought they had solved the problem.
What changed was clamping force (friction) and bolt deformation. Your guess is as good as mine which is doing the driving.
Then the Loctite & bolt lubrication got me thinking - when did Loctite find its way into the assembly line and into other vehicles' maintenance manuals? So I looked into it a bit. Loctite was patented in the 1950's but GM didn't start using it in production until the late 70's early 80's. It was specified for high vibration assemblies such as drivetrains. Sound familiar?
I don't doubt for a minute that the GM engineers knew exactly what they were doing (for the most part
 ) and made adaptations to car parts and procedures for the Motorhome so they wouldn't have to go to the trouble and expense of re-engineering and re-tooling to make low production numbers new parts.
 But they were working with a totally new animal, essentially a very large front wheel drive van, and there was a learning curve and a limitation of the available materials and procedures. Nowadays they'd spec a metric 12.9 bolt coated with anaerobic threadlocker and move on.
So I'm revaluating my thoughts on what's "best practice" for the output shaft bolt installation. I'll be keeping the Grade 9 Allen drive cap bolts and probably dropping the torque to 65 ft-lbs with blue threadlocker. I think that's a happy medium.
I appreciate everyone's input and thoughts on the matter. The back and forth helps home in on an answer, so thank you all.

You and me both, brother! But it's what I've been doing to date.You're putting socket head cap screws in place of the 12 point Grade 9 bolts? I'm surprised that 75 ftlb of torque can be applied through a 5/16" allen wrench.
I'll be dropping the torque to 65 from now on, the why is described in my recent post in this thread.
I ended up with the bands included with the banding tools I bought on Amazon, I expanded one of the large ones and it came in at 29.5" - enough to double band. This is the $20 kit I purchased, was impressed with quality, seemed extremely well built and heavy duty.Do you happen to have the NAPA part numbers for the boot bands? Having a hard time finding locally.
Thanks
https://www.amazon.ca/dp/B07XHGQ72L?
I also purchased this band kit as I hadn't received the tools and didn't know at the time that it came with long bands :
https://www.amazon.ca/dp/B0DRN8C44M?
now have enough bands to last a lifetime LOL
Larry
I jacked up the front end of my GMC as I continue to go over the brakes and suspension. I have a drivers outer boot torn open so I'll be doing this process soon.
If I understand it correctly, besides disconnecting the tie rod and turning the wheel one way or another, we are simply cutting the old boot off, clean up the grease, spread the snap ring and slide the CV axle back towards the diff. This will give you access to clean the joint, push the new boot on axle, slide CV axle back into place, ensure snap ring is snapped back in place. Grease up the joint and boot, slide boot back into place. Try to get as much air out as possible, then metal ties to seal.
If I understand it correctly, besides disconnecting the tie rod and turning the wheel one way or another, we are simply cutting the old boot off, clean up the grease, spread the snap ring and slide the CV axle back towards the diff. This will give you access to clean the joint, push the new boot on axle, slide CV axle back into place, ensure snap ring is snapped back in place. Grease up the joint and boot, slide boot back into place. Try to get as much air out as possible, then metal ties to seal.
Good summation.I jacked up the front end of my GMC as I continue to go over the brakes and suspension. I have a drivers outer boot torn open so I'll be doing this process soon.
If I understand it correctly, besides disconnecting the tie rod and turning the wheel one way or another, we are simply cutting the old boot off, clean up the grease, spread the snap ring and slide the CV axle back towards the diff. This will give you access to clean the joint, push the new boot on axle, slide CV axle back into place, ensure snap ring is snapped back in place. Grease up the joint and boot, slide boot back into place. Try to get as much air out as possible, then metal ties to seal.

The inner end of the boot doesn't need to be steel banded, it can be bound with a wide zip tie.
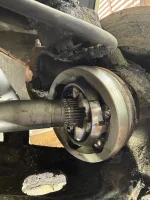
Finally tackling this. I got the snap ring spread and the axle does slide some, but not enough to slide free of the rest of the joint.
I attached a pic that shows the snap ring spread and axle pulled as far as it will go. Not sure what Im missing here. If anyone has done this, any feedback is appreciated.
Worst case scenario is pull the entire axle…
I attached a pic that shows the snap ring spread and axle pulled as far as it will go. Not sure what Im missing here. If anyone has done this, any feedback is appreciated.
Worst case scenario is pull the entire axle…
Attachments
I guess actual worst case in this scenario is unbolt the cv from the diff and drop it without removing the knuckle/bolt
I assume you took off the axle nut? I don't know if you can just take the outer joint off without removing the axle from the Final Drive. Once you remove the bolts from the inner joint there, it drops down nicely and you just slide the whole thing out.
Reading the linked shortcut boot replacement process on page 1, I dont see where it says to take off the axle nut. Only tie rod end and the snap ring. The axle shaft does slide towards the inner plunge joint, just not far enough to pop out of the outer cv. Maybe Im missing something here…
Just a suggestion but maybe turn steering to full lock?Reading the linked shortcut boot replacement process on page 1, I dont see where it says to take off the axle nut. Only tie rod end and the snap ring. The axle shaft does slide towards the inner plunge joint, just not far enough to pop out of the outer cv. Maybe Im missing something here…
You 100% need to take off the axle nut. It won't come out without that.Reading the linked shortcut boot replacement process on page 1, I dont see where it says to take off the axle nut. Only tie rod end and the snap ring. The axle shaft does slide towards the inner plunge joint, just not far enough to pop out of the outer cv. Maybe Im missing something here…
Right. Bob Drewes' method leaves the outer CV spindle still bolted to the hub and the inner CV bolts don't get touched. Just pulling the axle out of the CV to change the boot.Reading the linked shortcut boot replacement process on page 1, I dont see where it says to take off the axle nut. Only tie rod end and the snap ring. The axle shaft does slide towards the inner plunge joint, just not far enough to pop out of the outer cv. Maybe Im missing something here…
You have the tie rod disconnected and the wheel turned all the way, right? Try straightening the wheel a little bit and/or jacking up the lower control arm a little bit and then grabbing the axle shaft and giving it a good shove into the bell housing. If it plunged a little further in then you'll probably be good to go after turning the wheel all the way back out and dropping it back down.
Yup. Tie rod disconnected. I turned the wheel both ways to see if left/right made a difference. I did try jacking up the lower while it was turned, but not when straight. Will give that a try tomorrow.Right. Bob Drewes' method leaves the outer CV spindle still bolted to the hub and the inner CV bolts don't get touched. Just pulling the axle out of the CV to change the boot.
You have the tie rod disconnected and the wheel turned all the way, right? Try straightening the wheel a little bit and/or jacking up the lower control arm a little bit and then grabbing the axle shaft and giving it a good shove into the bell housing. If it plunged a little further in then you'll probably be good to go after turning the wheel all the way back out and dropping it back down.
Overall Id say this method isnt hard at all. Just this little bit of a puzzle to get the shaft out of the outer cv is the tricky part.
I tried again today with no joy. At this point I'll just unbolt the axle off the diff which should give enough room to slide the axle out.
Driver side or passenger?I tried again today with no joy. At this point I'll just unbolt the axle off the diff which should give enough room to slide the axle out.

