My apologies, that should have been uj3416 (29.52") that is twice the lenth of uj3415(14.37")Unfortunately the uj3415 arrived and is only long enough for a single wrap
CV joint ripped boot
- Thread starter boybach
- Start date
You are using an out of date browser. It may not display this or other websites correctly.
You should upgrade or use an alternative browser.
You should upgrade or use an alternative browser.
Not much of a bet! An engineer's primary function is to figure out how to do something consistently and safely. Factors of safety are their way of being conservative.I'd be willing to bet that was a conservative choice on GM's end,
The real question is if the requirement for using a NEW bolt was also specified for the Toronado and Eldorado. I could see that going either way.

The GM engineers specified a torque value that permanently deformed the bolt. By definition that is the yield point. The bolt is being torqued to yield, yes?Personally, I would challenge it, and I've yet to see a legitimate source for this. TTY bolts have a necked down region, and the steps from the neck to the full shank are gently tapered so as to avoid stress concentrations. That is not how these bolts are designed. Threads are never an appropriate yield zone--it's a minefield of stress risers. TTY bolt torque specs are more than a value too--it's a value plus some angular displacement (i.e. 50 ft-lbs plus 90 degrees). That angular displacement is where the deformation occurs. They approach yield level with the initial torque value, then execute the yielding process with a known, physical amount of stretch that can be calculated from the thread pitch and the angular displacement. That is the process that shouldn't be repeated.
We should be thankful they didn't specify a much more expensive bolt and intensive process!
It's ok, I'll order another. BTW I just measured the uj3415 and it came in at 13.75"My apologies, that should have been uj3416 (29.52") that is twice the lenth of uj3415(14.37")
Larry
Says who? That's what I'm trying to get to the bottom of. All I've found is yesterday hearsay.The GM engineers specified a torque value that permanently deformed the bolt.
If the former could be confirmed, I'd surely agree with the latter.By definition that is the yield point. The bolt is being torqued to yield, yes?
Now that's another very interesting question, and I think you could be on to something. This could be why we ended up with a smaller bolt and a smaller factor of safety than they thought was necessary when they wrote the motorhome manual.The real question is if the requirement for using a NEW bolt was also specified for the Toronado and Eldorado
Larry, FYI, You will likely find that McMaster-Carr will not sell or ship to Canada unless you have access through an existing account company that buys in large quantities from MM.Thanks! how many do I need and do you know the torque setting for these bolts?
In the past I have been able to order through US based GMCers when we know our paths will cross.
Thanks Bruce, I might give my bro-in-law in Seattle a call, he comes up here from time to time. ATM the plan is not to remove the axle. We'll see how it goes! I have a forwarder in Bellingham I often ship to, but the cost for trans-shipping 6 or 12 bolts would be a bit disproportionate to the cost of the bolts!Larry, FYI, You will likely find that McMaster-Carr will not sell or ship to Canada unless you have access through an existing account company that buys in large quantities from MM.
In the past I have been able to order through US based GMCers when we know our paths will cross.
Larry
After struggling to find banding to do double wraps on the boots, the banding toolkit I got on Amazon today came with three sets of bands, the large band in each set measuring 29.5", which looks large enough to do the job. The tools themselves feel heavy-duty and are definitely up to the task, no complaints there.
https://www.amazon.ca/dp/B07XHGQ72L?
After all this though, today I took a look with a bright light at the boot- it was covered with grease for sure, but after a quick wipe I couldn't see any split or damage. It looked like possibly excess grease had fallen down on to the (OEM style) boot from my over zealous and badly aimed greasing of the nipple directly above the boot. I only looked from the front (it was raining and I was lying on wet grass) so didn't look at the back side yet ..will be able to check more thoroughly on Monday.
One thing I did notice was that the shaft end of the boot wasn't clamped so could slide freely on the drive shaft. When I moved it back and forth slightly, I could see the shaft was greasy, clean and shiny. I guess the lesson here (if it turns out to be OK) is to always check diagnoses of others before proceeding to the parts store ...
Larry ..hoping the boot is good
Even if the boot appears good, it may not be. There is a lip on the edge of the big boot that is intended to hold the band on the boot by not letting it slip off that outside edge. I've done this job a number of times and every time I just replaced the band, more often than not, the band...no matter how tight you get it, if that lip is even slightly flattened, the new band will slip off in the first couple of miles. I think the best way to replace the boot is to take the axle out and do it clamped in a vice. Remove the cv joint and boot from the axle, clean up the axle as best you can. Cleanup the CV joint and repack with CV grease. Put the boot on the axle sliding it up the axle a ways to avoid grease getting on the boot. Scrub the CV joint around the boot contact area and in the groove where the band will rest on the boot. Clean and dry the CV joint and the inside edge of the boot within an inch of it's life with brake clean. Allow the brake clean adequate time to dry completely. Put the cv joint back on the axle. You may need a second person to help by holding the cv axle straight with the axle. Carefully, without allowing the boot to touch the grease, slide the boot on to the cv. Keeping the cv axle straight, put the band on making sure that both the boot is in the cv groove and the band is centered in the boot groove. Using a band tool, and BTW, a double band, NOT a single band, tighten the band and secure it. DO NOT allow any grease to get under the boot lip, between the boot and the cv groove. If it does, slide the boot back and clean it again within an inch of it's life and reassemble until you get it assembled dry of grease. IMO, you should not use the steel clamp on the inner boot fastening it to the axle. That portion of the boot that is on the axle needs to move/twist a little. So I use a couple of zip ties tightened lightly snug. With the steel clamps, I've seen the big end of the boot slip a iittle and if the small end is not allowed to slip with it, the boot can slip,/fold a little and the boot will form a fold between the two ribs. The boot is not designed to handle that kind of flex and will work harden and break, shortening the intended life. JWITAfter struggling to find banding to do double wraps on the boots, the banding toolkit I got on Amazon today came with three sets of bands, the large band in each set measuring 29.5", which looks large enough to do the job. The tools themselves feel heavy-duty and are definitely up to the task, no complaints there.
https://www.amazon.ca/dp/B07XHGQ72L?
After all this though, today I took a look with a bright light at the boot- it was covered with grease for sure, but after a quick wipe I couldn't see any split or damage. It looked like possibly excess grease had fallen down on to the (OEM style) boot from my over zealous and badly aimed greasing of the nipple directly above the boot. I only looked from the front (it was raining and I was lying on wet grass) so didn't look at the back side yet ..will be able to check more thoroughly on Monday.
One thing I did notice was that the shaft end of the boot wasn't clamped so could slide freely on the drive shaft. When I moved it back and forth slightly, I could see the shaft was greasy, clean and shiny. I guess the lesson here (if it turns out to be OK) is to always check diagnoses of others before proceeding to the parts store ...
Larry ..hoping the boot is good
Now, after reading all of this, you should see that doing this with the axle still in the coach is a frustrating and near impossible task. IMO, take the axle out. In the long run, less time and frustration.
I hear this repeated a lot, going many years back, and it is generally accepted as common knowledge.
Personally, I would challenge it, and I've yet to see a legitimate source for this. TTY bolts have a necked down region, and the steps from the neck to the full shank are gently tapered so as to avoid stress concentrations. That is not how these bolts are designed. Threads are never an appropriate yield zone--it's a minefield of stress risers. TTY bolt torque specs are more than a value too--it's a value plus some angular displacement (i.e. 50 ft-lbs plus 90 degrees). That angular displacement is where the deformation occurs. They approach yield level with the initial torque value, then execute the yielding process with a known, physical amount of stretch that can be calculated from the thread pitch and the angular displacement. That is the process that shouldn't be repeated. Torquing a bolt to specified value below it's yield threshold can be done repeatedly.
These are what Applied GMC sells:
View attachment 18260
Here's a conventional TTY bolt design we're all used to seeing on modern cylinder head bolts:
View attachment 18261
Flywheel/flexplate bolts are some of the shortest TTY bolts in the industry, but they still have a visible yield zone on them. Here are some Nissan flexplate bolts:
View attachment 18262
Where? I could be missing it somewhere (it is a length volume), or maybe I'm looking at a different version. I'm not seeing it in the X7525 manual. They do have this blurb that says, if it needs replacement the replacement should be equivalent:
View attachment 18263
TTY bolts are also installed by torquing to a specific number, then turned a specific number of degrees, stretching the bolt in yield.
The manual has no such instructions so they wouldn't be TTY bolts.
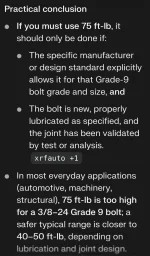
This raises some questions for me, Todd. A dry 3/8-24 Grade 8 bolt is torqued to ~45 ft-lbs ('standard' torque charts vary quite a bit), which is ~85% of its proof load and provides a clamping load of 7875 pounds. Proof load is a working‑strength limit - the highest load that can be applied repeatedly without causing permanent deformation.
The same bolt lubricated (Loctite is a thread lubricant while the bolt is being installed) standard torque spec is ~35 ft-lbs or less. So if Loctite is used that ~45 ft-lbs is going to generate a lot more clamping force.
The McMaster bolts in the links above have a tensile strength of 170,000 psi (which is curious as Grade 9 is 180,000 psi). Assuming the OEM bolts are similar at ~170,000 psi, and they're torqued to yield at 75 ft-lbs, that's a lot more clamping force than the Grade 8s.
More from Matt Colie:
GMCforum: GMCnet » So about that LH drive shaft..
So about that LH drive shaft..gmc.mybirdfeeder.net
Like I wrote at the beginning, I have questions. I haven't calculated clamping loads for the assembly, different fasteners, etc, and I know that Manny torqued the high tensile bolts to 65 ft-lbs with blue Loctite and called it good. And from other posts the reports are the bolts fall out, they don't break - unless you're removing them! So just keep an eye on them and safe travels.
Thinking about that clamping force, the only need for a high clamping force is so the torque on the axle flange is transfered by the friction resistance between the two flanges. GM wanted zero movement there. They could have let there be movement, bringing the bolts into shear to transfer the torque to the axle and that would be plenty strong, but after it slipped a few times it would loosen the bolts I bet. So they went with a clamping force that generate enough friction force to transfer the max torque on the axle without slipping.
It would be interesting to calculate that.
Last edited:
The patents relating to "Torque-To- Yield" bolts seem to show up in the mid-seventies.
So it appears safe to assume they had nothing to do with the designs of the mid-sixties (Eldorado and Toronado design timeframe, approximately).
Googles seems to think that these fasteners became common in the automotive word during the eighties.
So it appears safe to assume they had nothing to do with the designs of the mid-sixties (Eldorado and Toronado design timeframe, approximately).
Googles seems to think that these fasteners became common in the automotive word during the eighties.
We're talking mechanics and not semantics. Torque To Yield (TTY) bolts are different than torquing a bolt to yield (nothing in these parentheses because there is no acronym!), but the end effect is the same - the bolts are permanently deformed. It's a colloquialism and not a specification.TTY bolts are also installed by torquing to a specific number, then turned a specific number of degrees, stretching the bolt in yield.
The manual has no such instructions so they wouldn't be TTY bolts.


Post in thread 'Axle bolts'
https://www.gmcmotorhome.org/threads/axle-bolts.83473/post-536986
Post in thread 'Inner CV Joint to Final Drive Flange Bolts'
https://www.gmcmotorhome.org/threads/inner-cv-joint-to-final-drive-flange-bolts.88717/post-578522


The GM engineers knew what they were doing and they knew they were outside the standard acceptable load range of Grade 9 bolts. That's why they specified NEW bolts (their capitalization) and not to reuse them.
Here's the torque spec for the bolts on the same era passenger cars:

As I expected the GM engineers bumped up the torque spec on the Motorhome for the same reason that they beefed up the lower control arms on the Motorhome - they wanted to use existing car parts for the Motorhome.
The cost of new replacement bolts is ~$20, which is equivalent to about 6 gallons of gas or 50 miles, 60 if you're lucky.
Your coach, your cash, your call.
Attachments
The cost of new replacement bolts is ~$20, which is equivalent to about 6 gallons of gas or 50 miles, 60 if you're lucky.
Richard,
Does that $20 include shipping from McMaster? When I ring that up it's $30 to my door. Plus one day's time. If someone were on the side of the road, will FedEx deliver there?
Vs $0.01 of locktite carried in the coach's toolbag?
It seems I've heard of a few axles coming loose while people were travelling. I would be interested to know;
How many were new bolts installed properly at 75ftlb?
How many of these were reused bolts installed with locktite at lower than 75ftlb?
Anyone?
I try not to use McMaster-Carr. Last time I ordered bolts (not the ones being discussed), they showed them as in stock. They didn't give shipping costs nor did they indicate they would be coming from two different warehouses. They billed my credit card for two shipping costs. Based on weight, handling, package size, etc., one of the shipping costs should have be sufficient if they came from one warehouse.
I overestimated, sorry. $16.18 including tax & delivery to NY northern tier, so more like 3.5 gallons of gas.Richard,
Does that $20 include shipping from McMaster? When I ring that up it's $30 to my door. Plus one day's time.

Many/most things can't get delivered in a day on the side of the road. You carry a spare module and coil, right? Me too. I also carry a dozen spares of the bolts in question because they're cheap, lightweight and take up a few in^3.If someone were on the side of the road, will FedEx deliver there?
Someone said previously that they had used Grade 8 bolts torqued to a standard chart value (~45 ft-lbs?) and some Loctite. Loctite does not provide clamping force - glue can't replace ft-lbs.Vs $0.01 of locktite carried in the coach's toolbag?
My question would be how many bolts were snapped when reinstalling used bolts. That would never get reported, and it'd be a lucky thing if it happened in the shop instead of while driving.It seems I've heard of a few axles coming loose while people were travelling. I would be interested to know;
How many were new bolts installed properly at 75ftlb?
How many of these were reused bolts installed with locktite at lower than 75ftlb?
Anyone?
Is there any reason to not use new bolts other than the $20 cost?
I overestimated, sorry. $16.18 including tax & delivery to NY northern tier, so more like 3.5 gallons of gas.
View attachment 18286
You're putting socket head cap screws in place of the 12 point Grade 9 bolts? I'm surprised that 75 ftlb of torque can be applied through a 5/16" allen wrench.
Back to an earlier unanswered question: the effect of Loctite.
Well, there is some sort of consensus that "the Loctite people recommend 20% reduction in torque spec", or others that say there's no effect. A snippet from their threadlocking guide:

This acknowledges a lubricating effect, but contradictorily says no on-torque adjustments needed. Clear as mud.
Here's one Allis Chalmers forum thread where a member reportedly wrote to Henkel and received a response. In summary, they acknowledge there is an effect, but claim it is small compared to the overall variance in the K factor. As such, they provide no data or rule of thumb anymore, but are willing to do lab tests for you (for a nominal fee, I'm sure).
 www.allischalmers.com
Well, there is some sort of consensus that "the Loctite people recommend 20% reduction in torque spec", or others that say there's no effect. A snippet from their threadlocking guide:
This acknowledges a lubricating effect, but contradictorily says no on-torque adjustments needed. Clear as mud.
Here's one Allis Chalmers forum thread where a member reportedly wrote to Henkel and received a response. In summary, they acknowledge there is an effect, but claim it is small compared to the overall variance in the K factor. As such, they provide no data or rule of thumb anymore, but are willing to do lab tests for you (for a nominal fee, I'm sure).
Torque adjustment for Loctite
I've seen several postings stating torque should be reduced by 20% per Loctite. It sounded a bit...
Cleaned off and had a good look at the back side of the boot today and felt all around. The boot is OK. No need to do the job. Returned replacement boot but kept the bands and banding tools.
Thanks for all the help and advice, knowing what to do if the issue comes up again and now thoroughly understanding the system? Priceless.
thanks
Larry
Thanks for all the help and advice, knowing what to do if the issue comes up again and now thoroughly understanding the system? Priceless.
thanks
Larry
Do you happen to have the NAPA part numbers for the boot bands? Having a hard time finding locally.Planning on doing the boot replacement on Monday. Picked up the boot and bands from Napa. The band tensioner arrives tomorrow, so all ready to go ...however, if it turns out to be a problem to separate the CV from the axle on the coach, I thought I'd have a backup plan ready to remove the axle and do the job on the bench.
If I DO have remove it completely and the axle bolts can't be reused, I'd like to buy some new ones today just in case I need them.
I saw on the link page they are grade 8 but didn't find the info on the size or torque - anyone know the specs and how many I need for these bolts at the final drive? (coach out at storage area at the moment)
Thanks
Larry
Thanks

