Converting to LiFePO4 batteries and Sailor Man's LiFePO4 Build
- Thread starter RF_Burns
- Start date
You are using an out of date browser. It may not display this or other websites correctly.
You should upgrade or use an alternative browser.
You should upgrade or use an alternative browser.
Different strokes for different folks.
SunPower, like all other manufacturers has a much shorter warranty on their flexible panels than their rigid panels.
SunPower 110 watt semi flexible panel 5 years
SunPower rigid panels 25 years
SunPower Maxeon solar panels 40 years
Industry standard 10-15 years
Given that there is almost a certainty that at least one of the 15 SunPower solar panels will fail or be damaged requiring replacement. I have designed the fastening to make certain that replacement will be easy and quick. I don’t relish the almost certain nasty and lengthy job of wrestling with the removal of flexible solar panels fastened with adhesive to my coach’s roof and scraping off all of the adhesive residue.
My nightmare is surviving a hail storm when all 15 sun panels are damaged or destroyed. I once lost a very nice 1979 used Porsche 928 to a bad hail storm. It was parked outdoors at the repair shop (I wouldn’t have done that at home)and its beautiful welded aluminum body suffered more than 50 dents. The body repair estimate was over $37,000, so the car was totaled.I got $11,000 from the insurance company! That was $2,500 MORE THAN I PAID FOR IT.

The GMC Motorhome has an aluminum body too.
I have spent far too much time sccaping, sanding and painting the bottom of my 40 year old,37 ft sailboat, Mistral or pay for someone else to do it. Mistral is scheduled to have her bottom CopperCoated, which is a product consisting of 99% very fine copper dust bound in two part epoxy. This product has lasted 10 years and is cleaned while in the water with an abrasive sponge.
No labor or money for hauling, splashing, scraping, sanding, wed sanding, old paint removing and multiple coats of new antifouling anymore. Hopefully my boat will stay in the water for the next 10 years on my dock behind my house.
If I need to replace a failed solar panel. I remove 6 screws, pull the damaged solar panel off, fasten down the replacement panel, snap the wire harness together and drive on.
As Matt knows very well, when we go to sea, we take everything we need to fix things offshore and get back to a safe harbor. We try to prepare for almost every eventuality before we leave our berth.
I am approaching my GMC motorhome in a similar vein. I am traveling with replacement panels.
SunPower, like all other manufacturers has a much shorter warranty on their flexible panels than their rigid panels.
SunPower 110 watt semi flexible panel 5 years
SunPower rigid panels 25 years
SunPower Maxeon solar panels 40 years
Industry standard 10-15 years
Given that there is almost a certainty that at least one of the 15 SunPower solar panels will fail or be damaged requiring replacement. I have designed the fastening to make certain that replacement will be easy and quick. I don’t relish the almost certain nasty and lengthy job of wrestling with the removal of flexible solar panels fastened with adhesive to my coach’s roof and scraping off all of the adhesive residue.
My nightmare is surviving a hail storm when all 15 sun panels are damaged or destroyed. I once lost a very nice 1979 used Porsche 928 to a bad hail storm. It was parked outdoors at the repair shop (I wouldn’t have done that at home)and its beautiful welded aluminum body suffered more than 50 dents. The body repair estimate was over $37,000, so the car was totaled.I got $11,000 from the insurance company! That was $2,500 MORE THAN I PAID FOR IT.
The GMC Motorhome has an aluminum body too.
I have spent far too much time sccaping, sanding and painting the bottom of my 40 year old,37 ft sailboat, Mistral or pay for someone else to do it. Mistral is scheduled to have her bottom CopperCoated, which is a product consisting of 99% very fine copper dust bound in two part epoxy. This product has lasted 10 years and is cleaned while in the water with an abrasive sponge.
No labor or money for hauling, splashing, scraping, sanding, wed sanding, old paint removing and multiple coats of new antifouling anymore. Hopefully my boat will stay in the water for the next 10 years on my dock behind my house.
If I need to replace a failed solar panel. I remove 6 screws, pull the damaged solar panel off, fasten down the replacement panel, snap the wire harness together and drive on.
As Matt knows very well, when we go to sea, we take everything we need to fix things offshore and get back to a safe harbor. We try to prepare for almost every eventuality before we leave our berth.
I am approaching my GMC motorhome in a similar vein. I am traveling with replacement panels.
Last edited:
I've found the peel-and-stick Velcro method works great. Last year I attached six flexible solar panels using just Velcro tape on all panel perimeters and two stainless nuts/bolts/washers on the front panel's leading edge. I figured the front panel has higher risk of lift-off since it's on a slight downward curve on the front cap so I drilled just those two into the front corners. I was able to access the back side of those fasteners by reaching behind the driver & passenger map light. I did add six additional fasteners through the roof storage pod - easy to access the back side of those six fasteners. Everything else is stick-on velcro tape and 1" stick-on adhesive cable retainers for solar wiring. I slightly overlapped the panels shingle-style to minimize air catching a leading edge.
Drove it this way to Burning Man (flex solar panels in 2nd photo) and a few short trips after that. No problems so far.
Drove it this way to Burning Man (flex solar panels in 2nd photo) and a few short trips after that. No problems so far.
I was thinking more about the wiring than the panel attachments - one could also attach the wiring harnesses simply by covering the runs with eternabond tape. Very unlikely wiring would be damaged if installed like that and in the extremely remote possibility there was a fault, a Olfa box cutter and some fresh eternabond would sort the repair out pretty quickly. The tape would also protect the wiring from UV degradation.
JWIWD
JWIWD
Larry that's an interesting idea - covering rooftop solar wire with Eternabond tape. Available in white, tan, grey, black.
I'm updating the system this year and will detail that in a separate thread. The zip-tie wiring method I used last year does kinda look like Frankenstein's forehead.
I'm updating the system this year and will detail that in a separate thread. The zip-tie wiring method I used last year does kinda look like Frankenstein's forehead.

Kendra - just remember when installing it to wet your fingers every time you touch it! So sticky, comparable to chewing gum in hair LOLLarry that's an interesting idea - covering rooftop solar wire with Eternabond tape. Available in white, tan, grey, black.
I'm updating the system this year and will detail that in a separate thread. The zip-tie wiring method I used last year does kinda look like Frankenstein's forehead.
This is the actual battery tie down with a minimum of 6" in length.View attachment 8102I have ordered the new 51.6v Lithionics batteries with lift stairs. They are large and weight 155 lbs.
Since I was troubled about how to secure the (2) batteries in the generator compartment, it occurred to me that the lift straps had little use once the batteries were in place. Therefore, if I cut one side of the lift strap closed to the bolt, which itself count not be tightened or removed, I could use the strap as a tie down.
View attachment 8103
View attachment 8104


Which the external Battery Management System, 3 Port Combiner Box and Custom Electrical Tables, you are looking at and expenditure of $17,034.00. This does not include shipping, boxing or sat sales tax. After applying the Federal Income Tax Creity of 30%, the final cost is $11,923.80.
The (2) batteries (2x51.6x150ah) = 15,480kwH. This comes to $770.27/kwH. The cost per kilowatt hour is the only way to assess the actual cost of an installation. Remember this is more that just the cost of the batteries.
If you are considering the battery cost alone, the two batteries cost $13,998.00 or $9,798.60. That is $632,95/kwH. This is the number to compare these batteries with other batteries.
These are the only UL certified batteries in the world, so any premium is well deserved.
Last edited:
This is referring to the posting #285, Page 15, posted on March 11th.Larry
Claude and I have four reasons to visit Wisconsin in our coach.
First of all, we have family in Milwaukee. My son married into the Martin family and we have not seen all of them in one place since the wedding. Jim Martin is now retired, but he was the Head of the History Department at Marquette University and is a Civil War historian.
Next, Claude is a dual citizen, first generation born in the USA whose parents were born in Luxembourg. The Salomon family goes many generations back in Luxembourg. The Luxembourg American Cultural Society & Center is in Belgium, WI, which we want to visit. They tried to help Claude get her Luxembourg citizenship until they found out that she was already a dual citizen by birth.
There is certainly a very large congregation of Luxembourg Americans in Wisconsin.
Them there is Taliesin and the Frank Lloyd Wright Trail. Frank is my mentor, although I never met him. I have been in many of his buildings in the east, but I would like to experience those in Wisconsin. My son is on a mission to see all of wright’s surviving buildings, so he has already been there.
View attachment 7922
View attachment 7923
View attachment 8296
No this is not a FLLW residence. I is one of mine that I designed in 1975 and built with my client (no contractor) in 1975-1976, It is built on the ruins of a dam and forge built in 1715.
It has often been compared to FLLW’s Fallingwater, even by Kendra’s mom.
By the way, the largest number of Wright’s building are right here in Florida. He designed the Florida Southern College Campus in Lakeland, FL. Kendra and I are planning to take her mother there this summer, if it works out.
I think that it might be cool for the Sunshine Statesman to take one of the guided tours as part of a future rally.
And then, of course, there is you and your family.
I have been thinking about the table we all put in the coach between the driver's seat and the passengers seat. There are dozens of variations and even a few commercially available. I have been modifying the swing leg table that was in my coach when I bought it.

As you can see, it had the two stainless steel fans mounted on it mostly because the dashboard air condition was terrible or didn't work at all.
Now that the ac is 12v, blowing very hard and very cold, I no longer needed the fans, so off they came.

I added the 4 drink holders and a stand for an iPad that rotated around 2 axises. I planned to laminate 1/4" cameo white Dupont Corian to finish the piece.

Then I thought about the custom triangular dining room table that was meant for this house without any right angles. You can just see it in the 3D view. It was a table that folded out in two stages. It started as a trianglar table seating 6, 2 on a side.
It also works great against a wall or on a balcony or terrace with a view. This is a 3D rendering for a proposed installation in Keyport, NJ with a 270° view, including Manhattan 17 miles away. This is where I spent three days watching the World Trade Center burn and smoke blew steadily for days right over this spot. We lost a lot of friends and colleagues there.
My wife, Claude, was there for the first bombing. She was an attorney at the New York Stock Exchange. Thank God that she had another position in 2001.

The first fold out of three leaves formed a 9 sided table seating 9.

And then there was another swing out that produce a triangular table with rounded corners seating 12.

In the house, I intended to make two of these so they could be combined to form an enormous single table.
When the table was set for 6, the green marble triangle in the center is locked into place. However, when the three identical trapezoidal folded out to seating for 9, the triangle was free to rotate like a lazy susan's. However, it was also made of three identical trapezoidal segments that could also fold out, expanding the size of the now 9 sided lazy susan.
The pieced that formed the rounded corners in the final expansion actually were stored under the table and rotated out 180° to form the corners.
I could use this concept to work in the GMC motorhome. If the original triangular unit to be in place between the drivers and passengers seats, it would seat 3 people. The three legs could be telescoping, so that the table could either be at coffee table height of dining table height. When camping, this triangular table could be carried outside, eliminating storing a separate outside table, as we all do now.
The first fold out might provide a seating of and the second, maybe 9.
It will also accommodate any irregularity in the ground, as a 3 post table may be tilted, but it is always stable.
I think that it is a very good looking piece of furniture. I had to use the Breuer chairs because I could not decide whether to design a chair with a single pedestal or use 3 legs like FLLW in the Johnson Building.
How do you all think about this design?
Do you think that I should make a prototype? I know that it will take a very long time to make it work.
Will it be worth it when I still have so much to do on the coach?
If it is perfected, is there a market for it?
Is there anyone interested in helping me with this?
Attachments

Last edited:
Well we finally got the roof all cleaned off in preparation for the solar installation. Here are the before and after photos.This is the proposed layout of the SunPower SemiFlexible Panels on the roof. One of the problems with using the SunPower panels is that there is a systems limit of 45 volts and a maximum panel fuse rating of 15 amps.
Therefore, connecting (2) SPR-E-Flex-110 in series will generate 5.9 amps @ 37.6volts. Wiring (6) pairs will produce 35.4 amps @ 37.6 volts = 1,320 watts. Each (2) pairs will have to fused with a 15 amp breaker, (3) breakers in total.
This system should generate 1,470 watts. We can compare this output to the 6,000 watt output of the Onan. The original models only had a 4,000 watt Onan.
Also, As far as I know, only Sterling makes a 12 volt to 48 volt battery to battery charger. There is no 48 volt to 12 volt battery charger that I know of.
Therefore, it makes the most sense to charge the 12 volt battery bank with the solar panels and use the excess to charge to 48 volt bank through the Sterling.
The only 48 volt loads are for the (2) 12,000 btuh YMGI Mini-split heat pump systems.
Therefore one of two Mastervolt 48v to 12v dc to dc converters will provide backup 12 volt house power for the other users.
All lighting, including the headlights, have been converted to LED.
The YMGI mini-split have a SEER of 32 when connected to solar panels. The normal roof top air conditioning unit likely have a SEER of 7.5 when new.
Since the furnace and the electrically heated hot water heater have been eliminated, electrical use has been substantially reduced.
In the pace of the Onan 6000, there is now a Firman 3200 DF using primarily LPG with a gasoline back up. This is a very quiet and efficient generator. The mounting tray must be pulled out to use the generator, so the coach must be parked to use it. If necessary, second Firman generator can be paired with the permanently mounted unit.
With the solar array and significant electrical energy loss reduction, I doubt if the generators will ever needed to be used.
The roof will stay like this until I get the coach home where I will install the solar panels.
It certainly looks like the air resistance of the coach is greatly reduced and it will stay this way.

The roof looking forward.

Pretty slick now. Just imagine 15 SunPower semi-flexible panels added to the surface and all wiring in 1 1/2" aluminum raceway. Whoosh!
Should I paint the roof sparkling glossy white?
Well the rear Advent Air conditioning unit is gone and there is a small 14” x 14” hole in the overhead. The old Advent air conditioning unit was 21 1/2” x 22 1/2” x 3 1/2” deep.I thought that you might like to see some progress on the mini split installation.View attachment 6648
The bedroom mini split is mounted and I am piping and wiring it.
Just imagine what will happen when the roof mounted air conditioning unit is gone. There will be a very ugly hole in the overhead with an unpleasant looking rim material to deal with.
I intend to fit a 2’” old flat screen 12v dc in the hole that drops down when we are viewing in bed. When it is still up, it will be covered by a custom Cypress panel matching the cabinetry.
At least I am making progress getting rid of alternating current.I thought that you might like to see some progress on the mini split installation.
There is a nasty discolored patch in the overhead, 21 1/2” x 22 1/2” that looks nasty. I have ordered (2) Jensen 46VR 12v dc lat screen tv units that will lie up flat to the overhead on a 12” x 12” Vespa mount. The TV can drop down and rotate. The entire is 22” x 22 1/2” x 3 1/2”, so it will not take up the entire space.
I plan to fashion a sold cypress panel to match the cabinetry that hides the tv. I might add indirect edge LED lighting to illuminate indirectly illuminate the surrounding overhead and period a couple of adjustable recessed reading lights.
I will do the same thing forward in the salon where the forward air conditioning unit used to be.
And here is the 48v dc YMGI heat pump in the salon.
I think that the curvilinear surface of the YMGI mini split compliments the similar forms of the coach.


The overhead flat tv and enclosure will be much less bulky, so the and the space will seem much higher and more spacious.
The scissors couch will expand into a double bed and it is across from the dinette that also months into a double bed. I hope that I will be able to rotate both the passenger and driver seat around to make this a very spacious and cozy room.
On top of it all, the heating and air conditioning will be very quiet. In a pinch, I could even turn on the dashboard air conditioning without starting the engine.
I hope it will be a very pleasant and peaceful place, especially if we are boon docking in the wilderness.
Last edited:
This is a rather long term project that I plan to undertake after I get the coach back to Palmetto, FL.Well we finally got the roof all cleaned off in preparation for the solar installation. Here are the before and after photos.
The roof will stay like this until I get the coach home where I will install the solar panels.
It certainly looks like the air resistance of the coach is greatly reduced and it will stay this way.
View attachment 8628
The roof looking forward.
View attachment 8629
Pretty slick now. Just imagine 15 SunPower semi-flexible panels added to the surface and all wiring in 1 1/2" aluminum raceway. Whoosh!
Should I paint the roof sparkling glossy white?
The existing awning is not a Zip Dee and is aged. According to the previous owner, one of the studs broke and he fashioned a repair. I have no idea how old it is, so it is probably overdue for replacement.
Since there is 1.47kw of solar panels due to be installed along with the massive on board LiPO4 28.68 kWh, can I do any better?
How about installing (2) new Zip Dee Relax 12v dc awning, almost full length on both sides and instead of using the normal slope, which is almost level, suppose they are tilted up. I found an awning fabric that reflects 71% of the and is yet translucent enough to provide light underneath.
When I mentioned using the 5V galvanized aluminum roofing surfaces on the roof of my house to reflect additional solar energy onto the roof mounted solar panels, the 5V roofing was LEED certified to reflect 2/3 (66.6%) of solar energy. This fabric is supposed to reflect 71%. Not bad for an awning!
In addition, there is now a massive shaded area.
I am considering of how to fashion an easy and rapid take down for sustained and/or sudden winds and downpour.

How about this design? I will have to adapt the Zip Dee to allow it to tilt up, rather than down and get Zip Dee to approve this design and use a fabric like the Serge Ferrari. I might have to provide them the fabric. This fabric is a well tested and used awning fabric..
The area of the defective surface is much greater than the area of the solar panels, so there is a chance to achieve a two or three times greater collection of solar energy.
I know that this is really very far out but I would really like to hear everyone's comments, even those that are negative. Earlier in this conversation I mentioned the design for using the reflective surfaces of my house to collect additional solar energy. I also mentioned the possibility of using my coach to forgo using roof mounted solar panels for the house and use my coach instead.
With the three 12v winches, I could probably adjust the angles of the awnings.
Using the coach's air suspension, we could probably play with the tie down tension by raising or lowering the coach.
There are plenty of awning tie down systems commercially available.
Wouldn't it be great to use our coaches in such a fashion!
Anybody want to work with me on this?
Last edited:
I think you have an innovative but complex solution. Reminds me of fold-out solar cookers designed to warm a meal with sunlight.
A California company Xponent Power is working on a 16'x7' photovoltaic RV awning for production in 2024. Their design is heavy and assumes RVs are slab-sided, but as technology improves a direct PV-embedded awning could be a solution.

I think PV-embedded fabric similar to canvas will become a common solution in the future, but that will take years to develop.
A California company Xponent Power is working on a 16'x7' photovoltaic RV awning for production in 2024. Their design is heavy and assumes RVs are slab-sided, but as technology improves a direct PV-embedded awning could be a solution.
I think PV-embedded fabric similar to canvas will become a common solution in the future, but that will take years to develop.
Well we finally got the roof all cleaned off in preparation for the solar installation. Here are the before and after photos.
The roof will stay like this until I get the coach home where I will install the solar panels.
It certainly looks like the air resistance of the coach is greatly reduced and it will stay this way.
View attachment 8628
The roof looking forward.
View attachment 8629
Pretty slick now. Just imagine 15 SunPower semi-flexible panels added to the surface and all wiring in 1 1/2" aluminum raceway. Whoosh!
Should I paint the roof sparkling glossy white?

I thought that you might like to see a GMC Motorhome with nothing on the roof. She is still in Cliff’s shop with Cliff. I think that she looks very slick.


By the way. Cliff and I are working on the WakeSpeed WS500 alternator regulator in these photos. It has been a real pain in the rear. However, rejoice! We got the 12v alternator to work charging the 1000ah BattleBorn house battery bank. I will tell you all about it in a later post.
Sailor man, I’m enjoying catching up on your project, I too am a NJ native and in the energy industry, building energy conservation and renewable projects. I just wanted to throw a monkey into 7our wrenches… not sure you have seen this…https://www.wattfuelcell.com/uses/rv/. It’s not yet commercially available, but save room in your coach for one.
Kids just graduated college and we camped for the first time since Covid this past weekend and hope to be more active in this community again.
Kids just graduated college and we camped for the first time since Covid this past weekend and hope to be more active in this community again.
Now there is no generator on the coach and lpg is limited to hot water generation and cooktop, a fuel cell would be a good option. However, it is not yet commercially available. I think that once the installed solar collection system and generous battery capacity are tested, a fuel cell amy to be needed.Sailor man, I’m enjoying catching up on your project, I too am a NJ native and in the energy industry, building energy conservation and renewable projects. I just wanted to throw a monkey into 7our wrenches… not sure you have seen this…https://www.wattfuelcell.com/uses/rv/. It’s not yet commercially available, but save room in your coach for one.
Kids just graduated college and we camped for the first time since Covid this past weekend and hope to be more active in this community again.
By the way, 2 months ago, Lithionics was purchased by Winnebago, so there is now wide acceptance of how superior their batteries and accessories are.
Because of covid-19, a boatyard bakcruptcy and sale and my ill health, the installation of the 3 Lithionics LiPoe4 batteries were never totally installed. Lithionics has agreed to test and refurbish, if necessary after a 4 1/2 year hiatus. They asked me to measure the current voltage in the batteries which I have never charged or drawn power from. Lithionics requires that batteries in storage are required to be charged every 6 months. That was not done. It was astonishing that my multimeter measurements last week informed me that all three batteries appear to be 100% charged. It will be interesting to find out what Litthionics tells me after they test the batteries.
By the way, LIithioncs may be the only battery manufacturer who will refurbish their batteries for their customers, even though they are out of warranty as mine are.
Where are you in NJ? Have you been at Yogi Berra Stadium and/or Museum? I designed and built both.
View attachment 7093I would much like to have every person who owns, wants to buy or has every owned a GMC Motorhome follow this thread. Can you help me?
I am using 2 WaveSpeed remote alternator regulators, one for 12v and one for 48v.
The comments for the 12v and 48v system are from these companies:
BattleBorn
Victron
WaveSpeed
Balmar
I could have purchased all of these components directly from BattleBorn, but I chose to purchase them separately. The good news is that all of the componentsView attachment 7094 View attachment 7093are compatible and have specific wiring harnesses and software to make them function together as a team.
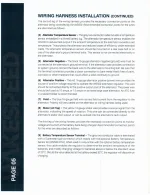
Here are the wiring diagrams for both systems. I have added the settings of the dip switches that correspond to the attached components.

We have had a devil of a time getting the WakeSpeed WS500 to work and turn the Balmar alternators on. This Tuesday, after nearly a year’s effort, the 12v system is working. There was a great difficulty in getting tech help but that all changed two weeks ago.
One of the problems wa stop update the firmware that was in my two units to the current version. WakeSpeed (owned by Dragonfly) is pc centric and the firmware and upgrades can only communicate with a pc or android device. There is iPhone and android apps available to monitor the regulator, alternator and batteries.
I tried to get eh firmware upgraded and the configuration files using a boatyard and multiple friend to not avail. Then I discovered a relatively new distributer in Sarasota, VanLife, could help snd everything changed. VanLife is a Litjionics distributer and I bought my batteries from them.
They had direct contact with WakeSpeed’s founders and had even recently produced a youTube with them.
They installed the new firmware, but were unable to confirm it. In conversations with WakeSpeed that found out that there is a bug in the installation software, but the firmware had indeed been installed.
A second issue was discovered when VanLife dug down deep into the programing and discovered that they configuration program produced a configuration file that would change a 12v battery but not the 51.6v battery that it was supposed to. It turned out that WakeSpeed was not aware of the flaw in their programing and if I had used it my 51.6v batteries may have been harmed. VanLife and WakeSpeed corrected the file and it was installed.
A couple of days later, Cliff and I tried to fire up the 12v alternator, but to no avail. The diagram that I have posted was inadequate. It seemed to show both the control and power circuiting, but the control wiring was not clear.
I found another diagram that dealt solely with the control wiring and realized that it was not installed properly. I could not wake up the Ws500.
I have attached a pdf of that diagram.
When we rewired the system, it woke up and activated the Balmar alternator. What we did not know caused us to think that it was not working. The WS500 is essentially a marine product and the marine engines are much less powerful than the earth bound vehicle’s. An alternator on a boat may use 3 to 5 times the percentage of a marine vehicle’s power. Therefore, when you start up an engine with an alternator controlled by a WS500, the alternator will not turn on until after a minimum of 30 seconds. After that point, when it does turn on, the alternator is only allowed to function at 70% and it will slowly build up over the next 30 minutes or so. Not knowing this, one would assume that the system was not functioning properly and we did. Only after another phone call did we find out about this and realized that the system was actually functioning properly. How confusing but we get it now.


Attachments
Last edited:
The Zip Dee Relax System is a motorized system. The only issue is wether I can devise a way to rotate the brakes get to the 45° up position.I think you have an innovative but complex solution. Reminds me of fold-out solar cookers designed to warm a meal with sunlight.
A California company Xponent Power is working on a 16'x7' photovoltaic RV awning for production in 2024. Their design is heavy and assumes RVs are slab-sided, but as technology improves a direct PV-embedded awning could be a solution.
View attachment 8677
I think PV-embedded fabric similar to canvas will become a common solution in the future, but that will take years to develop.
I only included the tie down cables to stabilize the awnings in the wind. The Zip Dee controls allow with the front or back of the awning to be slightly lower to direct runoff rain water away.
There is a motorized Austrian awning system called Square that incorporated a wind detector and their awning automatically roll in when the wind reaches 25 knots. Maybe incorporating that is better than the cables.
I have alway thought that the sails on my sailboat would be great is the sails themself could also collect solar panel. Just think of all that area. My jib and mainsail are almost 800sf. With that much area, the collection does not need to be very efficient.
When we sail, we have to protect ourselves from the sun much more than usual. The reflect sunlight for the sails and water causes us to be bombarded with about 250% of solar energy as compared to walking in the sun on land.
The roof top shakers are gone, ready for the 24” Jensen 12vdc flat tv’s waiting in my garage.

I can use the old ac wiring for the 12v dc feed so I don’t have to snake new lines above the overhead.

The ceiling looks higher, doesn’t it.
I could probably remove those front to back aluminum members that served to support the opening so I can fit the entire tv up in the recess to gave the new cypress panel nearly flush to the overhead.
I can use the old ac wiring for the 12v dc feed so I don’t have to snake new lines above the overhead.
The ceiling looks higher, doesn’t it.
I could probably remove those front to back aluminum members that served to support the opening so I can fit the entire tv up in the recess to gave the new cypress panel nearly flush to the overhead.
Last edited:
Sailor, I grew up in Bergen County, but lived un Sussex county till 2019 when I moved to Virginia. I installed all the LEDs for World Trade Center (Oculus, including the RGBW lighting) as well as Lincoln and Holland Tunnels, National Zoo and largest rooftop solar array in North America (2017) in Budd Lake, Toys r Us. 20 acres of solar on a roof! Recently I installed the EV bus charging at Newark Airport (ChargePoint CPE-250) and currently starting a Class 8 truck charging station at Port Newark.Now there is no generator on the coach and lpg is limited to hot water generation and cooktop, a fuel cell would be a good option. However, it is not yet commercially available. I think that once the installed solar collection system and generous battery capacity are tested, a fuel cell amy to be needed.
By the way, 2 months ago, Lithionics was purchased by Winnebago, so there is now wide acceptance of how superior their batteries and accessories are.
Because of covid-19, a boatyard bakcruptcy and sale and my ill health, the installation of the 3 Lithionics LiPoe4 batteries were never totally installed. Lithionics has agreed to test and refurbish, if necessary after a 4 1/2 year hiatus. They asked me to measure the current voltage in the batteries which I have never charged or drawn power from. Lithionics requires that batteries in storage are required to be charged every 6 months. That was not done. It was astonishing that my multimeter measurements last week informed me that all three batteries appear to be 100% charged. It will be interesting to find out what Litthionics tells me after they test the batteries.
By the way, LIithioncs may be the only battery manufacturer who will refurbish their batteries for their customers, even though they are out of warranty as mine are.
Where are you in NJ? Have you been at Yogi Berra Stadium and/or Museum? I designed and built both.

