1976 Eleganza II

Nice, I have some (2) very large and strait oaks I dropped this year and was wishing I had one. Was going to offer them on Craigslist but will probably just cut and split.

It's amazing the amount of firewood you get out of a woodmizer even, lots of wood doesn't make it into the lumber. One of his hobbies is maple syrup though, so he burns all the waste slab wood in an evaporator.

If your oak was from near your house a saw mill might be wary of foreign objects in the wood ruining their blade.

Is it red oak or white oak?
Red and White, yep the mills are not interested due to quantity, they want a lot of trees to make it worth it.
 
no i did not i think it needs a new sensor panel is goofy gage on tank seems right. overwhelmed right now so it will have to wait thanks for your interest. larry
 
I just spent the last two full days changing out all the control arm bushings, uppers and lowers. What a job, I'm whooped.

The uppers, I could see the rubber was crumbing off the exposed parts. They weren't too bad but I pressed them out using my hydraulic press. Digging around the garage there was a perfect diameter sleeve to use as a spacer. It just needed a little removed with my lathe to make the length right, cut it in half to make two shells to wrap around the old bushing for pushing out. Further digging, a socket made a perfect tool to push the little end out, and a piece of exhaust tubing (trued up in the lathe) on the bottom and they came right out with no damage to the control arm.

20220726_125523.jpg

One offset bushing was installed with the arrow pointing away from the ball joint on the rearward leg of each control arm. Regular bushings were installed in the front one.

20220727_084110.webp

On both the upper and lowers, you can't press directly on the bushing b/c the arm itself is in the way, I had to push on a bar supported on blocks on one end, and reaching into the spot I wanted to push on the other end.

20220727_084117.webp

The lowers, they looked like the pins were no longer in the center before disassembly.... Boy was I right, once the control arms were out in the light of day, the lowers were obviously shot, the centers were almost touching the outside!

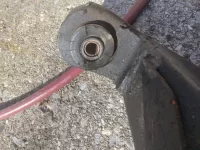
20220727_105626.jpg 20220726_175510.jpg

To get those out, I had to attack the rubber with a 3/8 drill bit and once most was gone the rubber and center fell out. Notice the white paint on the torsion spring socket, before disassembly I cleaned up spots on the spring and the arm and put white paint on them to aid in getting them assembled correctly.
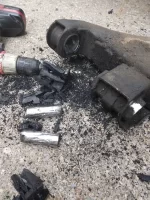
20220727_110747.jpg

Crude but effective.

Then I sliced the old bushing shell with an angle grinder a few times at the tip of the arm, not touching the control arm, then bent the shells inward with a chisel to collapse it, making it smaller so it would slip out.

20220727_111412.jpg

To press in the new ones, I found that exhaust tubing scraps fit perfect around the rubber to push on the tiny lip they give you for pressing. Using the lathe, I turned one slice about 1/2" tall for the top, and another slice about 3/4" tall for the bottom. The bottom support needed a little bit ground off to bridge the area between the hole and the stiffening bend in the control arm. I made a spacer from the tubing as well to prevent the control arm from crushing.

Day 1 I got one side apart, made the tools needed for pressing, pressed the 4 bushings in and reassembled the driver's side.

Day 2, I pulled the passenger side apart, rebuilt the control arms, got it back together, reinstalled the torsion springs (what a PITA) and did an alignment. Set the toe using strings on 5 gallon buckets at each corner, 101 inches apart, ~5 inches off the rear most tires, 8" off the center hub of the front wheels so it gave me 2 parallel lines to measure off. (This is just for me to reference later if I ever want to check the toe.) Got the toe set right at 0" Then used a caster/camber gauge to set the caster at -0.25* and caster at 3.75*. To make it easy on my tires and steering, I set the front tires on some scrap pieces of sheet metal. Two on each side with a glob of grease between the two. Made turning the wheel really easy.

Hopefully the handling will be a bit better, it wasn't bad before but it did have a 'tail wagging the dog' feeling with lane changes / winding roads. Seemed like if you made a turn, the front would dig in and the rear would rotate around and it would end up turning more than intended. And it didn't have the caster it needed, wouldn't track / return to center on its own if you took hands off the wheel. Hopefully this will help fix those driving problems.
 
Last edited:
  • Like
Reactions: pvfjr
Please report back, that sounds like my coach.
I have offsets in both holes of the upper and can still only get 3 degrees caster.
The tail wagging the dog issue I had assumed was rear bushings, hopefully it's lower A arm bushings like you said
 
Any play upstream from the steering box makes a big difference. I replaced my with a Borgeson link which worked fine - but later I took it apart and somehow lost the small leaf spring that holds the D shafts tight. Didn't notice it until the next drive which was a rally about 300mi away. It wandered quite a bit on the way there, so I started to look at 'the last thing I touched' and (didn''t) find the missing spring. I called around and found a hot rod shop familiar with Borgeson parts and they said to bring it to them - they didn't have the Borgeson spring but they said they sometime used a Ford brake part and probably had one around in a drawer somewhere. So I did, and they did, and I was back on the road in 20 minutes - no charge! Still works fine.
 
I just spent the last two full days changing out all the control arm bushings, uppers and lowers. What a job, I'm whooped.

The uppers, I could see the rubber was crumbing off the exposed parts. They weren't too bad but I pressed them out using my hydraulic press. Digging around the garage there was a perfect diameter sleeve to use as a spacer. It just needed a little removed with my lathe to make the length right, cut it in half to make two shells to wrap around the old bushing for pushing out. Further digging, a socket made a perfect tool to push the little end out, and another piece of something big enough to catch it out the bottom and they came right out with no damage to the control arm. One offset bushing was installed with the arrow pointing away from the ball joint on the rearward leg of each control arm. Regular bushings were installed in the front one.

The lowers, they looked like the pins were no longer in the center before disassembly.... Boy was I right, once the control arms were out in the light of day, the lowers were obviously shot, the centers were almost touching the outside! To get those out, I had to attack the rubber with a 3/8 drill bit and once most was gone the rubber and center fell out. Then I sliced the old bushing shell with an angle grinder a few times at the tip of the arm, not touching the control arm, then bent the shells inward with a chisel to collapse it, making it smaller so it would slip out. To press in the new ones, I found that exhaust tubing scraps fit perfect around the rubber to push on the tiny lip they give you for pressing. Using the lathe, I turned one slice about 1/2" tall for the top, and another slice about 3/4" tall for the bottom. The bottom support needed a little bit ground off to bridge the area between the hole and the stiffening bend in the control arm. I made a spacer from the tubing as well to prevent the control arm from crushing.

Day 1 I got one side apart, made the tools needed for pressing, pressed the 4 bushings in and reassembled the driver's side.

Day 2, I pulled the passenger side apart, rebuilt the control arms, got it back together, reinstalled the torsion springs (what a PITA) and did an alignment. Set the toe using strings on 5 gallon buckets at each corner, 101 inches apart, ~5 inches off the rear most tires, 8" off the center hub of the front wheels so it gave me 2 parallel lines to measure off. (This is just for me to reference later if I ever want to check the toe.) Got the toe set right at 0" Then used a caster/camber gauge to set the caster at -0.25* and caster at 3.75*. To make it easy on my tires and steering, I set the front tires on some scrap pieces of sheet metal. Two on each side with a glob of grease between the two. Made turning the wheel really easy.

Hopefully the handling will be a bit better, it wasn't bad before but it did have a 'tail wagging the dog' feeling with lane changes / winding roads. Seemed like if you made a turn, the front would dig in and the rear would rotate around and it would end up turning more than intended. And it didn't have the caster it needed, wouldn't track / return to center on its own if you took hands off the wheel. Hopefully this will help fix those driving problems.
Nicely done! I'll probably have to tackle this as well this winter--I just notices the crumbly bits on my lowers this week. I don't have a lathe, so hopefully I'll be able to find some random things laying around that are already "just right".
 
Please report back, that sounds like my coach.
I have offsets in both holes of the upper and can still only get 3 degrees caster.
The tail wagging the dog issue I had assumed was rear bushings, hopefully it's lower A arm bushings like you said

I _think_ it drives better. But I'm still not happy, will have to check the rear alignment next.

I added photos to the post above to show how the bushings are pressed out and in without crushing the arms.
 
Did you ever get the propane level indicator to work right?

Hi Billy,

Not sure if I answered you but, yes, it turned out to be the ground wire at the tank. It was sandwiched under the base of the tank against the plywood (from factory?) and that had long since deteriorated. I drilled a hole in the base of the tank, ground the metal clean, crimped on a new connector and bolted it to the tank, and sprayed it with battery terminal protector. It' s that red waxy stuff. Now it works!
 
  • Like
Reactions: bdub
Just to keep notes, I recently swapped out all the shocks for KYB purchased at the Lebanon rally last fall. Found one shock hanging loose and its mate was totally shot, offering no resistance to movement on the passenger side. This explains the awful resonating vibrations while hitting potholes, they were literally resonating, bouncing up and down, springing against each other on the passenger side with zero dampening from the shocks. At certain speeds, this resonance was _almost_ self sustaining, it would taper off over several seconds. Might explain why I kept loosing hubcaps on one of those wheels. The KYBs were physically smaller and went in place easily. I'm looking forward to the legendary GMC smooth ride!

I also removed the arms and links for the leveling valves. They weren't working anyway and the fiberglass they were mounted to was getting all busted up. I'll manually level the coach for travel with a measuring stick.

While the wheels were off, I greased the heck out of the boogie arms with the arms hanging under their own weight. Also pumped grease while pulling them out and pushing them in. Went through a half tube on each side. Grease came out both ends of the bushing. Arms have very little play, in fact I couldn't detect any movement, which made me extremely happy. I would have had to set up a dial indicator to measure the movement.

Didn't repack grease in the rear wheel bearings b/c that was done last year with a bearing packer tool.

Swapped out the steering relay arm for a Lenzi rebuilt unit, purchased from another guy on this site that has got out of his GMC and he had this relay arm on the shelf.

Greased the front end steering and ball joints, not the bearings. "Gonzo" doesn't have zerked front wheel bearings, yet.

I swapped out the steering shaft for a Borgeson kit. With the old shaft out, I could definitely feel some 'catches' in the CV part of the shaft. Looking down into the joint from the top, I could see the balls, so any bit of sand that found its way in there was going to cause a problem.

While in the front left wheelwell, I pulled down my Rostra cruise control unit, opened the window and set the 1+2 dipswitches to OFF at the recommendation of Wally. Hoping for less 'charging' up hills, it would actually overshoot going uphill, and undershoot after coming off a hill, basically the opposite of what I would have liked. I'm hoping this will be a little less aggressive on the uphills for mpg sake.

Repaired the air bag system with a short piece of 1/4" poly tubing and white plastic Sharkbite fittings.

Replaced the broken windshield washer switch with a vintage push button switch I've had kicking around for about 20 years. It's just a nice old momentary switch someone had used for a project and cut the leads off about 1" long. I crimped, soldered and shrink wrapped a pair of 1/4" spade connectors and it was a perfect fit for the old busted toggle switch. (it's so satisfying to take something out of my garage and actually use it! usually I run to the hardware store, buy the thing I need, then discover I already had one but just couldn't find it bc my garage is a disaster) Such a small job but so satisfying. Sometimes it's the small victories that make you happy!

On the +12 of that switch I added a lead for 12V power to a gauge set that's being added under the dash near the left knee of the driver. Also brought down a lead for dashboard lights 0-12V, brown wire behind the dash, for the gauges to have light.

The 3 gauge cluster is for an AEM O2 sensor wide band air to fuel meter to start. Finally getting around to installing it and am interested in seeing what the Quadrajet is doing while cruising on the highway :)

I might fill one of the other holes with a USB charger / voltage readout gauge, and ultimately I'd like tranny temperature on the 3rd hole.

Cheers!
 
Last edited:
  • Like
Reactions: dsmithy and bdub
Someone was asking about the gas sending unit mod, this was my FB post back in August 2019:

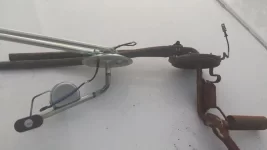
Well I got the rust out of the tanks for the most part and am getting ready to put them back in. Changed out all the lines, but needed two sending units. Vendors have them but they are $200. This is from a 76 toronado, $50 from rockauto, bent the pickup line and float arm to give it about 4-3/4" depth which puts it at the tank bottom. In case anyone is looking for a commonly available inexpensive option for a sending unit. Takes 10 minutes to modify with a tubing bender and MAPP gas torch. And an angle grinder to take off the indexing ears. Second photo is as arrived out of the box.

gas sending unit mod 2.webp

gas sending unit mod.webp
 
  • Like
Reactions: N2hcky
Starting to put it back together on the inside, excuse the mess but there's the new captains chairs in Ultraleather (genuine hyde of the naugabeast) in Chocolate. And there's new indoor outdoor carpet in the cockpit. Underneath is sound deadening.

Sheet vinyl on the lower floor after I wood puttied and sanded the whole thing. Reflectix insulation on the walls just like the ceiling.

I'll be starting the wall panels soon using plastic cardboard and a light tan colored hull liner from SailRite.

Furniture has been reupholstered and is sitting inside my outbuilding currently, they are a deep brown color, extremely tough(very high rub count specification) and stain _proof_ cloth but it's very soft at the same time.

So overall nothing radical, just trying not to screw it up by keeping the colors complimentary as much as possible.

View attachment 2681


I also am upgrading my 1976 GMC Eleganza II and you can see what I am doing on my thread, “Converting to LiFePO4 batteries and Sailor Man’s LiPO$ Build”
 
  • Like
Reactions: tmsnyder
We took a little trip this weekend, it was quite windy and I _think_ the handling was better with the new-ish relay arm and new Borgeson steering shaft. New shocks definitely helped.

Time for new front calipers and pads and rubber hoses have been ordered. I had one caliper hang up and absolutely cooked one side, got very hot and smelly. Luckily the rotor seems fine.

I think I'll do the master cylinder while I'm at it. It's looking pretty old and crusty. I did the rear brakes last summer.
 
Replaced the broken windshield washer switch with a vintage push button switch I've had kicking around for about 20 years. It's just a nice old momentary switch someone had used for a project and cut the leads off about 1" long. I crimped, soldered and shrink wrapped a pair of 1/4" spade connectors and it was a perfect fit for the old busted toggle switch. (it's so satisfying to take something out of my garage and actually use it! usually I run to the hardware store, buy the thing I need, then discover I already had one but just couldn't find it bc my garage is a disaster) Such a small job but so satisfying. Sometimes it's the small victories that make you happy!

I just tried to figure out why the washer wasn't working in mine...and the switch is busted in two pieces. What are the popular options here? Switches at NAPA weren't inspiring.