The original Onan carburetor has me stumped. I'm throwing in the towel. I think fuel is getting past the needle and seat. I've rebuilt it 2x, kits are about $20 each, so I've got about $50 in the rebuilds and $60 in a new low pressure fuel pump. Fresh rebuilt carb from the vendor is $200 plus $200 core charge, I'm not quite willing to go there $-wise.
I throw in the towel on the old carb. It's got me beat. It's in a box on a shelf just in case.
On ebay I notice there are Walbro LMB carb knockoff's for $15. No joke. $15 to my door. It arrived quickly, just a few days vs the 2 weeks I waited for a rebuild kit from a small engine parts house.
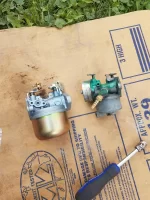
First impressions: The knockoff is a little bit bigger. Bigger bowl, bigger throat, longer end to end. Hmmm, first test; will it fit on the intake manifold studs?
The studs on the intake manifold fit perfect. It's exactly the same. The holes were so tight on the studs, in fact, I actually opened them up a little with a drill. I had the carb on and off several times during the process and opening them up made it a lot easier.
The fuel hookup is on the opposite side. Ok, no big deal, it can be tightened down in any direction so it went in a direction pointing towards the fuel filter.
The throttle shaft is bigger diameter and longer. Bummer. Was hoping that it could be swapped out for the old shaft but no luck. On the new carb there was a 90 deg bend in the throttle linkage. It was in the way so it was cut off where the red circled area is in this photo:

There was also a return spring on the shaft which was removed. Then a small bit of linkage was fabricated in order to pick up the governor link. Measured carefully and attempted to get the link hole in the same exact spot relative to the shaft. Old carb is farther away from the camera in this photo so it looks a little out of perspective but you get the idea. The throttle shaft nut and an unused hole were used for a screw and nut to attach. Distance and angle to the hole is as close as I could get it.

The collar to connect to air filter has a completely different screw center to center distance, and different screw size. And no room to drill and tap another pair of holes. So a small adapter made from 1/4" aluminum plate to be able to connect the collar.

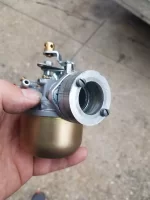
This made the whole carb assembly even longer, but everything still seems to hook up ok inside the generator compartment.
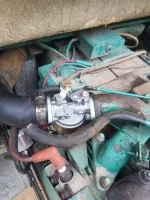
CHOKE:
I wish the automatic choke worked but it doesn't. On mine it wasn't working when I bought it. The actuator is kaput. On the new carb the choke is on a return spring so it's held open all the time. It is not connected but it's also not hurting anything. Still works manually. From stone cold it will start even without the choke (at 70F air temp) after several attempts, just like the old one did. Starts a lot easier with the choke, I'll add that to the to-do list.
First adjustment was to make the governor linkage drop into the carb linkage with engine off and carb held at WOT.
Then with the governor arm spring on the middle hole I started it up and adjusted the rpm to give 63 hz and let it warm up a few minutes. Then applied a load.
After loading it with a hair dryer, toaster, space heater, roof a/c and the water heater it pulled the speed too low, 55hz and 110v. No good.
Tried the next closer hole to the governor arm pivot and it was much better. No load I set it at 63hz and 130V. With one thing on, roof a/c or water heater, it drops to ~61hz and 125V (perfect imo) and with full load it was 57hz and 115V. I could probably go to the next closer hole on the governor arm for tighter control on the hz and V but I'm pretty happy. I'll never run with all that amperage. Water heater plus A/C is probably all it'll ever see and with those two on it's right at 60hz and 120v.
Time will tell how it holds up but at the moment it seems to run great, doesn't smell terribly bad like unburned fuel, doesn't surge excessively when a load is applied.
Just what I did....

