1975 GMC Glenbrook
- Thread starter pvfjr
- Start date
You are using an out of date browser. It may not display this or other websites correctly.
You should upgrade or use an alternative browser.
You should upgrade or use an alternative browser.

In the back room, I started trying to figure out the uneven subfloor situation so I could finish off the flooring. It seems they tore (not cut) out the subfloor, added a couple layers of EPS foam insulation, then tossed a 1/2" plywood board on top (unattached).
AKA "restored" by kids raised on HGTV house flipping shows
Personal items left by the previous owner after the crash imply there both older folks and a baby in this thing. Hard to tell what went on exactly. No shortage of hack jobs, that's for sure.AKA "restored" by kids raised on HGTV house flipping shows
That makes sense, the one size the hardware store doesn't sell. I'll probably make due with some 23/32. Thanks.The plywood in a 1975-78 is 3/4"
Wow, I can't believe I haven't updated since June. Life has been crazy. Our 93 year old neighbor got hit and killed by a car in front of our house several months back. They owned the 18 acre farm responsible for our wonderful sunset views, and it's been sold to a developer! The city will be annexing our property into their limits, and Aumsville has the longest list of unpalatable ordinances I've ever seen. We're outta here. The house sold in 2 days, and we're buying a new place that was nearly swallowed up in the Oregon wildfires, but is somehow still standing.
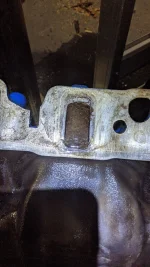
All that said, I had been waiting for a friend to finish his aluminum foundry so I could fill my intake. He dragged his feet all summer, but it recently became imperative to move the GMC right away so we could prepare our house for showings. I guess an old, faceless RV doesn't do wonders for property values. Luckily I found a local foundry to preheat the intake, fill the crossover port, and machine it flat-ish again. I reassembled with low confidence in the cork ends of the Mr Gasket 404 intake gasket. It was the only thing I could get on short notice, so I plan on redoing it with Patterson gaskets at some point. At least the crossover is taken care of, and I worry less about the small intake crack now.
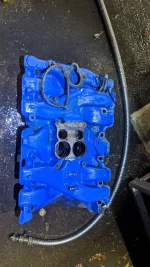
I eliminated all the stupid carb adapters and spacers that went with the Edelbrock, and installed the Quadrajet that I found in a box in the back. After fooling around with a 180-out distributor for a while, I finally got that ironed out and started it up. It was so quiet and smooth that it almost seemed like something was wrong! Runs way better than the Edelbrock did. I drove it 16 miles to store it on a friend's farm for now.
I plugged a lot of vacuum ports and lines. It was a hot mess to begin with. I'm starting with just the basics for now, and will try to find a vacuum diagram for the rest later on.
All that said, I had been waiting for a friend to finish his aluminum foundry so I could fill my intake. He dragged his feet all summer, but it recently became imperative to move the GMC right away so we could prepare our house for showings. I guess an old, faceless RV doesn't do wonders for property values. Luckily I found a local foundry to preheat the intake, fill the crossover port, and machine it flat-ish again. I reassembled with low confidence in the cork ends of the Mr Gasket 404 intake gasket. It was the only thing I could get on short notice, so I plan on redoing it with Patterson gaskets at some point. At least the crossover is taken care of, and I worry less about the small intake crack now.
I eliminated all the stupid carb adapters and spacers that went with the Edelbrock, and installed the Quadrajet that I found in a box in the back. After fooling around with a 180-out distributor for a while, I finally got that ironed out and started it up. It was so quiet and smooth that it almost seemed like something was wrong! Runs way better than the Edelbrock did. I drove it 16 miles to store it on a friend's farm for now.
I plugged a lot of vacuum ports and lines. It was a hot mess to begin with. I'm starting with just the basics for now, and will try to find a vacuum diagram for the rest later on.
Attachments
Last edited:
I also forgot to mention, we sold our 1993 Motorhome to a couple that lost their home in the fires. We gave them a great deal on it, and it saved me from having to prep it for sale. They're going to live in it while they rebuild. And as it turns out, we might be neighbors soon.
So, once we move, it'll be do-or-die for the GMC. It won't have to be fancy, but I need it functional for our next camping season. As my wife and I like to remind ourselves and each other: it can be a very long ways from perfect and still be far better than a tent!
I also bought a couple boats this summer, though I'll only be keeping one. Another great distraction to keepus me busy.
So, once we move, it'll be do-or-die for the GMC. It won't have to be fancy, but I need it functional for our next camping season. As my wife and I like to remind ourselves and each other: it can be a very long ways from perfect and still be far better than a tent!
I also bought a couple boats this summer, though I'll only be keeping one. Another great distraction to keep
Well, we've moved, did the holidays in the new house, and I got a slab poured in my new shop. I'll be retrieving our GMC from our friend's house soon, and try to get it going for the spring.
The best news is, I got in touch with DJ in Sheridan, OR and he was parting out one of his many coaches. He had a driver's windshield in good shape that I got a reasonable deal on, which will replace my current busted/spidered one. It looks like an aftermarket replacement, and has no fogging.
Unfortunately, the passenger side had small bubbles in the lamination. While it may have been an upgrade from my current foggy one, he wanted more than I'd pay for flawed glass. I haven't decided if I'm going to drive down to Coburg, OR and fork out $600 for one of the new ones.
I am going to need a new gasket I think. We'll see. I hadn't realized it was a single gasket all the way across. I kinda assumed it would be two. We just cut the gasket on the parts coach so we could remove the glass without stressing it. It was kind of a shame, since it seemed supple still. The gasket on my coach is probably original, so I have less confidence that it can be saved, even if I'm sacrificing the glass upon removal.
Where's the best place for a new gasket? Applied has them for $338, but I'm wondering if there are other options.
Applied. Sirum? Cinnebar. Worth calling them all.
i have not dealt with windshields yet..... but from what I have seen at a couple conventions and those that i know replaced windshield. Rarely does the gasket not get re-used.
i have not dealt with windshields yet..... but from what I have seen at a couple conventions and those that i know replaced windshield. Rarely does the gasket not get re-used.
It sounds like you're right. I was bummed that I had to cut up the "newer" gasket on the parts coach, but it was a cold day and I wanted to ensure we didn't risk the glass. After doing some reading from Jim Bounds on the topic, perhaps my old gasket will be just fine. He did say the lock strips tend to break down, but I was able to rescue the new lock strips from the parts coach. Fingers crossed I won't have to fork out hundreds for that chunk of rubber.Applied. Sirum? Cinnebar. Worth calling them all.
i have not dealt with windshields yet..... but from what I have seen at a couple conventions and those that i know replaced windshield. Rarely does the gasket not get re-used.
http://www.gmccoop.com/gmc-motorhome-windshields-2/
So, when you do replace your windshields, do a couple of things. Once the windshield is out, that is the best time to get at the screws that hold the dash board in place. You never know when you or next owner might need to loosen or take the dash out, and with the dash in place, those screws are a SOB to get at and if rusted in place are nearly impossible to remove. So take the time to pull those screws out, clean them up, put a little white lube or anti seize on the screws and just snug them down. Don't make them real tight. Maybe replace them with new SS screws. You will thank yourself for that. Second, take the time to seal the edges of the windshield with some kind of sealer. The reason these windshields fog on the edges is that moisture gets in there over time. Seal it and you will extend the anti-fog life of the windshield. I failed to do these two things back in 2005 when I replaced both windshields. Wish I knew then what I know now. So....now YOU know it!
That's a good reminder about the screws. I'll probably leave the windshields out for a while so I can do a number of things under the dash. This will feel like a real privilege now that my coach will actually fit inside the new shop to stay dry. I may stretch new vinyl, rehab the HVAC, etc. I think I'll just go with zinc plated steel though, as stainless may be corrosion resistant, but is pretty prone to galling/seizing/snapping. A good anti-seize lube will be a good measure.So, when you do replace your windshields, do a couple of things. Once the windshield is out, that is the best time to get at the screws that hold the dash board in place. You never know when you or next owner might need to loosen or take the dash out, and with the dash in place, those screws are a SOB to get at and if rusted in place are nearly impossible to remove. So take the time to pull those screws out, clean them up, put a little white lube or anti seize on the screws and just snug them down. Don't make them real tight. Maybe replace them with new SS screws. You will thank yourself for that. Second, take the time to seal the edges of the windshield with some kind of sealer. The reason these windshields fog on the edges is that moisture gets in there over time. Seal it and you will extend the anti-fog life of the windshield. I failed to do these two things back in 2005 when I replaced both windshields. Wish I knew then what I know now. So....now YOU know it!
I've been contemplating sealing the new glass, but haven't seen a good consensus on what to use. Does anyone have any good data or non-anecdotal recommendations from experts? It's hard to know with something that has such a long waiting period between the cause and effect.
Well some quick research suggests polysulfide sealants do well to block moisture. First one I'm finding is 3M AC-251. Pricey stuff, but might be worth it in 20 years.
I finally went out to my friend's farm and picked up the motorhome. It was sunken into the field a bit, but the frame was still high and dry by a small margin. It took some rocking to get it out of it's ruts, and it was able to back up just fine until the bald front tires (from the PO's 3" of toe-in) hit the ruts where the rear tires were resting.


It took a John Deere to get me the rest of the way out of the field.

The winter was just a bit rough on the old girl though. My peeling clear coat allows water to get trapped under the surface, and when held in place, seems to diffuse through the previous layers of base coat. Little pockets are forming under the surface which makes it looks similar to rust bubbles on a steel-bodied car. It happens both in aluminum and fiberglass regions of the coach. This means a greater deal of sanding in my future, as I'll probably have to strip it 100% to get it smooth again. Swell.
The drive home up into the foothills was interesting. My distributor kept advancing itself, and eventually I'd lose so much power I couldn't really continue. I tried getting by with quick hand adjustments, and it would run great for a while, but then it would be back to pinging and backfiring in no time. Being without tools, I eventually had to stop and see what I could accomplish with my SOG. Fortunately I was just barely able to tighten the distributor clamp sufficiently and the remainder of the trip was much better.
On long hills, however, it will get to bogging down and backfiring still. It almost seems like the secondaries are way too lean, or perhaps the fuel pump isn't keeping up. That'll require some more investigation. These are the first good hills I've tried to pull with the Quadrajet I discovered in a box, so I'm kinda starting over from scratch with the tuning of this beast.
At least she's home safe and sound. The wife is excited to get working on it again, though I'm still getting the new home and property squared away. The shop finally has a slab inside it, and I'm still waiting for my car lift to be delivered. It's hard not having one, after getting used to it.

It took a John Deere to get me the rest of the way out of the field.
The winter was just a bit rough on the old girl though. My peeling clear coat allows water to get trapped under the surface, and when held in place, seems to diffuse through the previous layers of base coat. Little pockets are forming under the surface which makes it looks similar to rust bubbles on a steel-bodied car. It happens both in aluminum and fiberglass regions of the coach. This means a greater deal of sanding in my future, as I'll probably have to strip it 100% to get it smooth again. Swell.
The drive home up into the foothills was interesting. My distributor kept advancing itself, and eventually I'd lose so much power I couldn't really continue. I tried getting by with quick hand adjustments, and it would run great for a while, but then it would be back to pinging and backfiring in no time. Being without tools, I eventually had to stop and see what I could accomplish with my SOG. Fortunately I was just barely able to tighten the distributor clamp sufficiently and the remainder of the trip was much better.
On long hills, however, it will get to bogging down and backfiring still. It almost seems like the secondaries are way too lean, or perhaps the fuel pump isn't keeping up. That'll require some more investigation. These are the first good hills I've tried to pull with the Quadrajet I discovered in a box, so I'm kinda starting over from scratch with the tuning of this beast.
At least she's home safe and sound. The wife is excited to get working on it again, though I'm still getting the new home and property squared away. The shop finally has a slab inside it, and I'm still waiting for my car lift to be delivered. It's hard not having one, after getting used to it.
Last edited:
Well, the wife's trip to VA to see her brothers on Mother's Day weekend has been abruptly canceled. She's made a formal request that we use the GMC somewhere that weekend instead. I have a month. I shall make a feeble attempt (at the very least) to throw a front end on this thing before then. Bear in mind, the davo and Dinette are out. The flooring only goes rearward to about the bathroom, the RV is stuffed with junk, the intake leaks oil, ignition timing is anyone's guess, gas and water systems are untested, etc. Never mind the fact that my shop has ONE electrical outlet.
So for the upcoming trip, the key to happiness will be low expectations! The bar for expected level of comfort is being set just one notch higher than tent camping. We have some cabinets, and some nice cushy seats that don't fold up on you. Elevated, dry sleeping quarters where cots can be laid out for the children. What's not to like?
I did swap some new tires onto the front. Some Federals from SimpleTire.com. I enjoyed the purchase experience, FWIW. These were to replace the chewed up front tires for the 3" toe-in I corrected in Vegas. Those poor BFGs were never the same. I figure these can last me until I wear out or age out the other tires. Then I'll probably get a matching set of 6 in the 225/75R16 size. These 245s probably don't help on the hills.
While I had the wheels off, the wife researched our Alcoas. They're from 2001, and not part of any recall we could see.
I also discovered a loose tie-rod end! That certainly explained a lot. I pulled the cotter pin, and was able to tighten the nut with my fingers. I torqued it down good-n-proper and repinned it. Another mystery. Time will tell if it holds tight, or if the tapered hole is egged out a bit and continues to wear. Anyone know what taper these joints have? Maybe I'll get the link reamed lightly...
Attachments
Last edited:
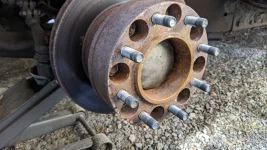
Also, I'm guessing this a factory wheel spacer? I don't think I dig that idea, but the bearings feel great and the brakes look good. I don't usually like wheel spacers, but if it's normal I guess I won't worry about it.
No, the wheel spacer is not a factory item. Probably put on by some PO. I put a set on my coach back in 2005 and have some 70K miles on wheel bearings that I installed in 2005. Only took the bearings apart once since for the original 25K check and regrease, At that time I drilled and installed the zirk for greasing. Now before every big trip, using the proper procedure, I take a grease gun to them. No issues. Some have put the spacers on to get the front in line with the rear. Many say that it puts undue stress on already stressed bearings. My main objective...admittedly...was to put the wheels out another 2" to make it look better. It did just that...looks better to me. I don't think that any harm is being done to the bearings, but think it is important to grease those bearings at a mimimun every 25K miles and can be best done by doing the zirk thing. Problem with taking the bearings out every 25K miles is that taking the bearing races out damages the knuckle bore a little each time. pretty soon the bore is large enough in diameter that the races can spin in the bore leading to failure. Putting the zirk in allows you to simply loosen the axle nut, slide the axle in about 1" and grease the bearing with a grease gun. No more damaging the knuckles on disassembly, and MUCH quicker....easier. JWID
Well, the wife's trip to VA to see her brothers on Mother's Day weekend has been abruptly canceled. She's made a formal request that we use the GMC somewhere that weekend instead. I have a month. I shall make a feeble attempt (at the very least) to throw a front end on this thing before then. Bear in mind, the davo and Dinette are out. The flooring only goes rearward to about the bathroom, the RV is stuffed with junk, the intake leaks oil, ignition timing is anyone's guess, gas and water systems are untested, etc. Never mind the fact that my shop has ONE electrical outlet.
So for the upcoming trip, the key to happiness will be low expectations! The bar for expected level of comfort is being set just one notch higher than tent camping. We have some cabinets, and some nice cushy seats that don't fold up on you. Elevated, dry sleeping quarters where cots can be laid out for the children. What's not to like?
I did swap some new tires onto the front. Some Federals from SimpleTire.com. I enjoyed the purchase experience, FWIW. These were to replace the chewed up front tires for the 3" toe-in I corrected in Vegas. Those poor BFGs were never the same. I figure these can last me until I wear out or age out the other tires. Then I'll probably get a matching set of 6 in the 225/75R16 size. These 245s probably don't help on the hills.
While I had the wheels off, the wife researched our Alcoas. They're from 2001, and not part of any recall we could see.
I also discovered a loose tie-rod end! That certainly explained a lot. I pulled the cotter pin, and was able to tighten the nut with my fingers. I torqued it down good-n-proper and repinned it. Another mystery. Time will tell if it holds tight, or if the tapered hole is egged out a bit and continues to wear. Anyone know what taper these joints have? Maybe I'll get the link reamed lightly...View attachment 4090
The paint looks great! I think you are in the right track, flat dry beds, a place to potty, a place to be out of the rain.
Thanks, there are some camera angles that don't make this thing look terrible on the lower half. unfortunately, all the clear is peeling on the upper half. It looks like they used a clear coat that was chemically incompatible with the base. It's like peeling a bad sunburn.The paint looks great! I think you are in the right track, flat dry beds, a place to potty, a place to be out of the rain.
The worst part is, the peeling clear coat creates pockets and folds where rainwater is held against the base. It seems like the rainwater soaked through the base and the original Imron, creating these weird water pustules. I'm hoping it hasn't affected the SMC fiberglass or gelcoat, if applicable. I think I see the same affects whether on portions of aluminum skin or fiberglass, so hopefully it's just a paint issue. It wasn't there last fall, or when i picked it up in Arizona. I guess a full winter in the PNW was just too much moisture exposure. It's going to take a full sanding down to bare to ever look good again.

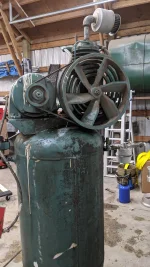
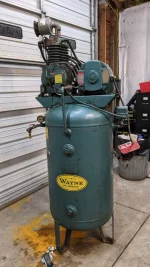
Last night I picked up a "new" tool that will be vital to fixing up the GMC. I have lots of DA sander and paint gun usage in my future, so I figured it's time to get a REAL compressor. I also picked up a blasting cabinet from TSC a couple weeks ago for 60% off. Now I might actually be able to pull it out of the box.
This thing is 54 years old, and weighs an absolute ton! I've moved a lot of compressors, but this one is really something else. I'm curious how thick the tank is. Anyway, I'm getting 16 cfm out of her. I've fixed a lot of leaks and need to replace the pop-off valve, then I'll be in business. I'm slowly running out of reasons to put off the fiberglass body work. Maybe soon...
Notice the Coke can for scale.
Attachments
I finished getting the compressor up and running. I also wired up the shop. Went from one outlet for the whole shop, to an outlet on every post (8 foot spacing). I also finished hanging all my lights, and did some rearranging. In the end, it was time to bring the motorhome inside for the first time!
Deconstruction has begun. I haven't destroyed the windshield seal yet. Fingers crossed...


Deconstruction has begun. I haven't destroyed the windshield seal yet. Fingers crossed...