1975 GMC Glenbrook
- Thread starter pvfjr
- Start date
You are using an out of date browser. It may not display this or other websites correctly.
You should upgrade or use an alternative browser.
You should upgrade or use an alternative browser.
Continued discussions surrounding realistic expectations.Aren't you headed out to camp in a few days? LOL What's the plan?

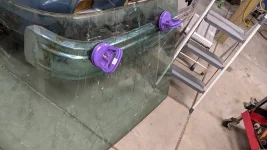
I do plan on swapping the front clip along with the necessary fiberglass work and stopping my steering leaks. I also want to inspect my timing chain and go through the ignition/timing system. Then I'll replace the windshields. The passenger side might just be too foggy to put back in. I can get a brand new one for $495. It's a tough pill for me to swallow, but I'm glad I live near enough to Coach Glass to forego the packing and shipping costs. I'll let fate decide tonight, and we'll see if I get the old one out without breaking it. My priority is the rubber seal, since it costs nearly as much as the glass! If I have to fork out hundreds, it'll be for the item with obvious benefit (i.e. no more fogged window).
I've decided to be happy whether or not I break the passenger side glass, and just go with it.
Last edited:
We've been delayed even further this week by some illness making the rounds, but we pulled the foggy windshield out. The wife was having trouble reading my mind while attempting to assist, so I kinda brute forced it once I felt the operation was going nowhere fast. Nailed it.
Attachments

Ha! I don't remember that line anymore, but hopefully I've learned the obscure lesson.I love these stories and am following! My favorite line so far is "Oh well, the next time I buy an antiquated and wrecked RV from Phoenix, I'll be sure to bring my rifle and hunting clothes. Lesson learned." Maybe later I can chime in one of my tidbits!

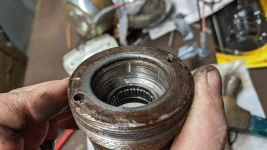
Well I've been tinkering a bit more. It was a good time to look at the leaky steering box. It turns out the pinch bolt and clamp on the input stub shaft was entirely loose! We pulled it off by hand. Add this to the tie rod end that was similarly loose, and I bet this thing will drive like a dream by comparison now. I consider myself fortunate it didn't come apart on me when I was getting it home.
I scribed the stub shaft adjuster plug/nut, and counted the turns removing it. Then I pressed out the old seals, and noticed the old seal didn't seem old at all. It was pliable, and with good lips. The bore it was pressed into, however, had two deep gouges in it--one small and one large. It seems someone went after it with a hardened punch. So it really wasn't the seal that was leaking, per se. I thought about replacing the nut, but then there goes my preload adjustment. So I did some sanding, cleaning, epoxy, and more sanding until I had a nice smooth bore with no gouges. Then I pressed the new seal into place with a very light coating of RTV. We'll see how it goes.
I've been testing all they vacuum actuators and reconnecting the lines according to the diagrams in the manual. My 3-position 2-port dual diaphragm actuator for the defrost control doesn't pass the test. One port holds vacuum, the other does not. Bummer. I see similar actuators available from Old Air for $70, but I'm not sure I want to pay that for such a part.
My dash controls are in sad shape too. There are plastic posts in the mechanism that no longer reside in their guide slots. The rotary valves never get actuated when you work the levers. I need to take the whole thing apart, and see if I can figure out why everything has been flexing out of plane and popping apart.
Attachments

Last edited:

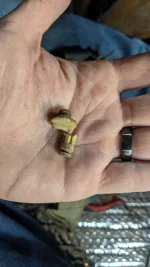
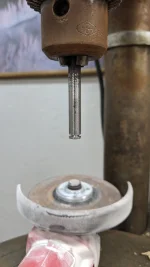
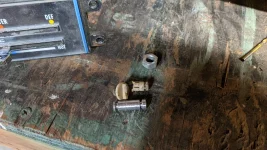
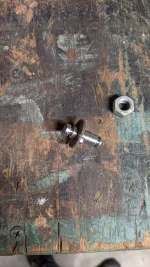
I figured out the heater controls. The central pivot point that pins the levers to the frame was busted. It's a two-piece plastic pin that clips together. I had to make a new one from steel. It isn't exactly like original, but works OK for now. The next time I'm in a yard I'll see if I can find the same part in an old GM product.
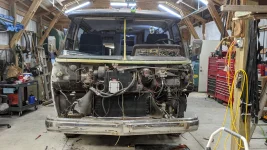
I also fetched the new front end from a friend's house. It had a nice coating of PNW patina from just one winter outside on my flatbed. It required some soapy steal wool to remove.
I still have to figure out how to rectify the defroster actuator issue. It is bolted to the defroster duct from the inside. I'm resistant to taking the entire dash out to swap it out, so I may try to think of another creative (lazy) solution.
Attachments
Last edited:
I figured out the heater controls. The central pivot point that pins the levers to the frame was busted. It's a two-piece plastic pin that clips together. I had to make a new one from steel. It isn't exactly like original, but works OK for now. The next time I'm in a yard I'll see if I can find the same part in an old GM product.
I think my brother is finding this same problem in his 76 Palm Beach, I'll show him your pictures! Nice solution! Way to improvise, adapt, overcome with the drill press 'lathe' and handheld 4" grinder!!
Last edited:
Thanks! I hope it can help. It may be an easy part to source, but I haven't had time to go to a junkyard, and don't have a great one near me that allows perusing. I think creating solutions out of junk laying around the shop is always satisfying anyway.I think my brother is finding this same problem in his 76 Palm Beach, I'll show him your pictures! Nice solution! Way to improvise, adapt, overcome with the drill press 'lathe'
It has probably been 7-8 years ago since I personally bought one. But I believe even a year or two ago. Sirum GMC has a metal replacement pin for the hvac. Don’t remember it being crazy expensive.
It has probably been 7-8 years ago since I personally bought one. But I believe even a year or two ago. Sirum GMC has a metal replacement pin for the hvac. Don’t remember it being crazy expensive.
So apparently they break pretty regularly?
Mine was broke.So apparently they break pretty regularly?
being old plastic, I am guessing lots are broke or about to break.
That would be great, unfortunately that's not something I've been able to find.It has probably been 7-8 years ago since I personally bought one. But I believe even a year or two ago. Sirum GMC has a metal replacement pin for the hvac. Don’t remember it being crazy expensive.
I am confused.
I just called Norma at Sirum. They still have the metal replacement hvac Pin. $10+ shipping.
I just called Norma at Sirum. They still have the metal replacement hvac Pin. $10+ shipping.
Thanks for checking on that. If mine fails to perform, I'll have to give them a call. I guess I'm more from the website generation than the phone call generation, and couldn't find any mention of that pin anywhere. That's not always the best approach with some of the companies in the GMC realm, especially when their websites leave much to be desired.I am confused.
I just called Norma at Sirum. They still have the metal replacement hvac Pin. $10+ shipping.
Paul.
I suggest that with the GMC suppliers you get more comfortable with calling. JimK, and Jeff have all they and their loyal and capable staff can manage to do just keeping up with the inventory. If you need it and they can find it, find it they will. Both of them also have lots of better than OE parts that they supply regularly. They don't like to fix things twice either.
Matt
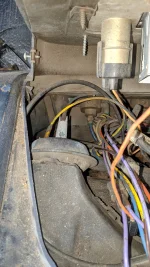
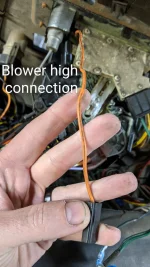
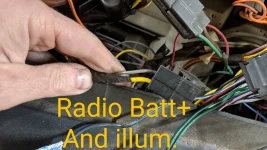
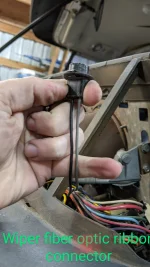
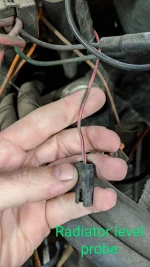
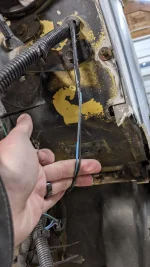
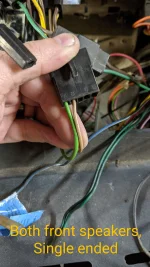
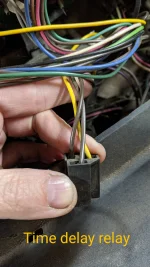
I've been tracking down all the mysteries. I took pics of dead end or modified wiring and consulted the manual, making notes on the pics. It helps when you take a 5 day break before coming back to it.
It seems I'm supposed to have a radiator fluid level sensor, but I don't think my radiator has a port for one. I might grab a float switch out of a junkyard reservoir and retrofit it to my universal overflow tank that the PO added.
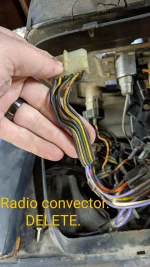
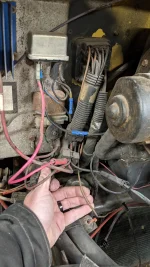
The "convector" harness was an interesting discovery. I didn't expect it to be factory, but I was wrong. It's certainly obsolete at this point.
It seems I'm supposed to have a radiator fluid level sensor, but I don't think my radiator has a port for one. I might grab a float switch out of a junkyard reservoir and retrofit it to my universal overflow tank that the PO added.
The "convector" harness was an interesting discovery. I didn't expect it to be factory, but I was wrong. It's certainly obsolete at this point.
Attachments
-
 PXL_20210425_022834879~2.webp847.3 KB · Views: 12
 -
 PXL_20210425_023032385~2.webp815.9 KB · Views: 13
 -
 PXL_20210425_023110161~2.webp882.2 KB · Views: 12
 -
 PXL_20210425_024020510~2.webp725.8 KB · Views: 11
 -
 PXL_20210425_023203350~2.webp872.5 KB · Views: 11
 -
 PXL_20210425_024501875.webp670.9 KB · Views: 11
 -
 PXL_20210425_024254991.webp889.3 KB · Views: 11
 -
 PXL_20210425_024313762.webp753.8 KB · Views: 11
 -
 PXL_20210425_023010886.MP~2.webp844.3 KB · Views: 11
 -
 PXL_20210425_022905502~2.webp926.8 KB · Views: 12