Ceiling cap over the cockpit

Billygoat

Active member
Jan 9, 2022
638
116
43
Kansas City Missouri
Went to the manual for how to drop the fiberglass ceiling cap and the disassemble instruction is pretty sparse.
Does the sunvisor nut spin loose independent from the sunvisor or are the two spin off together somehow? Trying to drop the cap to insert a wood piece at the draw curtain line behind the driver and passenger seats.
 
 
Oh boy, more fun with interior bolting and attachments.
 
Pay particular attention to Ken Henderson's post in that thread about removing the sun visor.

Have fun with it! I'm probably on your heels because the cracks in my inner cap are continuing to grow. 🤷🏻‍♂️
Ok, will do. Yep, in addition to fixing the cracks I’m going to provide a piece of wood to screw in the curtain track thats behind the seats.
 
If everything goes south , remember , Mike Sadlon fiberglass interior caps, I believe. Sor.\nRy , for any misspellings I am tired of fighting the autocorrect. You guys have a wonderful father's day. And if not , a father , simply have a wonderful day i'm gonna send healthy. Rich , I hope to see you in oklahoma.
 
  • Like
Reactions: Richard RV
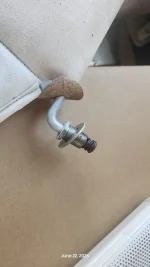
Not sure why the "One moment please". If one clicks, it's actually a link to the old GMC photosite and a picture of the visor nut. I fabbed a ceiling cap from a piece of FRP The vertical areas are trimmed with more FRP. So the visor nut was exposed. Normally the nut is covered with a PVC end cap which I removed for the pic. I also added a third screw to the visor mount.

If I ever get around to it... I'll install some rear view and side cams. Then mount the video screens on the vertical pieces of the ceiling cap.
 
Went to the manual for how to drop the fiberglass ceiling cap and the disassemble instruction is pretty sparse.
Does the sunvisor nut spin loose independent from the sunvisor or are the two spin off together somehow? Trying to drop the cap to insert a wood piece at the draw curtain line behind the driver and passenger seats.
Yes, they just unscrew.
 

Attachments

  • 20260622_094313.webp
    20260622_094313.webp
    1.1 MB · Views: 7
Not sure why the "One moment please". If one clicks, it's actually a link to the old GMC photosite and a picture of the visor nut. I fabbed a ceiling cap from a piece of FRP The vertical areas are trimmed with more FRP. So the visor nut was exposed. Normally the nut is covered with a PVC end cap which I removed for the pic. I also added a third screw to the visor mount.

If I ever get around to it... I'll install some rear view and side cams. Then mount the video screens on the vertical pieces of the ceiling cap.
Nice installation. 🫡

When I get a round tuit I think I'm going to cut the inner cap into 3 pieces to make easier to install and remove, run wiring, work in some overhead storage, etc.

My little projects always seem to turn into big ones... 🤔
 
  • Like
Reactions: GlenC
Nice installation. 🫡

When I get a round tuit I think I'm going to cut the inner cap into 3 pieces to make easier to install and remove, run wiring, work in some overhead storage, etc.

My little projects always seem to turn into big ones... 🤔
Thanks. The original had a sheet of foam rubber glued to it (ugh...) and at that time new replacements were not available. The FRP solution turned out better than expected and I'm quite happy with it.

Every project with this coach turns into a big one. I just replaced my door gasket with a door frame mounted gasket and by the time I got through cleaning up the old one and repainting the door frame it was a week later. Had to remove the door to do it right. (tip: the door is much easier to handle if you remove the window first) Installing the new gasket was the easy part and it definitely looks and works better. All I have to do now is fab some covers for the door hinge slots...

If you do cut your ceiling cap into 3 pieces... where would the cuts be? It is a PITA to remove the cap.
 
Rich ,

if you cut the center section out of your cap on the interior when you go to replace it you can install an overhead console with outside air temperature , time , sunglasses holder and lights. There are a couple options out of existing cars that have the overhead console and just need minor modification to do this.

This will make it easier to take the cap on and off.And also provide clearance and conduit for future electric wires.

Take care in stay cool,
Tom K.
 
  • Like
Reactions: Richard RV
Rich ,

if you cut the center section out of your cap on the interior when you go to replace it you can install an overhead console with outside air temperature , time , sunglasses holder and lights. There are a couple options out of existing cars that have the overhead console and just need minor modification to do this.

This will make it easier to take the cap on and off.And also provide clearance and conduit for future electric wires.

Take care in stay cool,
Tom K.
Exactly what I was thinking, Tom.

Instead of making fiberglass interior components that are identical to OEM, which were made in large pieces for speed of installation and not for servicing, breaking the bigger components up into two or three parts would make a lot of sense.

Breaking them up would allow easy removal and also cut down on shipping costs.
 
I think lining up the two seams with the roof vent would look the best, probably angle the seams narrower going back to provide more headroom entering the cockpit.


The guy literally just wrote: Every project with this coach turns into a big one.

And you want him to cut apart the end cap and modify to include parts from a modern car? Are you trying to kill the guy??

:)
 
Todd ,

My mistake , I thought he meant the headliner above the cockpit.

Everything I said pertains to the headliner, not the end cap on the exterior of the coach or the front cap on the exterior. My apologies if I was an error.

Take care and have a great day,
Tom K.
 
The guy literally just wrote: Every project with this coach turns into a big one.

And you want him to cut apart the end cap and modify to include parts from a modern car? Are you trying to kill the guy??

:)
Those lines you read between...? They did not mean what you think they mean. 😉

We've only been talking about the inner cap and that's what needs to be cut up, modified and embellished.

Has anyone here ordered an inner cap and had it shipped to them? Anyone here know of someone who had an inner cap shipped to them? The crating charge alone would be $$ and the total shipping $$$. A 3 piece inner cap would definitely sell and not just to locals.
 
Those lines you read between...? They did not mean what you think they mean. 😉

We've only been talking about the inner cap and that's what needs to be cut up, modified and embellished.

Has anyone here ordered an inner cap and had it shipped to them? Anyone here know of someone who had an inner cap shipped to them? The crating charge alone would be $$ and the total shipping $$$. A 3 piece inner cap would definitely sell and not just to locals.


Interior, yes. Looks like you all are snowballing his interior refresh project for him! With friends like you he doesn't need any enemys!
 
Interior, yes. Looks like you all are snowballing his interior refresh project for him! With friends like you he doesn't need any enemys!
Todd, these are my ideas about what I'd want to do with my inner cap. I believe they make sense and highly encourage someone to follow my lead ahead of me! 😉

Oh, BTW, I've been talking to your lovely missus about adding an extension on to your house - a very modest 1200SF. She's eager to have it done by this winter.
 
OK, not to hijack this thread, but now that you are talking about alternative solutions for the front interior cap, what about the rear? I have nothing original in the rear and a full fiberglass interior plus shipping to the PNW is prohibitive. Suggestions? Or, add them to my "Drinking the Koolaid" thread so as not to pollute this thread.

Thank you!