Went to the manual for how to drop the fiberglass ceiling cap and the disassemble instruction is pretty sparse.
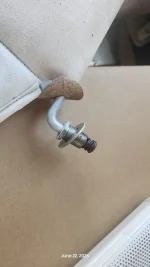
Does the sunvisor nut spin loose independent from the sunvisor or are the two spin off together somehow? Trying to drop the cap to insert a wood piece at the draw curtain line behind the driver and passenger seats.
Does the sunvisor nut spin loose independent from the sunvisor or are the two spin off together somehow? Trying to drop the cap to insert a wood piece at the draw curtain line behind the driver and passenger seats.