I am re-doing brakes and bearings, and was wondering how much grease should go in the rear hub bearings. Just grease the bearings with a bearing greaser, or do them and add a big blob inside the hub? Thnx.
Greasing rear wheels
- Thread starter nighthawking
- Start date
You are using an out of date browser. It may not display this or other websites correctly.
You should upgrade or use an alternative browser.
You should upgrade or use an alternative browser.

If I had to guess, I'd say I get mine thoroughly coated with the double-cone style greaser, cover ALL surfaces with a nice skim coat to keep surface rust at bay in case of condensation (seen that too many times), and probably add about another tablespoon per bearing during the install. As long as there's a decent amount of air space in there, you haven't added too much.
Don't put in a big blob. Too much grease is a bad thing.I am re-doing brakes and bearings, and was wondering how much grease should go in the rear hub bearings. Just grease the bearings with a bearing greaser, or do them and add a big blob inside the hub? Thnx.
How to Kill a Bearing: Over greasing
Explore the balance in bearing lubrication: Learn the risks of over greasing and how to calculate the right amount for optimal bearing performance.
jax.com
Sounds good. Thnx.If I had to guess, I'd say I get mine thoroughly coated with the double-cone style greaser, cover ALL surfaces with a nice skim coat to keep surface rust at bay in case of condensation (seen that too many times), and probably add about another tablespoon per bearing during the install. As long as there's a decent amount of air space in there, you haven't added too much.


I agree with paul. Most important is getting bearings themselves fully full of grease. The bearing grease tool really makes it easy…. Inside hub/spindle just cloated and a table spoon extra per per bearing seems right.Sounds good. Thnx.
The other thing is to let our rear seal sit “proud”. Not flush. Some seals touch the bearing itself. So a 1/16 “‘or so sitting out is best to keep seal from failing.
Oh yes, that's a good reminder for anyone doing rear wheel bearing seals!The other thing is to let our rear seal sit “proud”.
IIRC it was 0.030" proud that was required? There was a tech article or something on this somewhere. Someone had cut a shim/spacer/stencil to place on the hub around the wheel seal so they could press the seal down flush then pull the spacer off and be left with a seal that's 0.030" proud of the hub. I think they had a sheet of red plastic.
I had welding wire that was 0.030" already, so I just snipped off a piece and wrapped it around the hub circle with a light zig-zag pattern so it would traverse the top surface of the hub many times. I wish I had a pic--hope that makes sense.
So, something like this, if you have the right size of wire, and don't want to make a tool:

Then just press down until the press block bottoms out on the wire. There would be about another 1/8" to go in this pic below.

I abstracted a lot of the detail out of the seal obviously, but the main problem is an inner lip they tend to have these days, circled in red (and exaggerated). That lip didn't used to be there, and you could press seals all the way flush with the hub. Somewhere along the way the lip showed up in parts, and someone discovered it can rub the bearing cage and make metal dust! So we just don't press the seals all the way in anymore.

Then just press down until the press block bottoms out on the wire. There would be about another 1/8" to go in this pic below.
I abstracted a lot of the detail out of the seal obviously, but the main problem is an inner lip they tend to have these days, circled in red (and exaggerated). That lip didn't used to be there, and you could press seals all the way flush with the hub. Somewhere along the way the lip showed up in parts, and someone discovered it can rub the bearing cage and make metal dust! So we just don't press the seals all the way in anymore.
Last edited:
I agree with paul. Most important is getting bearings themselves fully full of grease. The bearing grease tool really makes it easy…. Inside hub/spindle just cloated and a table spoon extra per per bearing seems right.
The other thing is to let our rear seal sit “proud”. Not flush. Some seals touch the bearing itself. So a 1/16 “‘or so sitting out is best to keep seal from failing.

Rear axle seal
<p>Profile of the rear axle. Note how the seal housing is positioned slightly proud of the hub housing.</p><br /> <p>Axle profile drawing was sent to me by Ken Hendrickson. I\'m not sure of the original source.</p>
www.gmcmhphotos.com
Saw this after I flush pressed the seals in, but the seals I used were Timken, with the lip just barely at a 10 degree angle to help with insertion. Should not reach the bearing cage hopefully. Replaced brake cylinders, springs, shoes, bearings, seals, parking cables, and wheels spin so nicely.So, something like this, if you have the right size of wire, and don't want to make a tool:
View attachment 17930
Then just press down until the press block bottoms out on the wire. There would be about another 1/8" to go in this pic below.
View attachment 17931
I abstracted a lot of the detail out of the seal obviously, but the main problem is an inner lip they tend to have these days, circled in red (and exaggerated). That lip didn't used to be there, and you could press seals all the way flush with the hub. Somewhere along the way the lip showed up in parts, and someone discovered it can rub the bearing cage and make metal dust! So we just don't press the seals all the way in anymore.
View attachment 17932
That "hopefully" carries quite a bit of risk...and everything is risk vs reward.Saw this after I flush pressed the seals in, but the seals I used were Timken, with the lip just barely at a 10 degree angle to help with insertion. Should not reach the bearing cage hopefully. Replaced brake cylinders, springs, shoes, bearings, seals, parking cables, and wheels spin so nicely.
The reward in this situation is that you don't have to replace the seals, which would cost you ~$50 and a couple hours of work.
The risk is that the seal contacts the bearing, metal shavings, damaged bearings and spindles and possibly losing a wheel. I'm not trying to be a scaremonger, it happens, and I'd hate to see anything happen to you or your GMC. The risk, depending on how badly the bearings and spindles got damaged, could easily reach well into the thousands.
I am by no means the most experienced mechanic on this forum, but I have helped a GMC owner look for his rear wheel after the end of the spindle sheared off and the wheel went bouncing down the road.
Yikes.That "hopefully" carries quite a bit of risk...and everything is risk vs reward.
The reward in this situation is that you don't have to replace the seals, which would cost you ~$50 and a couple hours of work.
The risk is that the seal contacts the bearing, metal shavings, damaged bearings and spindles and possibly losing a wheel. I'm not trying to be a scaremonger, it happens, and I'd hate to see anything happen to you or your GMC. The risk, depending on how badly the bearings and spindles got damaged, could easily reach well into the thousands.
I am by no means the most experienced mechanic on this forum, but I have helped a GMC owner look for his rear wheel after the end of the spindle sheared off and the wheel went bouncing down the road.
You might be able to carefully check each assembly and look for clearance between the seal and the bearing cage. The right combo of lights and an inspection mirror could prove helpful.Yikes.
I can't say I've seen Timken seals with this issue of the inward curving lip, I can only say I've seen it on National and SKF seals. Others may be able to confirm the Timken construction. The lip on National and SKF seals is NOT huge. The CAD above was lazily done, and the lip is exaggerated. So it's probably worth checking if you can.
Pulling the rear wheels to check clearances is only marginally faster than replacing the rear seals with them sitting 30 thousandths proud. And remember that the method to torque the rears is intentionally loose because things expand when they heat up.You might be able to carefully check each assembly and look for clearance between the seal and the bearing cage. The right combo of lights and an inspection mirror could prove helpful.
I can't say I've seen Timken seals with this issue of the inward curving lip, I can only say I've seen it on National and SKF seals. Others may be able to confirm the Timken construction. The lip on National and SKF seals is NOT huge. The CAD above was lazily done, and the lip is exaggerated. So it's probably worth checking if you can.
Timken lip seems very slight, almost none at all, just barely to allow starting in, and still sort of tricky. Will check tho. Thnx.You might be able to carefully check each assembly and look for clearance between the seal and the bearing cage. The right combo of lights and an inspection mirror could prove helpful.
I can't say I've seen Timken seals with this issue of the inward curving lip, I can only say I've seen it on National and SKF seals. Others may be able to confirm the Timken construction. The lip on National and SKF seals is NOT huge. The CAD above was lazily done, and the lip is exaggerated. So it's probably worth checking if you can.
In my mind, the seals were already installed in the drums, but the wheels and hubs were not mounted on the spindles. Looks like that might not be the case. I think I saw the part where he said they were already pressed in flush, and might've skimmed over the part where he mentioned the wheels spin freely.Pulling the rear wheels to check clearances is only marginally faster than replacing the rear seals with them sitting 30 thousandths proud.
The wheels spinning freely means exactly nothing.In my mind, the seals were already installed in the drums, but the wheels and hubs were not mounted on the spindles. Looks like that might not be the case. I think I saw the part where he said they were already pressed in flush, and might've skimmed over the part where he mentioned the wheels spin freely.
Consider the force necessary to get a 30" wheel spinning, the inertia keeping it spinning, the distance from the bearing seal and the amount of greased and smooth contact area of the seal and bearing. Would you expect to feel chattering or hear grinding even when freshly installed? Of course not. That doesn't mean there's not interference.
This is what seal/bearing interference looks like.

New Bad Timken Rear Wheel Bearing Seal
With the 1/4 inch od tube rolled under the rubber it kicks the seal up off the table. I just purchased this seal at Autozone yesterday. It will be going back tomorrow. If you have an old seal, take it with you when you buy a new one and show them how the 1/4 in. od tube should roll under it. It...
www.gmcmhphotos.com
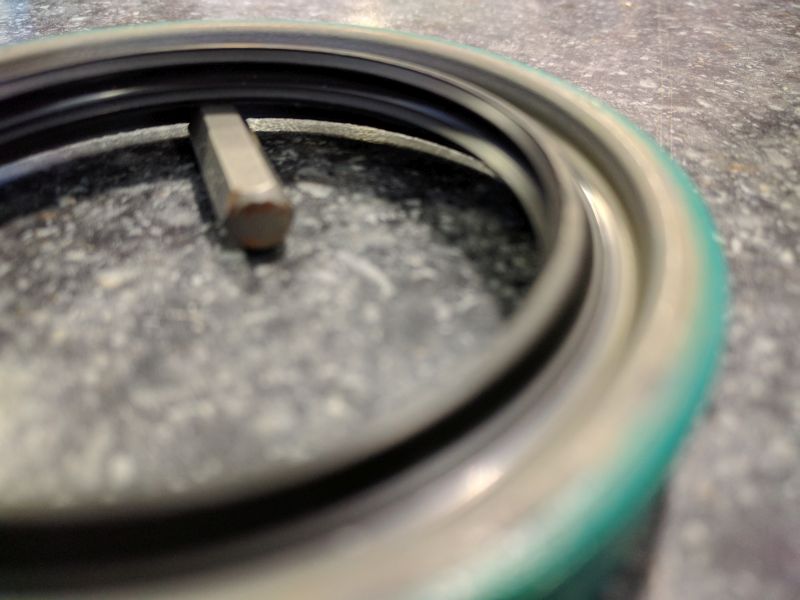
SKF-21771_rear_seal_fails_the_0_25_clearence_test_2
<p>Brough along a 0.25" hex drive to Napa to measure the clearence on NAPA SKF-21771 rear wheel bearing seals. Â The hex drive actually measures ~0.247" on my calipers. But as you can see in the photos, they failed the test.</p>
www.gmcmhphotos.com
That's why we adhere to this:

Risk vs reward. Your coach, your cash, your call.
It meant he had it reassembled. That's what I was pointing out I was missing the first time, due to skimming over that part. I agree, free-spinning wheels is not indicative enough in itself, and I was not implying otherwise. I also agree there is very little time savings in trying to inspect the clearance vs just reinstalling new seals. The only factor remaining would be whether or not he can source new seals on an acceptable timeframe, and feels like paying for them again.The wheels spinning freely means exactly nothing.

