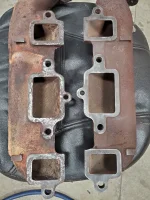
Yes, those are the ones that go with your manifolds.This is what I found
PN 11-003 -- Oldsmobile, 400 ('65-'69), 425 ('65-'67), 455 ('68-'74), Manifold Applications, 2/Set

OLDSMOBILE Header Exhaust/Manifold Gasket
REMFLEX EXHAUST GASKETS are extra thick as well as soft and compressable. REMFLEX gaskets fill voids on warped header flanges and exhaust manifolds. REMFLEX gaskets are good to 3000 degrees. REMFLEX gaskets won't burn out. No retorquing required.catalog.remflex.com
1973 GMC 26' Glacier Build
- Thread starter ScottC
- Start date
You are using an out of date browser. It may not display this or other websites correctly.
You should upgrade or use an alternative browser.
You should upgrade or use an alternative browser.
Wow it finally cooled down, I got the exhaust down and taking it to my buddies garage to get new made any suggestions on mufflers? I know I need to get the copper gaskets for the manifolds, any particular brand or style? I will start on the final drive this week.
I put a pair of 2.25" Walker turbo-style mufflers on in that oem location, and an extremely inexpensive chamber muffler just before the 90 degree bend into the frame rail. It's nice and quiet now we can actually have a conversation while going down the road.
If the exhaust manifold are off, check them for flatness and have them resurfaced if needed.
Yep I will have the manifolds off tonight, will check for cracks and flatness.
I left a message yesterday, have not heard back yet.I sent Jeff a Facebook message letting him know you called, and he asked if I could let you know that he is out of town with no cell service until Sunday, so I'm letting you know!
That doesn't look too terrible. Do you have access to a mill? You could bolt it to the table using the mounting holes to fixture it flat and mill a few thou off the flange. How are the heads?Well the passenger side looks great, the drivers side not so much, lots of pitting. I replaced the drivers side gasket before the trip home because it was leaking bad. Looks like I need some machine work or another manifold.
When I fixed my exhaust leaks, I found my manifolds had cracks in them. Bought a new pair from Cinnebar (NOT cheap) but they are brand new off the OEM patterns for the sand molds. They fit perfectly. I also had to machine the mounting surfaces on my heads as they were VERY eroded. I got them to a 90% clean up and used some High Temp Epoxy to fill the remaining low spots...
Here is a link to my build thread where I discuss the engine work...
1978 Royale Update and Restoration
Mike_H, Be very cautious with that double roller set. It has crank locations for +&- 4°. The problem with the timing chain was both the loads it saw in TZE service and the age it might get to. That was because the nylon cam gear face wore, aged more than in other service. The block off...
 www.gmcmotorhome.org

Well I cleaned the exhaust manifold the best I could with a bench top belt sander, nice and flat except for a couple low spots on the center port, what "epoxy" did you use? Pyro Putty was suggested.
Good effort but that's not what is meant by 'flat'. It needs to go on a milling machine, it's not hard to take 0.010" off the face and make it truely flat. You may have made your leak worse actually, b/c the area with missing 'meat' was easier to remove more material, but it's already missing material so you probably made it even lower than it was.
It's no big deal, find a machine shop or a friend with a mill and have them clamp it down and mill off a little until it's a flat surface.
Sorry to be the bearer of bad news.
Maybe he has one of these?Good effort but that's not what is meant by 'flat'. It needs to go on a milling machine, it's not hard to take 0.010" off the face and make it truely flat. You may have made your leak worse actually, b/c the area with missing 'meat' was easier to remove more material, but it's already missing material so you probably made it even lower than it was.
It's no big deal, find a machine shop or a friend with a mill and have them clamp it down and mill off a little until it's a flat surface.
Sorry to be the bearer of bad news.
 That could do an OK job in theory.
As Todd mentioned, the flatness needs to be precise. "Looks flat and fresh" won't quite get it done. If entire manifold fits on the supported flat part of the belt sander all at once, it's possible to accomplish this. But, not entirely likely. It can also be checked with a precision straight-edge and a feeler gauge. That will tell you what sort of gaps you have.
Another manual labor option is to start with a flat surface and a large piece of sandpaper. A 6" roll of sandpaper taped down onto a granite counter will often suffice. This could take a LOT of sanding though, depending on your starting flatness. Feeler gauges and a precision straight edge will tell you what you're up against. Coloring all those fresh surfaces with a Sharpie, then sanding until all the Sharpie is gone will let you know when you're done. If sanding seems infeasible, time to find a machine shop.
It was suggested by my drag racing buddy, my sander is not as big as that but yes the manifold was on the sander all at once. When I was done I checked it on a piece off glass. Looked real good to me and I figured the Remflex gaskets would take car of any slight imperfection. I like the sharpie idea but if you guys think I should still have it machined I will take your advice. I am going to need a lot of advice through out this project.
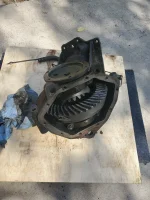
Pulled the final drive over the weekend!
Pulled the final drive over the weekend!
Attachments
Maybe he has one of these?
View attachment 5104
As Todd mentioned, the flatness needs to be precise. "Looks flat and fresh" won't quite get it done. If entire manifold fits on the supported flat part of the belt sander all at once, it's possible to accomplish this. But, not entirely likely. It can also be checked with a precision straight-edge and a feeler gauge. That will tell you what sort of gaps you have.
Another manual labor option is to start with a flat surface and a large piece of sandpaper. A 6" roll of sandpaper taped down onto a granite counter will often suffice. This could take a LOT of sanding though, depending on your starting flatness. Feeler gauges and a precision straight edge will tell you what you're up against. Coloring all those fresh surfaces with a Sharpie, then sanding until all the Sharpie is gone will let you know when you're done. If sanding seems infeasible, time to find a machine shop
According to my friend, his dad (a machinist) used to _stone_ my friend's cylinder heads flat, using a straight-edge.
Sounds like you came up with a decent process. If it looks flat on glass with a feeler gauge, I bet you're right, good enough for some Remflex gaskets.It was suggested by my drag racing buddy, my sander is not as big as that but yes the manifold was on the sander all at once. When I was done I checked it on a piece off glass. Looked real good to me and I figured the Remflex gaskets would take car of any slight imperfection. I like the sharpie idea but if you guys think I should still have it machined I will take your advice. I am going to need a lot of advice through out this project.
Pulled the final drive over the weekend!
I used high temp JB weld...Well I cleaned the exhaust manifold the best I could with a bench top belt sander, nice and flat except for a couple low spots on the center port, what "epoxy" did you use? Pyro Putty was suggested.

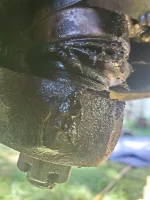
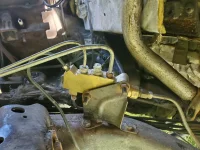
Sorry I have not updated it has been very busy couple of weeks, our (new, lol) son in law was in town to marry my daughter before he moved from Texas to New Mexico (active Air Force). Still working on mechanicals up front, picking of the final drive this weekend, I am also picking up tool to change from wheel bearings and other parts. the tie rod ends look newer, the ball joints don't feel bad but they definitely need new boots, sway bar needs new ends and bushings. It appears the timing cover is leaking pretty good so I am going to go ahead an take a look at the timing chain, already have all new belts and hoses.
Attachments
Scott,
I was just reading both your post and the signature and I see three issues.
If tires are outdated, it is just not worth the risk to try to run them. The damage that they do when they fail catastrophically can be more than the cost of new tires. With 16" wheels, you have a lot to choose from.
Getting new boots for the ball joints may be though, but give it a try. I replaced one of my lower ball joints because it would no longer take grease. Only later, I found out that the zerk fitting had bottomed against the ball and if I had removed it and ground a little off it and put it back, I might have run it a little longer.
If you have a new combination valve, you may have the wrong part. There are right ones that may be available soon, some wrong ones that are not all that wrong and some others that are way wrong. The Dave Lenzi article in one of the Vintage RVing (I forget which) can tell you about this.
And finally, I saw some discussion way back about going to TBI. TBI alone does little good unless you travel to higher altitudes a lot. The real value is in going to the knock controlled timing. If the coach has been converted to HEI, then the air filter housing has been replaced or abused enough to clear it. If it still has points, get a Pertronix 1181LS and put that in to replace the points and never mess with it again. If you want to fire plugs harder, just add a real CDI box and be done with it forever.
Matt
Matt,Scott,
I was just reading both your post and the signature and I see three issues.
If tires are outdated, it is just not worth the risk to try to run them. The damage that they do when they fail catastrophically can be more than the cost of new tires. With 16" wheels, you have a lot to choose from.
Getting new boots for the ball joints may be though, but give it a try. I replaced one of my lower ball joints because it would no longer take grease. Only later, I found out that the zerk fitting had bottomed against the ball and if I had removed it and ground a little off it and put it back, I might have run it a little longer.
If you have a new combination valve, you may have the wrong part. There are right ones that may be available soon, some wrong ones that are not all that wrong and some others that are way wrong. The Dave Lenzi article in one of the Vintage RVing (I forget which) can tell you about this.
And finally, I saw some discussion way back about going to TBI. TBI alone does little good unless you travel to higher altitudes a lot. The real value is in going to the knock controlled timing. If the coach has been converted to HEI, then the air filter housing has been replaced or abused enough to clear it. If it still has points, get a Pertronix 1181LS and put that in to replace the points and never mess with it again. If you want to fire plugs harder, just add a real CDI box and be done with it forever.
Matt
Thank you for you advice! The tires still have the tits on them but the date code is (3410) so they are 11 years old, the fronts are only 2 yrs old and I picked up a new spare for the trip home.
The ball joints, I thought I saw that Steve Ferguson had some urethane replacements, I will try and find that page.
The brakes did suck for the trip home, I did read the article about the valve and pulling out the rubber plug and spring. The combination valve does not have a vent hole and I will take a closer look to see if it has any numbers on it.
For know I am going to stick with the carb probably due for a rebuild, will evaluate when I get it back on the road. Yes it has stock GM HEI. I might look for a points distributor to go with the carb just in case the EMP wipes everything out and I can stay mobile for "Bug Out" to higher ground, LMAO.
Scott
And yes I will swap the tires before we are ready to hit the road on a long trip. That's going to be a while
Monday update, I am currently busy with the font end, picked up all the tools, bearings and seals to do the front wheel bearings and add a zerk for grease, picked up the 3.70 final drive, a Zip Dee awning, bunk bed couch, louvered cabinet doors, whole drivetrain (455, tranny, stock final drive). Hope to pick up more parts this weekend.
Can't wait to meet & learn this weekend!
Scott
Can't wait to meet & learn this weekend!
Scott
It sounds like your part searching has been very productive! I think you'll like the bunk bed couch. They're a neat piece of engineering, and provide good flexibility. I'm jealous you found louvered cabinet doors and a Zip Dee to boot! And the 3.70 will be great. You're making a lot of great choices and this is sure to be an amazing coach when you're done. Take lots of pics on with your front end work. I'd be curious to see someone else go through the process.

