Added some new headlights today. I can't stand sealed beams... There is so much better technology available today.
First off, I wanted to do LED. However, I can't stand the look of most of them, and aftermarket designs generally perform as bad as they look. That leaves me with trying to integrate an LED housing from a wrangler... Have you priced them lately? Yeah, I have other things to spend my money on. Plus, while they look and perform better than aftermarket, they still don't match the aesthetic of a 78 motorhome.
That leaves me with an H4 ecode housing upgrade. I'm familiar with that process as I did it to my 04 wrangler, with outstanding results. That was set up with Cibie housings, a custom built (by me) relay harness, and Phillips 130% 60/55 watt lamps. That project cost me about 200 bucks and a full Saturday's work.
I planned on doing the same to the motorhome. But as I was reading the other forum I'm on for my wranglers, someone posted about a H4 kit Toyota is selling for the land cruiser. Shipped to my house, it was less than 60 dollars from the dealer!
It includes Koito lenses (the best of the best), bulbs, and a nicely assembled and weatherproofed relay harness. For what it's worth, Daniel Stern lighting sells the Koito housings for 180 a pair... Just for housings! I think Toyota has a glitch in their pricing model... So if you're thinking of doing this, I'd recommend doing it NOW!
Her are a few pics of the kit.
Part number

Housing and lens. Notice the nice rubber boot that slides over the bulb, More on that later.


The relay harness. Includes (2) 20 Amp ATC style Blade fuses and holders (the blue things) and nice relays, holders, and clip mounts. The wire crimps are fantastic, the bulb sockets look very good, and they even included a tube of Dielectric to glob on all the connections. The only modification I needed to make was the positive power ring terminal was not large enough for the positive terminal lug, so I had to cut that off and install a larger one.

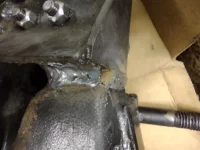
Remember the rubber boots? They don't fit in the headlight buckets very well. I addressed that with my dremel tool and a mounted wheel. I removed a very slight amount of material from the buckets to get the housings to fit all the way down. I then cleaned em up and shot them with some rustoleum to protect the now exposed raw steel. That is the ONLY permanent modification I made to the coach.
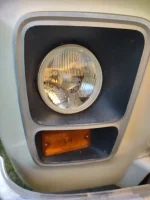
Here are the headlights installed.

And harness
Fuses and Relays are mounted high on the "panel"

Extra wire was coiled and bundled. I zip tied it to a self adhesive cable anchor. The harness that runs to the driver's side was run along the top of the inside of the grill (right under the access doors) and held in place with more self-adhesive cable anchors.

And finally, how the whole set-up works.

You install a male connector to the existing harness. It now becomes a "signal" harness to trigger the relays. The headlights themselves get power directly from the battery (or the positive lug, in my case), through the relays, directly to the lights. The two circuits are fir High and Low Beam. This set-up minimizes voltage loss, and prevents high current from going through the dash system. If I get a wild hair, I'll be able to convert to a multi-function stalk with this arrangement and eliminate the high current switch that controls High Beams.
Note: I zip tied the connectors together so they can't come apart.
Ok, enough of the install...What do they look like? These pics are from my aiming session at work. Not the greatest to see what they look like in the wild, but you can see just how good these housings are. Pay attention to how sharp the cut-off is.
This is low beam and you aim the lights on low beams

The bottom of the tape line on the wall is my vertical alignment guide. Notice the knife's edge cutoff. There is NO scatter beyond that cutoff point, which on-coming drivers will really appreciate. The trick with aiming headlights and getting light down the road is to aim them as high as possible without dazzling other drivers. The sharper the cutoff there, the higher you can go. The fact that these show a nearly horizontal line means I will have as much light as possible down road.
Here are the high beams

I'll get some night pictures when I receive the last piece of the puzzle. These pics were taken with the "stock" 65/55 bulbs. My set of Phillips 130% bulbs will be here tomorrow. It is a much whiter light and should be quite a bit brighter (all the more reason to run a high quality lens).
If I missed something, ask questions...I am pretty passionate about this stuff because we have LOTS of critters running around at night where I live. I've been playing with it for quite a while now. I've modified the headlights on each of my cars for the last 15 years...except my wife's Audi with HID projectors. That has ridiculously good headlights.
First off, I wanted to do LED. However, I can't stand the look of most of them, and aftermarket designs generally perform as bad as they look. That leaves me with trying to integrate an LED housing from a wrangler... Have you priced them lately? Yeah, I have other things to spend my money on. Plus, while they look and perform better than aftermarket, they still don't match the aesthetic of a 78 motorhome.
That leaves me with an H4 ecode housing upgrade. I'm familiar with that process as I did it to my 04 wrangler, with outstanding results. That was set up with Cibie housings, a custom built (by me) relay harness, and Phillips 130% 60/55 watt lamps. That project cost me about 200 bucks and a full Saturday's work.
I planned on doing the same to the motorhome. But as I was reading the other forum I'm on for my wranglers, someone posted about a H4 kit Toyota is selling for the land cruiser. Shipped to my house, it was less than 60 dollars from the dealer!
It includes Koito lenses (the best of the best), bulbs, and a nicely assembled and weatherproofed relay harness. For what it's worth, Daniel Stern lighting sells the Koito housings for 180 a pair... Just for housings! I think Toyota has a glitch in their pricing model... So if you're thinking of doing this, I'd recommend doing it NOW!
Her are a few pics of the kit.
Part number
Housing and lens. Notice the nice rubber boot that slides over the bulb, More on that later.
The relay harness. Includes (2) 20 Amp ATC style Blade fuses and holders (the blue things) and nice relays, holders, and clip mounts. The wire crimps are fantastic, the bulb sockets look very good, and they even included a tube of Dielectric to glob on all the connections. The only modification I needed to make was the positive power ring terminal was not large enough for the positive terminal lug, so I had to cut that off and install a larger one.
Remember the rubber boots? They don't fit in the headlight buckets very well. I addressed that with my dremel tool and a mounted wheel. I removed a very slight amount of material from the buckets to get the housings to fit all the way down. I then cleaned em up and shot them with some rustoleum to protect the now exposed raw steel. That is the ONLY permanent modification I made to the coach.
Here are the headlights installed.
And harness
Fuses and Relays are mounted high on the "panel"
Extra wire was coiled and bundled. I zip tied it to a self adhesive cable anchor. The harness that runs to the driver's side was run along the top of the inside of the grill (right under the access doors) and held in place with more self-adhesive cable anchors.
And finally, how the whole set-up works.
You install a male connector to the existing harness. It now becomes a "signal" harness to trigger the relays. The headlights themselves get power directly from the battery (or the positive lug, in my case), through the relays, directly to the lights. The two circuits are fir High and Low Beam. This set-up minimizes voltage loss, and prevents high current from going through the dash system. If I get a wild hair, I'll be able to convert to a multi-function stalk with this arrangement and eliminate the high current switch that controls High Beams.
Note: I zip tied the connectors together so they can't come apart.
Ok, enough of the install...What do they look like? These pics are from my aiming session at work. Not the greatest to see what they look like in the wild, but you can see just how good these housings are. Pay attention to how sharp the cut-off is.
This is low beam and you aim the lights on low beams
The bottom of the tape line on the wall is my vertical alignment guide. Notice the knife's edge cutoff. There is NO scatter beyond that cutoff point, which on-coming drivers will really appreciate. The trick with aiming headlights and getting light down the road is to aim them as high as possible without dazzling other drivers. The sharper the cutoff there, the higher you can go. The fact that these show a nearly horizontal line means I will have as much light as possible down road.
Here are the high beams
I'll get some night pictures when I receive the last piece of the puzzle. These pics were taken with the "stock" 65/55 bulbs. My set of Phillips 130% bulbs will be here tomorrow. It is a much whiter light and should be quite a bit brighter (all the more reason to run a high quality lens).
If I missed something, ask questions...I am pretty passionate about this stuff because we have LOTS of critters running around at night where I live. I've been playing with it for quite a while now. I've modified the headlights on each of my cars for the last 15 years...except my wife's Audi with HID projectors. That has ridiculously good headlights.
Attachments
Last edited: