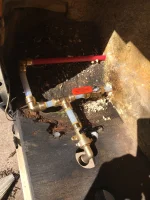
Next is the pump area, where I am confused. Water comes from the tank, T's off, one i the direction of the pump where there is a valve (#1) and one to a valve of some sort,( #2).
#1 - Can I attach a bottle of the antifreeze here, then the pump will pump it directly into the system?
#2 - This appears to be a drain, but it won't budge, appears to be open and nothing is coming out anywhere?
#3 WTF is this?
I believe I can make this work, use city connection to blow out with air, then pump antifreeze into #1, but would love some clarification.


.jpg")