So what did you do to your GMC today?

Today I dropped both gas tanks to find what I thought might be a vent line that broke off. Nope, only had the vent line drop off. In the next few days I also need to put in a new steering box, check rear brakes, install a hydro boost, and fix a broken TV antenna wire. Lots to do before I leave for Canadian fishing trip after Memorial Day. When I get back gonna install the Toyota headlight kit.
 
  • Like
Reactions: dsmithy and Keith V
Rowing to get back into the current (thread).

Cut a small chuck out of the '76 dash where it's not visible to remove the last of four bolts for the booster - in preparation for the Lenzi booster/two-stage master cylinder to let me reconnect the rear-rear Ford 150 electric/hydraulic calipers (a Bruce Hislop electric parking brake kit).

I had capped the brake line section from the tee on the bogies to the Ford calipers to keep dirt out in the meantime, and last summer noticed a brake drag pulling into the campgroup during our Cascaders' rolling rally. Brake heat from the Oregon hills heated up the captured brake fluid and expanded to engage the calipers.
 
  • Like
Reactions: Keith V
Connected the third Lithium battery for stand-alone solar-charging; bringing the SoC up to 100% before connecting it to the full battery bank (currently at 50% from the shipped 25% two hours ago). I should be able to add it to the bank in the next day or two.

Looking forwarded to using the full 10KW/hr bank for boondocking with A/C. :D
 
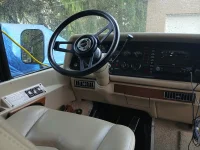
my nephew stopped by last week, he is a big guy...hes gonna help me drive out west, took him out to test drive it, get a feel for the odd seating position, he did ok, BUT looked crammed in behind the wheel, even folded up... so went to summit and got a new wheel, and a 2" riser, gives a lot more room, and the thicker foam rim feels better...can now see all the gauges too.
its got ba VDO clock in the dash, loses like a hour a day- gonna toss it and put transmission temp gauge in its place...got the sender, the adapter/mount, but oil temp gauge backordered another week or two. while dash out, gonnas replace tach too, its not that old but jumps around a lot, as if needle sticks. anyways the new 13.5" and 2" riser grant wheel is on, and it gives a ton more room, looks better, can see gauges better- happy camper...
all that said, its on, but what a piece of junk. the 2" spacer had holes clocked wrong from top to bottom, putting wheel 90 degrees off...upper plate has 5 bolts, so 90 not a option, went to closest position...horn contacts are aluminum tape, overlapping bolt holes, so bolts cut into the tape making a ground...well kinda...ended up scraping powdercoatoff where horn contacts hit, as the tape cuts thru, leaving no connection...went to put horn button on, foam is 1/4" out of round, horn button wont even go on... getting fed up, took a razor blade and cut the foam so it would clear the button... put button on, spring is >1/4" too short...had to stretch it out so it had a little tension...with horn button on, cant see where i cut foam, but can see the eccentric gap around horn button-if youre looking for it... quality control these days :(
 

Attachments

  • 20260508_065626.webp
    20260508_065626.webp
    792.6 KB · Views: 5
Last edited:
  • Like
Reactions: Kendra and pilondav
I installed the new LED tail lights from Mike H., installed the remote radiator fill from Jim K., and started the installation of the Fridge Defend module. A few small victories.
new to this, never heard of the fridge defender- thanks for the tip, sounds like a smart investment... had read up on absorption refrigeration quite a bit over the years, never thought about tilt affecting the delicate fluid balance, allowing overheating damage. neat :)
 
  • Like
Reactions: pilondav
new to this, never heard of the fridge defender- thanks for the tip, sounds like a smart investment... had read up on absorption refrigeration quite a bit over the years, never thought about tilt affecting the delicate fluid balance, allowing overheating damage. neat :)
When I heard Norcold went bankrupt, I figured I should do something. My fridge is about 20 years old and I'd like to keep it (and my GMC) going as long as I can. Even if a thermal runaway situation doesn't cause a fire, it will still ruin the fridge.

I'm also going to install a halon automatic fire extinguisher behind the fridge.
 
Helping a club member with their gmc this week.

Had brake fluid loss to the rear wheels. So I installed a new master cylinder and rear wheel cylinders. Bled the brakes(love my hupy bleeder).

It was running a little rough. And this is not your ordinary gmc, as it has a dynosources 8.1 liter conversion…. I decided to put a couple new fuel filters in to start with. I decided to do some more test driving, as it was not driving really bad, But just seemed a little off…. It is not my gmc, so maybe it is just like this?? so I drove it to 1st part store that did not have them in stock. 2nd part store had only 1. Third part store was Napa and the damn motorhome started running really rough and died right there in the parking lot.

So napa got some money because I left
My tool bags at home.

I bought a fuel pressure tester. And that needle pegged! I wondered if it was bad off shelf. But bought and installed a new fuel regulator that also required $25 snap ring pliers. That got me going.

Time to return this gmc to it’s owner!!

I know nothing about 8.1’s.

But google tells me this is bad:

IMG_3143.webp

And this is good. You can see the regulator just to the left of the dial. Was on top and easy to get to. But the snap ring was a bitch. New one leaked and I ended up using the oring off the old one to get it to stop leaking.


IMG_3145.webp
 
looking over underneath, the lower a arm bushings-especially passenger side- were looking pretty sad... got the urethane lowers/new uppers with rear offset from Applied... started taking the lower arms down, and realized how much room was under there, didnt remove them, just popped sway bar/shock/bushing bolts after unloading torsion bars, used my OTC ball joint press to push the center bushings out(after halfway, put a socket in to press thru), and just thumped a screwdriver in between the rubber and steel by hand and pried the old rubber out, tapped the urethanes in, lubed, jacked back into position and put it all back together...i did notice shock tube barely rubs on CV boot, put 2 washers on before shock to give another 1/8" clearance. only got passenger side done, but easiest bushing change ever... I'll try and get the drivers lower this week, maybe pop the uppers this weekend, gotta turn up some spacers to support control arm before pressing... took a drive tonight, holy cow, what a difference. just a week or so ago, reset ride height and adjusted toe(was toed out- and felt like it, was all over the road) that helped tremendously- but driving tonight, it felt like a car, no wander at all...sure drivers lowers will help a little too, but the passenger lowers were really shot once i got them out, could see how badly theyd squished out...
anyways, anyone thinking of changing lower bushings, get a OTC balljoint press and do it without having to pop balljoint/tie rod/pull torsion bars out to remove the arm...easy peasy. I may not even bother with the uppers, its driving so nice, and they dont look that bad... hardest part is always getting the bolts back into the stiff new bushings, a tapered pry bar to pull the holes inline makes it pretty easy
 

Attachments

  • 20260511_200935.webp
    20260511_200935.webp
    1.8 MB · Views: 5
  • 20260511_202531.webp
    20260511_202531.webp
    775.7 KB · Views: 5
  • 20260511_204633.webp
    20260511_204633.webp
    2.9 MB · Views: 5
  • 20260511_204646.webp
    20260511_204646.webp
    2.2 MB · Views: 5