Do these have a bucket down function? I’m a little tired of looking through the top 2” of the windshield, lol."New" front seats ordered/received; Honda Odyssey 2018-2025 2nd-row w/integrated seat-belt/harness. I currently have 2009 Odyssey seats with the associated seat-belt/harness mounted to the floor and wall structure. I prefer the integrated belt solution. Plus, my driver's-side retract-er mechanism has failed....
Unfortunately, while the seat mounting mechanism is similar in design, some of the measurements are different between the years, so I will have to have some metal fabrication done. It's always something....
So what did you do to your GMC today?
- Thread starter RvRev2
- Start date
You are using an out of date browser. It may not display this or other websites correctly.
You should upgrade or use an alternative browser.
You should upgrade or use an alternative browser.
No height adjustment.Do these have a bucket down function? I’m a little tired of looking through the top 2” of the windshield, lol.
With the seat mounted to around 4" of steel "tube", my eye-line is at about 6" from the top of the windshield. I'm 6' 1.5" with a longer torso (I need adjustable headrests; shaped seats with formed headrests hit me at the base of my skull [whiplash!]).
I'm looking at 3.5" tube this go-around. I don't want my legs sticking way out in front of me like I'm reclining in the seat. I also drive in a very upright position; no lean-back/slouching for me!
 Think truck-style bench seating position....
This is what a PO installed...

This is the design of the new system...


The locking rails will be sized to the seats. The flat-bar stock will be sized for the OEM support structure of the coach. This is just a concept; no measurements included at this time (a template will be made this weekend).
Well well, I’m also 6’ 1.5 and prefer sitting upright! I look forward to seeing how your install turns out and hearing how you like it.No height adjustment.
With the seat mounted to around 4" of steel "tube", my eye-line is at about 6" from the top of the windshield. I'm 6' 1.5" with a longer torso (I need adjustable headrests; shaped seats with formed headrests hit me at the base of my skull [whiplash!]).
I'm looking at 3.5" tube this go-around. I don't want my legs sticking way out in front of me like I'm reclining in the seat. I also drive in a very upright position; no lean-back/slouching for me!
This is what a PO installed...
View attachment 16819
This is the design of the new system...
View attachment 16821View attachment 16822View attachment 16823
View attachment 16820
The locking rails will be sized to the seats. The flat-bar stock will be sized for the OEM support structure of the coach. This is just a concept; no measurements included at this time (a template will be made this weekend).
I am also 6'-1" tall and I have no problem with my seats. I have used Villa 6 position electrical seats with 3 point seat belts. Check out how I installed them on other threads.Well well, I’m also 6’ 1.5 and prefer sitting upright! I look forward to seeing how your install turns out and hearing how you like it.
View attachment 16745
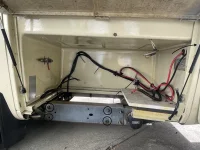
I have the batteries back and the good news is that they are as good as new. They have also provided the missing IonBus cables at no cost.
I am now ready to reinstall the batteries and wire up the 51.2vdc system.
On the left is the valved lpg connection that was installed to power the dual fuel portable generator. I am going to leave it in place.
On the right is the feed going to the rear lpg compartment for the 51.2 vdc circuit breaker panel for the (2) mini-splits.
In the right rear is the very difficult to access tie down strap when the battery is moved into the compartment.
View attachment 16746
One battery is almost in place and I am going to have to rotate it at least 90° to the left to access the rear tie down strap.
Ain't going to be easy!
Good thing that I bought these lift tables. The batteries weigh 175 lbs.

When this battery is in place, the red and black battery cables and connectors are in severe structural stress, even at rest. I expected that there would be more clearance.

The battery on the slide is much lower, so its cables are not under stress.

At the rear of the battery, the 1" thick white Starboard panel supporting the battery could no get enough bit on the coach's frame, so Cliff inserted a strip of 1" thick black Starboard material to gain bite. The result was to raise the battery 1" higher than planned.
THe screw you see hanging down is part of the turnbuckle that is scraping down the battery.

This is the 1" thick front black Starboard spacer that Cliff used to level the white Starboard panel so that the battery will be level. I think that this the residue of the past need to level acid lead batteries.
LiFePO4 batteries do not have to be level.
I intend to pull the (2) self tapping phillips screws securing the front edge of the Starboard panel after supporting the white panel with a bottle jack. If I can lift the white panel about 1/16", I should be able to knock the black linear spacer out.
Then I should be able to drop the front edge of the white panel 1" by releasing the bottle jack and reinsert the 2 self tapping screws.
I should then have the additional 1" cable clearance.
There is an additional problem with the installation that I will address in another post.
Cut the front part of my exhaust system apart and re-welded it back together.
I was able to get that portion of the exhaust tucked up tighter toward the floor, I wasn't happy with the previous version hanging down a little bit.
It was not so much fun but I'm hoping my exhaust donuts will last now. I think the way I had it welded up before was not quite right the way it lined up with the exhaust manifolds. If it blows another donut out I'll have to install a flex connection on one side.
This will sound silly/trivial, but for the first time since buying this behemoth 2.5 years ago, I drove in the rain for a while. The electric wiper mod with delay is wonderful! Started out heavy rain then turned to a light mist; the delay worked perfectly at all levels. As a side note, I noticed the wipers moved faster with longer delay-interval settings. Anyone else noticed this, or do I have a problem in the making?
FYI, I'm not running with the original kit. I had issues with it a while back and replaced the pot (linear taper) and switch (DPDT ON-OFF-ON w/LEDs). I also replaced the resister (same value) and all of the wiring. After doing all of that, I may have simply had a bad ground, but c'est la vie....

FYI, I'm not running with the original kit. I had issues with it a while back and replaced the pot (linear taper) and switch (DPDT ON-OFF-ON w/LEDs). I also replaced the resister (same value) and all of the wiring. After doing all of that, I may have simply had a bad ground, but c'est la vie....
Last edited:
View attachment 16858
When this battery is in place, the red and black battery cables and connectors are in severe structural stress, even at rest. I expected that there would be more clearance.
View attachment 16859
The battery on the slide is much lower, so its cables are not under stress.
View attachment 16860
At the rear of the battery, the 1" thick white Starboard panel supporting the battery could no get enough bit on the coach's frame, so Cliff inserted a strip of 1" thick black Starboard material to gain bite. The result was to raise the battery 1" higher than planned.
THe screw you see hanging down is part of the turnbuckle that is scraping down the battery.
View attachment 16861
This is the 1" thick front black Starboard spacer that Cliff used to level the white Starboard panel so that the battery will be level. I think that this the residue of the past need to level acid lead batteries.
LiFePO4 batteries do not have to be level.
I intend to pull the (2) self tapping phillips screws securing the front edge of the Starboard panel after supporting the white panel with a bottle jack. If I can lift the white panel about 1/16", I should be able to knock the black linear spacer out.
Then I should be able to drop the front edge of the white panel 1" by releasing the bottle jack and reinsert the 2 self tapping screws.
I should then have the additional 1" cable clearance.
There is an additional problem with the installation that I will address in another post.
 I am trying to prevent this from happening. There were only (4) bolts holding it into place and they were so close together vertically that they could not resist this moment. I could not determine the solution until I disassembled it.
It was only attached to the grey steel chassis by these (4) bolts. That was certainly not enough to resist the rotation that would cause the type of failure above.

The puck in the ellipse is separating the yellow aluminum and fiberglass components from the gray steel chassis frame members.
If I remove the rest of the aluminum flange in the rectangle, (like it was further to the left), I will gain access to the chassis to bolt the slide to. It will also eliminate the binding issues I had in removing the slide.
If I add (2 )vertical bolts with washers I will adequately support the slide and eliminate the rotational problem.
This is a simple and safe solution that should have been utilized in the first time.
I hope that this will soon be accomplished so that I can get back to activsating the 51.2vdc system.
Attachments
Open for business:
My award winning 10x10 custom workshop and parts warehouse (shed) now has new signage advertising my worldwide global support efforts.

It really adds class to the joint

Part of my vast empire of business dealings
I got this sign off of that auction site

My award winning 10x10 custom workshop and parts warehouse (shed) now has new signage advertising my worldwide global support efforts.
It really adds class to the joint
Part of my vast empire of business dealings
I got this sign off of that auction site
Hi Gloss!! GMC Motor Home Parts And Service Vintage Style Sign | eBay
Beautiful advertising sign 12x12 inch in size. Hi gloss finish with mounting holes for easy hanging. See the difference in quality of the finish, must have for a vintage style memorabilia collector . Please contact us for combining shipping on a large order of signs .
www.ebay.com
Last edited:
We loaded up the fridge and the freezer, and mostly moved our clothing, etc out of my sister in law's house in preparation for starting out on the trip back home (Northern Lebanon County, PA to Tucson, AZ). Leaving tomorrow AM for Delaware (Lums Pond State Park) for two nights, then on through Virginia to Tennessee on I-40 for a while.
Sounds goodWe loaded up the fridge and the freezer, and mostly moved our clothing, etc out of my sister in law's house in preparation for starting out on the trip back home (Northern Lebanon County, PA to Tucson, AZ). Leaving tomorrow AM for Delaware (Lums Pond State Park) for two nights, then on through Virginia to Tennessee on I-40 for a while.

I installed the Toyota Headlight upgrade that I read about on a recent thread on this forum. Super easy and fast install.

You left out 'ridiculously cheap'!I installed the Toyota Headlight upgrade that I read about on a recent thread on this forum. Super easy and fast install.
Fast, easy, good & cheap.
I installed the Toyota Headlight upgrade that I read about on a recent thread on this forum. Super easy and fast install.
It's crazy how easy the install is, like the kit was made for the GMC motorhome instead of an old Toyota Landcruiser!
It's crazy how easy the install is, like the kit was made for the GMC motorhome instead of an old Toyota Landcruiser!
I saw a video in YT about it. Incredibly easy to install and made for the coach. The best alternative.I installed the Toyota Headlight upgrade that I read about on a recent thread on this forum. Super easy and fast install.
First turtle wax job of the season


...and it rained
...and it rained
Last edited:
Shiny! Amazing how that old Imron paint holds up.
Okay, how long did that take you?
Hand wash 'n' wax, no buffer, about 1.5 hours for per side.Shiny! Amazing how that old Imron paint holds up.
Okay, how long did that take you?
Another hour for the roof
Wow, looks amazing. Good job

Has anybody compounded the old paint & then waxed as we used to do bacon the 50's? We used do that every 4 to 6 weeks back then.

