So what did you do to your GMC today?

  • Please note, the forum recently had a problem with outbound emails for notifications, registrations, etc. A new email provider has been set up which should resolve all email issues. If you have any further trouble, please DM Christo or reach out via the Contact Us link in the website footer.
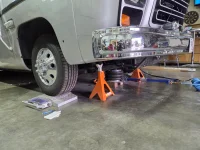
I have been struggling with my torsion bars since I bought my coach. Originally one of them was bent, so I tried new, heavy bars that I got from Manny. They were way too stiff, so I sourced some from the coach that I parted out. I tried different methods for getting the height "right" and working on my alignment at the same time. I knew that I needed to get my coach on a set of scales, but attending a rally any time soon isn't going to happen. Using the Cat scales at a local truck stop was out because the scale is elevated, meaning there would be a twist to the coach. I even considered building a leverage system so I could use scales not intended for 4000 lbs.! I asked a couple truck shops what they use for scales and none had an answer. I asked Google, and whoa and behold, the scales could be rented... for $300/day! Well, ya gotta know when to say when, so I bit the bullet. I picked up the scales, went home, ate a sandwich, and got after it, expecting to use a fair part of my weekend messing around with it. I had the scales back to the shop 2 hours after I picked them up! it helped that I already had my coach in position, ready for surgery. Sometimes, just sometimes, procrastination can get the better of you!

BTW, the shop that rents scales claimed that they rent to many local shops, but apparently not the ones that I asked! I also got a "deal" from the scale shop. $250 for 24 hrs., and they allowed me to pick up on Friday before lunch and said that I could return them anytime on Monday. I only work my job until 10 a.m. on Fridays so that allowed me to gitterdone before "Let's Make A Deal" was on tv! I am so happy that this project is off my back, now on to a skin panel that is coming off my coach.
 

Attachments

  • 20260227_132515.webp
    20260227_132515.webp
    981.5 KB · Views: 7
I finalized my retro fit of the old house vacuum system.
Small 3 gallon Harbor Frieght shop vac with the seperate detailing hose kit.
I had to make a relay box to get it to still work when you insert the hose in the wall unit.
Works way better than the original did and not worried about finding bags.
Plus.....you have a shop vac now....built in.
 

Attachments

  • PXL_20260228_195523168.webp
    PXL_20260228_195523168.webp
    870.1 KB · Views: 7
  • PXL_20260228_195512877.webp
    PXL_20260228_195512877.webp
    645.4 KB · Views: 6
I finalized my retro fit of the old house vacuum system.
Small 3 gallon Harbor Frieght shop vac with the seperate detailing hose kit.
I had to make a relay box to get it to still work when you insert the hose in the wall unit.
Works way better than the original did and not worried about finding bags.
Plus.....you have a shop vac now....built in.
That's a great idea!
 
Well, I began a new project. A previous owner had reupholstered everything but the rear lounge with a brown cloth material. It is showing its age. The rear lounge still had the original greed plaid upholstery. I have never sewn before. So I bought a sewing machine and attempted a proof of concept with the rear lounge. I have learned a lot through trial and error, and mostly through mistakes. I tried to keep to the original colors, and tried to keep it 70's looking.

Got some tweaking that still needs to be done, but I am close to having one seat done (see pictures below). I think it looks good, but wonder if something else would look better.
Well, I decided to go forward with what I started. I was really waffling between a modern, tan or gray upholstery throughout, which would have been easier I think, or going this route. While it may not be original, I think it still has that vintage 70's vibe to it.
I have the passenger side seat of the rear lounge done, and most of the driver's side seat done as well. I ran out of fabric to complete the seat back on the driver's side...RATS!
Below you will see a picture of the seats in bed mode (note the incomplete upholstery on the driver side seat back). It is waaaaay more comfortable and much softer in bed mode now. That alone was worth all the work. You can also see the brown panel beneath the rear window. The rest of the upholstery in the rig is covered in that brown material, but hopefully not for long.....
I have ordered more material, and it should arrive soon. I hope to have the rear lounge done in time for the Spring Rally.
I was able to remove the original green plaid upholstery from the rear lounge intact. it appears in pretty good shape, though some of the buttons are missing. Perhaps they will end up in someone's GMC that they are restoring to original condition.
 

Attachments

  • Almost Done bed mode.webp
    Almost Done bed mode.webp
    1.1 MB · Views: 9
I took it to the Chevron station and put 25 gallons of gas into it, at $1.79/gallon, with my Safeway/Chevron Rewards discount, Brought it home, plugged it in, and turned on the fridge in preparation for a Saguaro Jetset rally starting on Sunday.
 
  • Wow
Reactions: Tybalt39
I took it to the Chevron station and put 25 gallons of gas into it, at $1.79/gallon, with my Safeway/Chevron Rewards discount, Brought it home, plugged it in, and turned on the fridge in preparation for a Saguaro Jetset rally starting on Sunday.
🤨

I didn't realize you're the type of guy who waves sausages in front of a starving guy, Carl!

$3.30 in Florida
 
🤨

I didn't realize you're the type of guy who waves sausages in front of a starving guy, Carl!

$3.30 in Florida
It jumped up about 30 cents here since Wednesday. We get a dollar off per gallon up to 25 gallons with the grocery store (Safeway/Albertson's) App, plus 10 - 25 cents off at participating Chevron and Texaco stations.

I noticed gas prices were a little higher in Florida last Spring when we were there.
 
Checked the Mouse traps and they are still empty! I wiped things down a bit. Weather has warmed up and we
Might have a early spring. I “could” drive my coach out now without being stuck in the snow. But probably leave some ruts yet in grass. Might be time for some drives around town in a week or two. Just needs to dry out a little bit more. And probably cant de-winterize till april for sure.
 
I took it to the Chevron station and put 25 gallons of gas into it, at $1.79/gallon, with my Safeway/Chevron Rewards discount, Brought it home, plugged it in, and turned on the fridge in preparation for a Saguaro Jetset rally starting on Sunday.
I just dropped $110 in fuel into my rig. At least it is full now.
 
  • Wow
Reactions: Carl Stouffer
Replaced my starter with a rebuilt Delco. The vehicle starts much more "instantly" now. 😁. EFI and a "new" starter are making a big difference. 👍.
Now to get the "new" as of last summer starting battery tested and the compressor delay installed, as I still see low voltages when the compressor kicks in while driving. 14.4-8 at startup, 13.6 while diving with headlights, and 12 when the compressor is running.
 
  • Love
Reactions: pvfjr
Now to get the "new" as of last summer starting battery tested and the compressor delay installed, as I still see low voltages when the compressor kicks in while driving. 14.4-8 at startup, 13.6 while diving with headlights, and 12 when the compressor is running.
Is your alternator a "1-wire" alternator? The voltages you are seeing are typical of a 1-wire alternator since the voltage regulator only references the voltage at the output terminal.

The OEM 3-wire alternator used a voltage sense wire connected in the wiring harness so that it could compensate for voltage drops in the wiring from the alternator, through the battery isolator and into the wiring harness.

Connect a volt meter to the output terminal of the alternator.
- Start the engine and note the voltage.
- Then add electrical loads and note if the alternator output voltage increases each time a load is added.
- Dash HVAC fan
- Headlights
- Rear suspension compressor

If the alternator output voltage increases each time you add a load, then you have the proper 3-wire alternator.

If the voltage stays relatively constant as you add loads, then you have a 1-wire alternator. A 1-wire alternator is for applications where the alternator load stays relatively constant, like a stationary engine for irrigation or an old tractor. It is not a good choice for applications where the alternator load varies widely like in our coaches.
 
  • Like
Reactions: dsmithy
Is your alternator a "1-wire" alternator? The voltages you are seeing are typical of a 1-wire alternator since the voltage regulator only references the voltage at the output terminal.

The OEM 3-wire alternator used a voltage sense wire connected in the wiring harness so that it could compensate for voltage drops in the wiring from the alternator, through the battery isolator and into the wiring harness.

Connect a volt meter to the output terminal of the alternator.
- Start the engine and note the voltage.
- Then add electrical loads and note if the alternator output voltage increases each time a load is added.
- Dash HVAC fan
- Headlights
- Rear suspension compressor

If the alternator output voltage increases each time you add a load, then you have the proper 3-wire alternator.

If the voltage stays relatively constant as you add loads, then you have a 1-wire alternator. A 1-wire alternator is for applications where the alternator load stays relatively constant, like a stationary engine for irrigation or an old tractor. It is not a good choice for applications where the alternator load varies widely like in our coaches.
It's a three-wire rebuilt Delco (white Molex type connector at the rear of the alternator). I installed it the first month I owned the coach as originally the coach would only run with fully charged batteries; the alternator wasn't putting out anything to charge them.

That said, the voltages mentioned are from the display of the EFI (the EFI ECU is connected directly to the positive terminal of the battery per manufacturer's instructions). A new instrument cluster will include a volt meter.
 
It's a three-wire rebuilt Delco (white Molex type connector at the rear of the alternator).
I had a rebuilt alternator installed a few years back. I soon noticed the voltage was on the low side, especially when headlights and ac was ON. The shop said it was the same PN they always use on GMC's. I pulled the alternator and opened it, looked up the PN of the regulator and it was a 1 wire regulator, but it had the 2 side terminals. Seems the voltage regulator manufacturer uses the same regulator housing for both types.

The shop was too far away to return, so I bought a correct regulator locally for less than $20 and installed it.

The PN on the alternator tag indicated it was a 3-wire, but it had the wrong regulator installed.

The only way to be sure of what you have is to measure the voltage at the output of the alternator under various loads.
 
  • Like
Reactions: Tybalt39