Replace Dash HVAC with Old Air Hurricane System
- Thread starter RHecht
- Start date
You are using an out of date browser. It may not display this or other websites correctly.
You should upgrade or use an alternative browser.
You should upgrade or use an alternative browser.


Oh boy, that does look involved. I can see why the Vintage air install would be easier.What's inside of a 73-76 dash.View attachment 11584
There was 3 dash hvac designs. None of the 3 were super, but the first 2 (i had/have the 2nd generation in my 75). Just dont flow enough air to make worthwhile comfort. They changed it again ans 77 and 78 years will blow cold air that you can feel.Not understanding about the existing air vents. My air vent for my air conditioning looks similar to Carls photo except I have just 2 vents that cold air come out. The vents on the dash and side vents on the sides seem only have heat in winter come out of them. So are you meaning those vents?
Tom
I had everything working in my old 75 a/c system, but the air just would not put out enough to feel more then a few inches away from the vent.
Read here where there are changes you can do to improve the 73-76 dash air…. But even with the stuff outlined below it is a far cry from what a vintage air or a 77/78 coach does for cooling effect.
Separating Hot from Cold
www.gmcws.org
If your '76 still has the add-on lower vents (they're called 'Max Air' vents) you can move the slider to full cool and then select 'Recirc'. This moves a flap that closes off the heating coil and dash vents and directs cool or outside air from the fan, through the cooling coil, and to the Max Air vents. Very little air volume is lost compared to the dash vents. ('Recirc' doesn't recirc;. GM just didn't relable the controls).Oh boy, that does look involved. I can see why the Vintage air install would be easier.
So with my setup its best to go Vintage or Old Air? I’ve got the Sanden compressor and thought I could make this my winter project and have it ready to go next spring. I’ve heard talk of plenum box, the vents and their duct runs but is there anything need to be done for the condenser or do the nee systems come with a condenser?If your '76 still has the add-on lower vents (they're called 'Max Air' vents) you can move the slider to full cool and then select 'Recirc'. This moves a flap that closes off the heating coil and dash vents and directs cool or outside air from the fan, through the cooling coil, and to the Max Air vents. Very little air volume is lost compared to the dash vents. ('Recirc' doesn't recirc;. GM just didn't relable the controls).
Tom
Last edited:
Hi,What's inside of a 73-76 dash.View attachment 11584
I'm going to the hvac box with Old Air, do happen know if the dash is the same for a 1977 23" birchaven side bath ?
And if not is there a dash breakdown for it?
Thanks
Jeff
There was dash changes.Hi,
I'm going to the hvac box with Old Air, do happen know if the dash is the same for a 1977 23" birchaven side bath ?
And if not is there a dash breakdown for it?
Thanks
Jeff
Read here too:
Separating Hot from Cold
www.gmcws.org
Hi all,
I'm working on a kit that will enable DIY conversions to the latest VintageAir Gen 5 Magnum MAX evaporator system for 73-early 76 coaches (pre-HVAC refresh)
I'll start my own build thread to cover the details, but I have put a lot of effort (and $$$) into designing this.
The kit won't be cheap -- probably $3k+ for all the parts -- but it will enable you to upgrade your AC system to modern specs without having to fabricate janky custom bracketry and such. Also, many of the custom components will be made in the USA !
!
I'm in the middle of the first prototype build and then have a friend of mine (and local GMCer) lined up to do the 2nd install where everything will be refined and we will write the instructions.
I'm trying to design it so that the dash doesn't necessarily have to be removed to install it (which can get messy). That being said, mine is out and I've glued/sealed all seams, applied Eastwood XMAT sound deadening/insulation, and then put 3M Thinsulate blanket over that. You can only cool so much when your cockpit leaks air like a sieve.
Here's a preview of what I've been working on:

.webp")
.webp")
.webp")
I'm working on a kit that will enable DIY conversions to the latest VintageAir Gen 5 Magnum MAX evaporator system for 73-early 76 coaches (pre-HVAC refresh)
I'll start my own build thread to cover the details, but I have put a lot of effort (and $$$) into designing this.
The kit won't be cheap -- probably $3k+ for all the parts -- but it will enable you to upgrade your AC system to modern specs without having to fabricate janky custom bracketry and such. Also, many of the custom components will be made in the USA
!I'm in the middle of the first prototype build and then have a friend of mine (and local GMCer) lined up to do the 2nd install where everything will be refined and we will write the instructions.
I'm trying to design it so that the dash doesn't necessarily have to be removed to install it (which can get messy). That being said, mine is out and I've glued/sealed all seams, applied Eastwood XMAT sound deadening/insulation, and then put 3M Thinsulate blanket over that. You can only cool so much when your cockpit leaks air like a sieve.
Here's a preview of what I've been working on:
Inquiring minds need to know.... Does this accommodate the 1976 'Max Air' slot and add-on duct? Are there 100% OSA and Recirc functions? Is the OEM front panel retained? What does the bottom photo represent?
Last edited:
The base kit will eliminate the add-on duct, as that vent is used as the intake for the new system.Inquiring minds need to know.... Does this accommodate the 1976 'Max Air' slot and add-on duct?
There will not be an outside air function, as the VintageAir system is designed for inside air (ie: Recirc) intake only (as are essentially all aftermarket HVAC systems).Are there 100% OSA and Recirc functions?
I was considering adding this feature, but decided against it because it would add a lot of additional cost and complexity for a feature I don't think many would care for. You can always open a window if you want outside air, I suppose.
Didn't they eliminate OSA in later coaches?
Is the OEM front panel retained?
I have designed brackets and adapters to convert the original OEM control panel from vacuum-valve output to electronic (ie: resistive/potentiometer) output, as required by the VintageAir system.


The OEM control conversion includes a new faceplate (laser cut acrylic and UV-printed artwork done here in the USA) with artwork that corresponds to the new functionality of the VintageAir system. In line with my attention to detail on this kit, the dots for each setting line up with the original detents in the mode slider. Modern ISO symbols have been used and a classic font has been selected to capture the original style.
The OEM control panel conversion will be an optional upgrade -- aftermarket control panels are available but they look stupid. If you want to keep the original classic look, this kit will be available, and will be comparable in cost to the aftermarket option:

Another optional upgrade will be a new indicator (aka "idiot light") panel, also laser-cut acrylic and UV printed here in the USA. I worked closely with my supplier to capture the original style. This indicator panel adds a blue "AIR COND" indicator (replacing a blank spot) so you can tell when the AC system is enabled (ie: the compressor is operating). This is a standard output of the VintageAir ECU.What does the bottom photo represent?
The current artwork is for 73-75, rendering below:

73 coaches had an unused "FASTEN BELTS" indicator that I have replaced with the "LOW AIR" indicator used from 74-75.
In 76+ coaches, "LOW AIR" was removed and "ENGINE WATER" (coolant) was added. "SET POWER LEVEL TO TRAVEL" was also changed to "SET LEVEL TO TRAVEL AUTO".
I can modify the artwork to retain the original indicators as needed.
To retain the original wiring harness pinout (so it's "plug and play") and add a blanked out indicator, I designed a new indicator panel flexible printed circuit board that has LEDs instead of bulbs. The connector has been designed so it is compatible with dash wiring harnesses of all years. The kit will include a pigtail to add the "AIR COND" wire to the harness, it simply snaps into the existing plastic connector housing.

I plan to have several optional parts so you can buy just what you need. If you have a Mac dash or want to add custom vents, you can buy just the basic kit from me. If you have an original dash and want everything original looking (as I do), those parts will be available.
Again, I'm on prototype #1 using my own coach and I have only seen so many model years in person, so there may be some modifications required. It will not be an easy installation. But it will eliminate many of the custom parts you'd have to design/make yourself, and provide a guide for a basic installation that you can then customize for your specific needs.
My background is as an electrical engineer but I do a lot of product development and some mechanical design as well. The GMC is my "artistic" outlet for products I personally want to exist
")
The base kit will eliminate the add-on duct, as that vent is used as the intake for the new system.
There will not be an outside air function, as the VintageAir system is designed for inside air (ie: Recirc) intake only (as are essentially all aftermarket HVAC systems).
I was considering adding this feature, but decided against it because it would add a lot of additional cost and complexity for a feature I don't think many would care for. You can always open a window if you want outside air, I suppose.
Didn't they eliminate OSA in later coaches?
I have designed brackets and adapters to convert the original OEM control panel from vacuum-valve output to electronic (ie: resistive/potentiometer) output, as required by the VintageAir system.
View attachment 16126
View attachment 16125
The OEM control conversion includes a new faceplate (laser cut acrylic and UV-printed artwork done here in the USA) with artwork that corresponds to the new functionality of the VintageAir system. In line with my attention to detail on this kit, the dots for each setting line up with the original detents in the mode slider. Modern ISO symbols have been used and a classic font has been selected to capture the original style.
The OEM control panel conversion will be an optional upgrade -- aftermarket control panels are available but they look stupid. If you want to keep the original classic look, this kit will be available, and will be comparable in cost to the aftermarket option:
View attachment 16127
Another optional upgrade will be a new indicator (aka "idiot light") panel, also laser-cut acrylic and UV printed here in the USA. I worked closely with my supplier to capture the original style. This indicator panel adds a blue "AIR COND" indicator (replacing a blank spot) so you can tell when the AC system is enabled (ie: the compressor is operating). This is a standard output of the VintageAir ECU.
The current artwork is for 73-75, rendering below:
View attachment 16128
73 coaches had an unused "FASTEN BELTS" indicator that I have replaced with the "LOW AIR" indicator used from 74-75.
In 76+ coaches, "LOW AIR" was removed and "ENGINE WATER" (coolant) was added. "SET POWER LEVEL TO TRAVEL" was also changed to "SET LEVEL TO TRAVEL AUTO".
I can modify the artwork to retain the original indicators as needed.
To retain the original wiring harness pinout (so it's "plug and play") and add a blanked out indicator, I designed a new indicator panel flexible printed circuit board that has LEDs instead of bulbs. The connector has been designed so it is compatible with dash wiring harnesses of all years. The kit will include a pigtail to add the "AIR COND" wire to the harness, it simply snaps into the existing plastic connector housing.
View attachment 16129
I plan to have several optional parts so you can buy just what you need. If you have a Mac dash or want to add custom vents, you can buy just the basic kit from me. If you have an original dash and want everything original looking (as I do), those parts will be available.
Again, I'm on prototype #1 using my own coach and I have only seen so many model years in person, so there may be some modifications required. It will not be an easy installation. But it will eliminate many of the custom parts you'd have to design/make yourself, and provide a guide for a basic installation that you can then customize for your specific needs.
My background is as an electrical engineer but I do a lot of product development and some mechanical design as well. The GMC is my "artistic" outlet for products I personally want to exist

My dash ac is blowing hard and cold. I replaced the engine driven ac compressor with a 12vdc compressor. Air is blowing out all inlets when I turn the key but not starting the engine. AC works without the engine.


This is the 12vdc dash ac compressor on a Ragusa 2 battery tray on the driver's side.
The compressor can be set for 3 different btuH capacities depending on which wire is connected.
I am definitely interested.It will be an upgrade kit for all 73-early 76 (pre-AC redesign) coaches with or without factory AC.
Another optional upgrade will be a new indicator (aka "idiot light") panel, also laser-cut acrylic and UV printed here in the USA. I worked closely with my supplier to capture the original style. This indicator panel adds a blue "AIR COND" indicator (replacing a blank spot) so you can tell when the AC system is enabled (ie: the compressor is operating). This is a standard output of the VintageAir ECU.
The current artwork is for 73-75, rendering below:
View attachment 16128
73 coaches had an unused "FASTEN BELTS" indicator that I have replaced with the "LOW AIR" indicator used from 74-75.
In 76+ coaches, "LOW AIR" was removed and "ENGINE WATER" (coolant) was added. "SET POWER LEVEL TO TRAVEL" was also changed to "SET LEVEL TO TRAVEL AUTO".
I can modify the artwork to retain the original indicators as needed.
To retain the original wiring harness pinout (so it's "plug and play") and add a blanked out indicator, I designed a new indicator panel flexible printed circuit board that has LEDs instead of bulbs. The connector has been designed so it is compatible with dash wiring harnesses of all years. The kit will include a pigtail to add the "AIR COND" wire to the harness, it simply snaps into the existing plastic connector housing.
View attachment 16129
I plan to have several optional parts so you can buy just what you need. If you have a Mac dash or want to add custom vents, you can buy just the basic kit from me. If you have an original dash and want everything original looking (as I do), those parts will be available.
Again, I'm on prototype #1 using my own coach and I have only seen so many model years in person, so there may be some modifications required. It will not be an easy installation. But it will eliminate many of the custom parts you'd have to design/make yourself, and provide a guide for a basic installation that you can then customize for your specific needs.
My background is as an electrical engineer but I do a lot of product development and some mechanical design as well. The GMC is my "artistic" outlet for products I personally want to exist
Kool I already make a Telltale replacement? Uses LEDs and eliminates the original connector?
Options! Telltale
Hello,I guess depending on the year of the coach. My 77 I did not have to remove the dash....just the complete box from the outside. I used the original ducts and plenum.
Will you be able to send or post the dimensions, thickness of the bracket used to mount the old Hurricane unit?
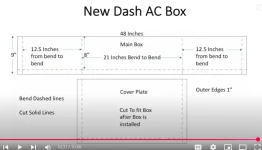
How to fabricate bracket.
Jeff
This is a screen shot of a video that Co-Op did a few years ago.Hello,
Will you be able to send or post the dimensions, thickness of the bracket used to mount the old Hurricane unit?
How to fabricate bracket.
Jeff
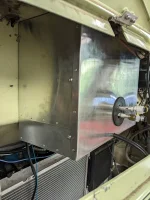
I made my box a couple of inches taller to give me more room to connect the defrost vents.
I saw the finished product in person when I went to Co-Op's closing sale