Hi there,
New GMC owner here. I have been searching the forums here but had some general questions that I am a bit afraid to ask but some posts seemed too in depth for a newbie. I am mechanically savvy - I can do car suspensions/timing belts/brakes etc but my toyota 4runner seems like a piece of cake to this bohemoth. Feel free to respond to 1 or more questions IF you have time. ITs a lot to process and would love some feedback so thanks in advance.
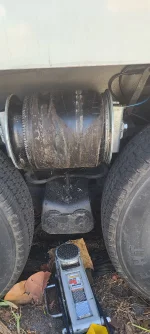
1.) Jacking up the year - I just figured out what a bogie is. when I use a traditional jack - just right under the "big black" bogie? I do have a bottle jack as well but it seems I might need that little hook thing. Does that sound right and is it a requirement to use that hook with a bottle jack? And when I jack up one side, is it going to twist and crack the windshield? Can I jack up one side and then do the other without harm? I've read to do both backs and then the front on the crossmember.
2.) Greasing - someone told me there are about 15 spots to grease. I also saw a "straw" method. Is there a list I can find? I do have a grease gun and from what I have read is to use synthetic grease. Just want to shove a bunch of grease everywhere in case its old and cruddy in there.
3.) Front end work. I am about to jack up the front and do my brakes. I bought new calipers/rotors/pads/master clinger and brake lines. I figured just do the whole thing since I have no idea how old it is in there. Anything weird that I'm going to encounter compared to a normal car?
4.) When I have the front end apart, do most people just take care of the wear parts (ball joints/bushings/shocks/tie rods)? They don't look super worn but they're definitely are going to be a future maintenance item. Can I do these at a later time? I'm afraid when I'm doing my brakes, maybe something I take apart won't go together great again.
5.) When I ordered my brakes, the wheel bearings came up. It seems this is a rabbit hole in itself. I did order new seals to see how mine are but looks like pulling out the bearing requires 1 or 2 specialized tools. Do most people just go to a shop for that? Considering its probably a rare maintenance item, I probably won't use it much.
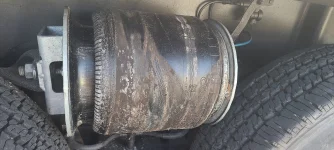
6.) Rear air bags. My rear air bags have been my 1st priority as of right now. I had just a huge leak with the rotary style power level knobs. My compressor turns on and does fill the tank. My pressure switch wasn't triggering so I have a new replacement on the way. I ordered the "power level II" switch panel which i have seen recommended which has the nice switches and it was pretty easy to install with the color coded install. BUT for whatever reason, my bags will still not inflate. I know my panel is getting the air pressure to the red line but when I follow the blue line to the bags for example - no pressure and no hissing. IS it possible its kinked somewhere or maybe some after market ball valve of some sort? Where do these lines run underneath? Are they just under near the frame or run somehow inside the cabin/under the floor. I can't seem to figure out that part although I do have some new height control valves on the way since mine are pretty cruddy.
I have more questions BUT this is my main worry for the time being - more safety related stuff. I appreciate any and all advice and sorry my jumbled up questions.
New GMC owner here. I have been searching the forums here but had some general questions that I am a bit afraid to ask but some posts seemed too in depth for a newbie. I am mechanically savvy - I can do car suspensions/timing belts/brakes etc but my toyota 4runner seems like a piece of cake to this bohemoth. Feel free to respond to 1 or more questions IF you have time. ITs a lot to process and would love some feedback so thanks in advance.
1.) Jacking up the year - I just figured out what a bogie is. when I use a traditional jack - just right under the "big black" bogie? I do have a bottle jack as well but it seems I might need that little hook thing. Does that sound right and is it a requirement to use that hook with a bottle jack? And when I jack up one side, is it going to twist and crack the windshield? Can I jack up one side and then do the other without harm? I've read to do both backs and then the front on the crossmember.
2.) Greasing - someone told me there are about 15 spots to grease. I also saw a "straw" method. Is there a list I can find? I do have a grease gun and from what I have read is to use synthetic grease. Just want to shove a bunch of grease everywhere in case its old and cruddy in there.
3.) Front end work. I am about to jack up the front and do my brakes. I bought new calipers/rotors/pads/master clinger and brake lines. I figured just do the whole thing since I have no idea how old it is in there. Anything weird that I'm going to encounter compared to a normal car?
4.) When I have the front end apart, do most people just take care of the wear parts (ball joints/bushings/shocks/tie rods)? They don't look super worn but they're definitely are going to be a future maintenance item. Can I do these at a later time? I'm afraid when I'm doing my brakes, maybe something I take apart won't go together great again.
5.) When I ordered my brakes, the wheel bearings came up. It seems this is a rabbit hole in itself. I did order new seals to see how mine are but looks like pulling out the bearing requires 1 or 2 specialized tools. Do most people just go to a shop for that? Considering its probably a rare maintenance item, I probably won't use it much.
6.) Rear air bags. My rear air bags have been my 1st priority as of right now. I had just a huge leak with the rotary style power level knobs. My compressor turns on and does fill the tank. My pressure switch wasn't triggering so I have a new replacement on the way. I ordered the "power level II" switch panel which i have seen recommended which has the nice switches and it was pretty easy to install with the color coded install. BUT for whatever reason, my bags will still not inflate. I know my panel is getting the air pressure to the red line but when I follow the blue line to the bags for example - no pressure and no hissing. IS it possible its kinked somewhere or maybe some after market ball valve of some sort? Where do these lines run underneath? Are they just under near the frame or run somehow inside the cabin/under the floor. I can't seem to figure out that part although I do have some new height control valves on the way since mine are pretty cruddy.
I have more questions BUT this is my main worry for the time being - more safety related stuff. I appreciate any and all advice and sorry my jumbled up questions.