That’s interesting. When I bought mine the PO gave me a little plastic vice grip to use on the fuel line at the separator when fueling. He said it was only needed if I was going to fill it to the top. I really dont like doing that sort of thing so your mod sounds good.A second of many annoying features on my GMC motorhome, is its propensity for dumping fuel out the carbon canister while filling up. I had a method of filling the tanks until I started to see fuel spitting up from the fill port, then quitting filling immediately.
Then I did the 'Hi Tee' mod which is supposed to allow complete filling like a modern vehicle. I filled until it 'clicked off', waited a few moments, then topped it off until it 'clicked off' again.
Two out of three fill-ups were fine. The third resulted in about 3 gallons of fuel on the ground resulting in the attendants calling the Ohio state police and an Ohio thruway safety truck. I've resolved to solve this annoying feature.
My vapor separator is not very reliable apparently. I used an Exacto knife to carefully open up the case. It consists of the case with an inlet and outlet port, a float ball about the size of a pingpong ball, a chunky stainless steel needle, and a brass seat molded into the case. The float felt light as air. I think it's not sealing because the float ball is trying to push a stainless needle into a brass seat. Testing it with my mouth, it doesn't seal well (no surprise).
It's made by Rochester, so I thought, why not install a Rochester needle valve from a carb rebuilt kit? It's got a rubber tip, which should actually seal against the brass seat. And it's ethanol resistant since it's brand new.
I turned the needle valve down to 3/16" and drilled the stainless steel original valve 3/16" to accept it, and used JB weld epoxy (claims to be chemical and fuel resistant) to install the new rubber tipped needle into the drilled stainless needle. More of a press fit would have been nice but I couldn't figure how to push it in without damaging the tip.
The float ball has a seam on it which might cause it to hang up in the separator, so I scrapped that flush with the Exacto, and went around it with sandpaper as well.
And glued the case back together with the same JB Weld epoxy.
Testing again with my mouth, it doesn't seem to leak at all now, the new rubber needle makes a tight seal.
Time will tell, will report back here how this little experiment works out!
View attachment 9519 View attachment 9520
1976 Eleganza II
- Thread starter tmsnyder
- Start date
You are using an out of date browser. It may not display this or other websites correctly.
You should upgrade or use an alternative browser.
You should upgrade or use an alternative browser.
That’s interesting. When I bought mine the PO gave me a little plastic vice grip to use on the fuel line at the separator when fueling. He said it was only needed if I was going to fill it to the top. I really dont like doing that sort of thing so your mod sounds good.
First fillup after that and no issues. I stopped filling after the second click-off. And I did the Hi-Tee mod, so the tanks are _full_
Oh, that's right, I remember you talking about roller cam options earlier. That'll be exciting! I'm getting close to getting my new engine ready as well. Good luck!View attachment 10555
I had a 455 Olds rebuilt by a local machine shop, he installed hardened valve seats for our lead free fuel, and roller cam for our ZDDP free oil. Bored 0.020 over.
Todd,
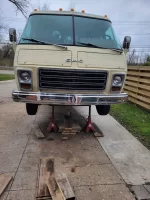
Seeing your coach up so high on so narrow a perch gives me the willies. I do hope you have a plan B.
Sorry for being such a nanny.
I got it up, now back from a long weekend out of town I'll get something under it to give me room to live if anything happens, before I get under it. Gives me the willies too.
When I remove a car tire (modern wheels are usually wide) I toss it under the subframe for additional safety if I'm going there. Single GMC wheels aren't wide enough for that but a pair is.
I don't trust concrete blocks. Hit one with a sledge hammer and you'll see why.
Totally agree, thanks Kendra
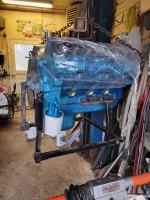
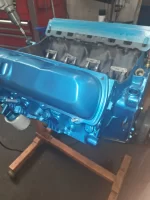
Engine for our Ellie is back from machine shop, shop had to go 0.020" over on the bore, I opted for a roller Comp cam, had hardened exhaust valve seats installed, 460 Ford rear main seal. $5200 in parts, labor, machine shop work. The roller cam added A LOT to the cost, not just the cam but the Morel roller lifters and shorter custom push rods. I'll get a specific number but I believe it was ~$2000 of the total.
I'm finishing up another project but will be starting to tackle removal of the old engine in the next few days.
Had a busy weekend. Got the old engine out, it went down thru the bottom.
Photos are posted below as thumbnails to save bandwidth.
I had already removed the radiator, all the front accessories, exhaust, starter, drive axles, distributor etc,
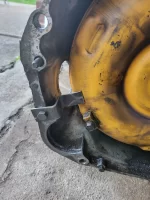
To remove the transmission, one must unbolt the torque convertor from the flex plate. To hold the flexplate from rotating while removing the bolts, I took a crude impression of the teeth onto cardboard, cut it out and transferred it with spraypaint onto a piece of scrap angle iron. Then cut it out by hand with an angle grinder and welded it onto another piece of the same angle iron. This bolts to the starter bolt holes and holds the flexplate from turning, maybe not 100% necessary for removing the bolts b/c the impact took them right out, but will be useful for retorqueing the converter back on during reassembly. Getting those torqued correctly is fairly important! and I don't want to mess around trying to hold that from rotating while trying to torque.

I also made a little bracket to retain the torque convertor so it didn't fall out while removing the transmission. Should be useful during reassembly as well.
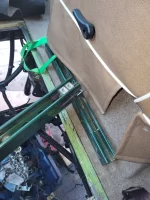
To support the rear of the engine, I welded 2 pieces of unistrut together and used the lift screw/hook and chain from a 1000lb HF engine support. I placed the unistrut bar across the hatch opening. This would provide support for the rear of the engine to remove the transmission. I picked up the engine using the distributor hold down bolt. Here's the right side of it showing the doubled up uni-strut. BTW this was all just stuff I had laying around my messy garage, I didn't make a single trip to the hardware store during this process woohoo!
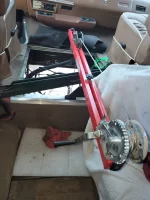
To lower the transmission, I used a TH425 lift bracket fabricated from drawings online (thank you, whoever designed that!) and the rest of the 1000lb HF engine support modified with a boat winch and a pulley bracket. The legs on the support bar were tall enough to allow it to pass over the top of the unistrut bar. Just by pure luck!

The TH425 lift bracket is designed for just the tranny, not including the final drive, so I had to support the FD with a jack stand on top of my floor jack and make multiple trips topside and bottom side to lower the transmission and FD down gradually.
Once hanging free of the coach I was able to set and balance the transmission/fd onto my floor jack and rolled it out from underneath.
I repositioned the red 1000lb HF bar to the right side to pick up the engine using 2 of the intake manifold bolts.
One downside of the support bar being low near the floor is that I had to fight the engine, a little bit, to go past the crossmember. If the cable were hanging from a support gantry high above the floor, it would have been easier to pull the engine rearward as it lowered past the crossmember.
But, it did go past it without too much trouble being lifted by a bar just over the floor level.
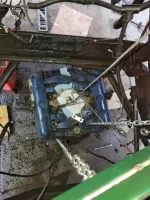
I have the front crossmember on big jack stands, they are at 28" off the concrete and was worried that it wasn't high enough. 30" has been posted online as the required height for this job.
Once I got the engine near the concrete, I started trying to figure out a way to roll this lump out of there. I decided to use a 1000lb HF moving 30"x18" dolly, it was in my garage underneath another th425. The dolly allows the oil pan to extend down through the dolly. Two ~24" long 4x4s support the engine on the dolly at the oil pan. (again, I had those 4x4 chunks stashed away, scraps from a deck build)
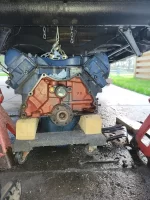
And I was able to roll it out by hand.
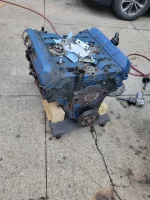
Using this method, the coach really only needs to be jacked up a little over 23 inches (not 30). With the valve covers removed, less than 23 would be required, probably not more than 22".

Photos are posted below as thumbnails to save bandwidth.
I had already removed the radiator, all the front accessories, exhaust, starter, drive axles, distributor etc,
To remove the transmission, one must unbolt the torque convertor from the flex plate. To hold the flexplate from rotating while removing the bolts, I took a crude impression of the teeth onto cardboard, cut it out and transferred it with spraypaint onto a piece of scrap angle iron. Then cut it out by hand with an angle grinder and welded it onto another piece of the same angle iron. This bolts to the starter bolt holes and holds the flexplate from turning, maybe not 100% necessary for removing the bolts b/c the impact took them right out, but will be useful for retorqueing the converter back on during reassembly. Getting those torqued correctly is fairly important! and I don't want to mess around trying to hold that from rotating while trying to torque.

I also made a little bracket to retain the torque convertor so it didn't fall out while removing the transmission. Should be useful during reassembly as well.

To support the rear of the engine, I welded 2 pieces of unistrut together and used the lift screw/hook and chain from a 1000lb HF engine support. I placed the unistrut bar across the hatch opening. This would provide support for the rear of the engine to remove the transmission. I picked up the engine using the distributor hold down bolt. Here's the right side of it showing the doubled up uni-strut. BTW this was all just stuff I had laying around my messy garage, I didn't make a single trip to the hardware store during this process woohoo!

To lower the transmission, I used a TH425 lift bracket fabricated from drawings online (thank you, whoever designed that!) and the rest of the 1000lb HF engine support modified with a boat winch and a pulley bracket. The legs on the support bar were tall enough to allow it to pass over the top of the unistrut bar. Just by pure luck!

The TH425 lift bracket is designed for just the tranny, not including the final drive, so I had to support the FD with a jack stand on top of my floor jack and make multiple trips topside and bottom side to lower the transmission and FD down gradually.
Once hanging free of the coach I was able to set and balance the transmission/fd onto my floor jack and rolled it out from underneath.
I repositioned the red 1000lb HF bar to the right side to pick up the engine using 2 of the intake manifold bolts.

One downside of the support bar being low near the floor is that I had to fight the engine, a little bit, to go past the crossmember. If the cable were hanging from a support gantry high above the floor, it would have been easier to pull the engine rearward as it lowered past the crossmember.
But, it did go past it without too much trouble being lifted by a bar just over the floor level.

I have the front crossmember on big jack stands, they are at 28" off the concrete and was worried that it wasn't high enough. 30" has been posted online as the required height for this job.
Once I got the engine near the concrete, I started trying to figure out a way to roll this lump out of there. I decided to use a 1000lb HF moving 30"x18" dolly, it was in my garage underneath another th425. The dolly allows the oil pan to extend down through the dolly. Two ~24" long 4x4s support the engine on the dolly at the oil pan. (again, I had those 4x4 chunks stashed away, scraps from a deck build)

And I was able to roll it out by hand.

Using this method, the coach really only needs to be jacked up a little over 23 inches (not 30). With the valve covers removed, less than 23 would be required, probably not more than 22".

Last edited:
I got the intake manifold with blockoff plates installed on the new engine and reinstalled in motorhome. And installed transmission this weekend. Tonight I got the transmission mounts installed and torque convertor bolted to the flex plate. It's starting to go back together!
Well you're beating me now! That sounds like great progress, well done! I just ordered a torque converter, so waiting on that will be my excuse.
Well you're beating me now! That sounds like great progress, well done! I just ordered a torque converter, so waiting on that will be my excuse.
Well, it's a slow go for sure. But hoping to make it to the Heritage Cruisers rally near Rochester NY at the end of the month as a shake down test.
I'm re-using my old torque convertor, it had sharpie marker with a date from 1991.
Do they go bad??
What convertor did you end up buying?
One of my biggest obstacles (aside from work and raising a family, of course) is the fact that my Glenbrook still works great. It's hard to force a rigid deadline on myself when in the back of my mind, I always know we can just take the old coach instead.Well, it's a slow go for sure. But hoping to make it to the Heritage Cruisers rally near Rochester NY at the end of the month as a shake down test.
I'm re-using my old torque convertor, it had sharpie marker with a date from 1991.
Do they go bad??
What convertor did you end up buying?
I had the feeling the converter in the new Palm Beach was not doing well. Either that, or it was improperly spec'd in this application. Felt like maybe it was slipping too much, or maybe it was just a high stall for some reason? You can really feel the difference between the way the Glenbrook climbs onto the alignment rack/lift vs the way the Palm Beach did. The Glenbrook just lays the torque down to the ground the way you'd want it to, while the Palm Beach did...something else.
I ended up ordering the Heavy Duty one from Applied. It's going to cost me a pretty penny with the core charge or two shipping charges. Oh well. I want to believe it's a good choice for the long haul. The old one is of unknown origin, and performance was under suspicion. I've read lots of stories about TCs swelling, putting excess pressure on thrust bearings, wiping out motors, etc. I hate to spend several hundred for little more than some peace of mind, but it is what it is. Fingers crossed I feel a notable improvement in drivability and I can chalk it up as a justified purchase.
New engine is in and running well after working out an issue with a couple lifters. New tranny seems to shift fine and working well.
One mod along the way, I split the fan shroud in two with a bolt flange. So to get at the front of the engine I remove 4 3/8" nuts and 4 1/4" nuts.
![20240527_125037[1].webp 20240527_125037[1].webp](https://www.gmcmotorhome.org/data/attachments/10/10651-29d9c286a554eec3dc875c0de0598fb9.jpg?hash=pQTWNWLgyR)
![20240527_125041[1].webp 20240527_125041[1].webp](https://www.gmcmotorhome.org/data/attachments/10/10652-d4951d499d304e449c05576c17fab425.jpg?hash=lKvIEWFskL)
![20240527_125045[1].webp 20240527_125045[1].webp](https://www.gmcmotorhome.org/data/attachments/10/10653-0cbba0a1ef4492d7be8b76805ba38ba8.jpg?hash=qlHqcNxZJO)
Makes access to the belts and front of engine _very_ convenient. Should have done this years ago. I highly recommend taking the time to do this, it makes life much easier. I have since riveted the loose bottom 1/8 plate to the bottom tin ring to make it much easier to reassemble.
Was able to upgrade to a 3.42 final drive thanks to a fellow GMCer that is selling off his stuff. I bought his rebuilt tranny while out in Corunna for the rally, ran out of money so couldn't get the FD and while talking to him about the tranny he mentioned he still had the FD for sale for a price I couldn't turn down. He didn't mention it came with a Ragusa cover so that was a very nice surprise when I opened the box!
Nice job with the shroud! I have similar plans with mine scheduled for this week or next. I can't wait for that mod to be done, and I certainly understand your desire to do it. When I pulled the motor I vowed: never again.
What happened with the lifters? You had all brand new rollers didn't you?
What happened with the lifters? You had all brand new rollers didn't you?
What happened with the lifters? You had all brand new rollers didn't you?
Installer error, forgot to tighten the locking set screws on the rocker nuts on the final cylinder I did, #2. Ran fine at first, then started missing and clattering on its initial shakedown drive. I was sooooo happy when I found that was the problem. I thought I was going to have to pull the intake manifold!
Then, b/c I'm a chevy guy and the Olds distributor rotates the wrong way, looking at the rotor, I set the lash on #2 while it was TDC on #8. Needless to say, there was still a tick. So, took off the valve cover again and got it TDC on #2 and set the lash finally correct the 2nd (3rd) and final time.
I'm not embarrassed to say that I sometimes make mistakes. This work isn't something I do everyday. But it makes it appropriate to say that I do it Nice, b/c I do it Twice. And in this case I did it twice as nice b/c I did it thrice!
Well I'm glad it was a mistake that didn't produce glitter! Can't wait to find out what I've goofed up. I've had a lot of late nights lately...

