1976 Eleganza II

  • Please note, the forum recently had a problem with outbound emails for notifications, registrations, etc. A new email provider has been set up which should resolve all email issues. If you have any further trouble, please DM Christo or reach out via the Contact Us link in the website footer.
I believe this is the fabric we used for the seats; the bunk bed couch and the dinette. The rear dinette is in my outbuilding, not going back in the RV, we're putting a bed platform in the back with storage underneath.

I found this online regarding rub counts LOL

Discussion | Fabric Grades
  • General Contract Upholstery – 30,000 to 50,000 double rubs.
  • Heavy Duty Upholstery – 55,000 – 75,000 double rubs.
  • Extreme Wear Upholstery – 80,000 to 100,000 double rubs.
This is extremely soft feeling though, it doesn't feel tough to the touch.

The actual fabric is showing on the top, above my hand. The bottom color is the next sample in the stack. We went with the darker brown.


20200116_082021[1].jpg
 
I'm still getting a little bit of water from holes drilled into the extrusion the exterior 'rail' is screwed onto. So I called GMC Coop and talked with Jim Bounds about how to seal this. I was hoping to just clean up the roof/rail joint and run an exterior bead of some magic sealant. He said 'nope the rail has to come off' so here I am and what follows is pretty much what he said to do.

First I got out my torx bits and found the one that fit. Then I gave each one about 20 raps with my smallest ball peen hammer. I hit it pretty hard but not enough to damage the threads in the aluminum. Also I found a pick handy to get the 44 years of gunk out of the torx pocket.

Then I put a ratchet on the bit and tightened the screw ever so slightly. Just enough to see movement. Then I reversed the direction of the ratchet and tried to move it ever so gently CCW. Then back and forth dozens of times and eventually the threads would feel loose enough to start increasing the amount of movement until there was almost no resistance and then I could take it right out. The time investment has to be made in those dozens of initial movements.

On about the 6th one I was feeling pretty confident and tried to make progress too fast and broke the head right off . It took surprisingly little effort. Not much torque. They are actually pretty small screws, 10-24 by 1" i believe. After that I abandoned the ratchet and looked for a tiny breaker bar which I didn't have. I ended up using a 3/8 drive speed wrench and it was perfect. With one hand near the center and just using my wrist, I had very little leverage on the screws so the torque could be very small, and with no ratchet I could flick it back and forth very quickly to get those initial movements into the screw. It paid off, no more broken screws. And the next day, after removing the rail, there was enough screw exposed that I was able to get it out with a pair of vicegrips.

To remove the rail, it came off with my bare hands by lifting up under the bottom edge of the rail. Starting at one end I rolled it upward first from the bottom edge, then down from the top edge. Both ways I could feel whatever was holding it give up and break eventually. By the time I worked to the other end it was only held on by threads of adhesive and those broke when I pulled the whole rail forward. I did NOT lift up from the end of the rail or pull it completely away from the body as that would have bent it. I only rocked it up and down holding it against the body.

Here's what was under the rail, 44 years of S California and El Paso TX dust and someone's attempt at sealing the rail to the roof with asphalt roof seal:

20200504_174008 small.jpg


Here's what's left of the seal, I think it was a piece of ~1" wide foam tape. Similar foam tape was used to seal the window frames to the body. The rail here is laying on the roof upside down b/c I flipped it over onto the roof.

20200504_174454 small.jpg

This has to be the original foam gasket under this front end cap.

20200504_175202 small.jpg

I have a gas can of bad fuel from the GMC prior to having the tanks boiled out and sealed, so I use gas a lot for cleaning on the GMC. It also softens the black sealant on the extrusion, I don't want anything in the way during the reinstall. There's a groove there, and a tab on the rail that looks like it was supposed to fit into the groove. But mine wasn't installed there from the factory. Mine was installed just below the roof sheet edge, on top of the extrusion. I have a feeling that the rivets wouldn't be covered if I install it where it's probably 'supposed' to go.

20200504_180234 small.jpg
 

Attachments

  • 20200504_173901 small.webp
    20200504_173901 small.webp
    104.1 KB · Views: 47
That job looks...icky. That's all I can think of. Great job pushing through it, you'll rest easy knowing it's all squared away when you're done.
 
Still just working on the driver's side rail. Got the rail down and all cleaned up. Jim Bounds recommends drilling and tapping to get the rail tab into the body slot. Wurth Bond and Seal goes in a bead on the roof sheet, just above the exposed extrusion, basically directly across the rivets. So the rail went on for a test fit, drilled and tapped holes (10-24) , and taped off the joint so when it squirts out after screwing down the rail I can wipe it with my finger and peel off the tape leaving a neat finish.

Got all the gook off the rail, removed burrs from tab around holes for easy insertion in the groove.

20200506_155219 small.jpg


Test fit, drilled and tapped holes that were not in the groove. 1976 assembly went about 1/2" up higher than it should have, tab wasn't in the groove on the front 9. Once in position, taped off the joint for cleanup:

20200506_171646 small.jpg


Flipped the rail onto the roof, placed a 3/8" bead of Bond and Seal on the roof about 3/4" below the tape on the roof. Carefully lowered the rail into position, making sure to get the tab into the groove and started some of the screws, then tightened them all in place. Ran a little bit more Bond and Seal along the joint, fingered it smooth and peeled off the tape:
20200506_201620 small.jpg


It was a lot of scraping, wire brushing, soaking with gasoline, wiping, .... to get all that gook off and get it back together.

Now I'm looking at the screws and thinking they are definitely going to leak. Why would GMC design it this way. The heads don't sit flat, and even if they did it's Aluminum on Steel, metal on metal, not really sealed. I'm ordering these:


The sealant is supposed to squish up against the fastener while the washer seals to the surface below, in this case the rail.

One side down, one side left to go.
 

Attachments

  • 20200506_155219 small.webp
    20200506_155219 small.webp
    120.8 KB · Views: 52
  • 20200506_171646 small.webp
    20200506_171646 small.webp
    32.9 KB · Views: 53
  • 20200506_201620 small.webp
    20200506_201620 small.webp
    53.8 KB · Views: 52
Last edited:
  • Like
Reactions: ScottC and 6cuda6
Very tidy, well done! Maybe we should have this as a separate how-to in the tech section? Looks like a pretty good guide to me.
 
I was under the impression that the seal came from butyl tape type sealer pressed into the rail above a below the center groove. Is that not correct? Also, what kept water leaking through the screws holes from the factory? Was the butyl tape covering the entire area top to bottom on the rail?
 
I believe my rail was untouched, and what I found was the remnants of foam tape with what was once a single sticky side, stuck to the rail just below the upper edge, about 3/4 to 1 inch wide under the rail. It was the same type of foam tape sealant I found sealing the window frames to the body, just wider.

The only butyl I found under the rail was some messy caulking, excess that had come from where the roof sheet was riveted to the extrusion. There's a layer of black butyl there, still pretty sticky and gummy. It appeared to be more of a contaminant in the rail to extrusion joint though, there didn't appear to be any system of sealing the two pieces together with butyl, thankfully b/c it would have been more difficult to get apart.

I think if you try to seal the rail down with butyl, it will be too firm and since the rail is so flimsy and the screws are so far apart, it won't end up looking good or sealing. The rail would have a dip in it at every screw. It needs to be a soft bead of some material that gets squished into final shape and then gets firm, but not hard. The Wurth Bond and Seal from the Coop does this, but I just wish it didn't remind me of silicone so much. No vinegar smell but the end result looks and feels a bit like it. I did screw down the end caps with black butyl underneath.

I don't believe there was anything from the factory keeping water from going past the screw heads, down the threads and into the interior of the extrusion, except the fact that the screw heads were tightened against the rail. Maybe there was a sealant under the screw head I just didn't notice. After 44 years it could have turned to dust. Something as simple as a little plumbers putty under the screw head would do it for a few years.

The other thing I noticed was that the way it is assembled, water tends to shed down and out by design. The roof sheet is on top of the extrusion, the side panels are under the extrusion. And the groove is water tight until they drilled a bunch of holes for the rail to screw on to.

You wouldn't want any sealant under the bottom half of the rail b/c at that point you want the water to continue down onto the outside of the body. If you seal it below the rail screws, any water that gets under the rail will back up and possibly find a way to get inside the coach.
 
  • Like
Reactions: Mike Perez
It's forecast to rain, so putting the other rail on hold for a bit, turning back to the interior. I measured for the first panel above the under-window trim. Started with the piece just behind the drivers seat. Cut it out of plastic cardboard and test fit, trimed, fit repeat until satisfied. Tried it on the passenger side and woohoo it's the same or at least close enough! Covered it with the same foam backed white pleather as the ceiling. I wrapped the 'tips' that will butt against the strips of the same material over and under the windows, there will be butt joints of these panels just as the original had. To do them all in one panel would have wasted a ton of headliner material and I probably would have kinked the panel putting it into place, would be very flimsy.


20200510_213222.jpg20200510_214549.jpg

I'm still waiting on seat belts or else I could install the lower wall panel and then get these installed, so no final install picture :(
 
  • Like
Reactions: 6cuda6
Kind of bouncing around a little, still threatening to rain. so inside, in the rear, I want to start cleaning up the plumbing and water system. Changing out the old nasty hoses and cleaning up. First thing was to change out the fill hose. Someone has been here. The flex hose has a silicone goobered union from one size to another half way. And the floor is pretty well rotted out in the vicinity of the tank from water leaking in.

I grabbed the fill hose to remove it and this happened:

20200513_140345.webp

GMC just stuck this on with sticky tape? Then the PO goobered it up with silicone, wtf.

Just some kind of sticky tape? And silicone residue of course:
20200513_142058.webp

Cleaned gunk off, it's ugly but original:

20200513_143011.webp

I made a piece of plywood with 6 set screws in it to push on the water inlet panel and hold it while the Wurth Bond and Seal cures, taped it off and installed it:

20200513_170317.webp

20200513_172148.webp

20200513_172242.webp

20200513_172329.webp

20200513_172337.webp

So it's still ugly but at least the water is staying outside I hope. There was so much ElPaso dust and dirt down inside the wall from where this was leaking.
 
Got the water tank out, it looks like the original 30 gallon tank, maybe? The wood in the back is really spongy, I think this tank was leaking for the last 44 years. I've ordered some brass bulkhead fittings, the original were plastic with an o-ring seal, the surface is not smooth so I can believe it was sealing.

That's some fine siliconing gooberage right there:

20200513_214413.webp

Level sensor is beyond hope

20200513_214719.webp
 
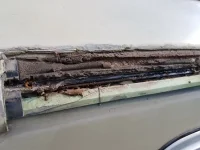
We had some good weather coming up so it was time to reseal the passenger side 'rail' dripedge. This side was actually less molested than the driver's side, probably because there was an awning track screwed to the roof above the drip rail, so the PO couldn't get his silicone caulk gun on the top edge. The big take away lesson is that the original seal was foam tape stuck to the rail pressed against the roof after install, and there is no sealant in the groove.

Immediately after removing the rail. Notice the only black gooey sealant in the area of the groove is whatever may have squeezed out from under the roof panel. No significant, deliberate application of sealant in the groove. The only seal was along the line of rivets on the roof panel.


20200521_145633.webp

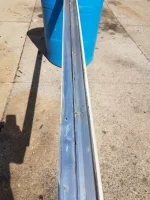
Here's the rail immediately after it was removed, it's upside down so the bottom is the top. Notice there is no sealant on the ridge where the screws go through into the groove. Also notice the only seal is between the upper part of the rail and the roof panel, that black strip used to be foam tape.
20200521_145656.webp

Gasoline works the best for cleaning this up. Putty knife, paper towels, gas, and wire brush:

20200521_150630.webp

Extrusion before cleaning:

20200522_092244.webp

Extrusion after cleaning:

20200522_094148.webp


Dry fit, make sure it goes on ok, and tape for Wurth Seal and Bond:

20200522_115137.webp

Tape it off top and bottom:

20200522_122736.webp

With a helper, practice holding the rail about a foot away from where it is going then bringing it straight in towards the body. A pair of marks on the tape help to get the screw holes aligned properly while installing the rail onto the Bond and Seal.

20200522_144544.webp

Cut the Wurth Bond and Seal so it gives a 5/16 bead or so, and apply it to the roof right straight across the center of the line of rivets. This puts it on the upper half of the rail and you should get some squishing out of the joint onto your tape on the roof. Naturally, after this photo was taken I was in such a rush to get it on the roof and get the rail in place that I didn't take a picture of the bead on the roof.

20200522_144632.webp

In places where it didn't squish out of the rail, I ran the Bond and Seal into the gap, pushing it under and filling under the rail, then cleaned up the fillet with my finger. Then peeled off the tape strips leaving this:

20200522_152048.webp

You can see here where the Wurth Bond and Seal has created a water seal between the roof panel and the drip rail. This is where the original seal was a 3/4" wide strip of foam tape:

20200522_152201.webp
 
  • Like
Reactions: 6cuda6
So if i understand your process correctly when your done their should be no sealer IN the joint [within reason] ? Also how did you seal the actual fasteners to prevent any leak with them?
 
Correct, I'm just putting the seal where they put it at the factory. Just under the top lip of the rail. I didn't see any sealant consistently around the threads of the fasteners as originally built and I'm very sure that the rails on mine had never been off.

If water gets past the top seal you want it to have a clear path to drain out the bottom under the rail. The way it's designed the water sheds down and out. The only way into the coach would be past the threads of the screws.

I would put something under the heads of the screws before tightening them against the dripedge rail, like butyl. In the picture are washers from McMaster Carr that are supposed to form a seal around the screw and seal against the rail, but butyl would be better, I may back those out and put a little under the washer and then re-tighten them.
 
Update on the headliner:

With the hot weather things are sagging. Not happy with the plastic cardboard!! I'm going to have to either figure a way to screw it up to the ceiling or rip it all out and start over again with another panel material.

:mad:
 
Did you make the seams/joints the same a factory or extend them further? If you remember were all the roof bows are you could add a couple snap tracks across the roof to secure it in place better and shorten up the span.

Update on the headliner:

With the hot weather things are sagging. Not happy with the plastic cardboard!! I'm going to have to either figure a way to screw it up to the ceiling or rip it all out and start over again with another panel material.

:mad:
 
  • Like
Reactions: tmsnyder
That's one option I'm considering, 1" wide 1/8" thick aluminum flat stock, and put one on every roof rib. I did measure where they all were prior to covering it up. It just stinks.

If I wanted to do it all again, I'd probably buy 20ga aluminum sheet metal and make it from that using the same headliner material. That would hold shape no matter the temperature. I might do it anyway.

Did you make the seams/joints the same a factory or extend them further? If you remember were all the roof bows are you could add a couple snap tracks across the roof to secure it in place better and shorten up the span.
 
You could cover them with same fabric and they wouldn't look out of place at all

That's one option I'm considering, 1" wide 1/8" thick aluminum flat stock, and put one on every roof rib. I did measure where they all were prior to covering it up. It just stinks.

If I wanted to do it all again, I'd probably buy 20ga aluminum sheet metal and make it from that using the same headliner material. That would hold shape no matter the temperature. I might do it anyway.