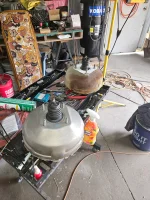
So what did you do to your GMC today?

  • Please note, the forum recently had a problem with outbound emails for notifications, registrations, etc. A new email provider has been set up which should resolve all email issues. If you have any further trouble, please DM Christo or reach out via the Contact Us link in the website footer.
Ashamed to share. I installed gas strut supports on my generator door today. Worked great a couple of times. Then one side broke. RATS!
23 ft GMC Door Lifts (230 by KenH
http://www.gmcmhphotos.com/photos/showgallery.php?cat=3118

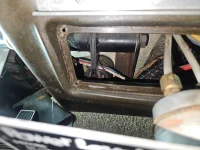
When I bought some door lifts from Gasco in Florida about 10 years ago, they came with some directions on how to reinforce the door so the hinges did not crack the doors due to the increased loading from the air lifts. Their directions were to drill out the pop rivets for the hinges and fill the cavity adjacent to where the rivets were attached with Bondo (I used the fiberglass filled Bondo).
Then, drill through the original holes for the hinges, through the Bondo and through the second fiberglass webs just below where the hinges were attached. The hinges were then reattached using # 10 bolts. By filling the cavity between the two door webs, the hinge mounting is probably more
than three times stronger then the original configuration. Chuck
 
I added side pipes, recived fiberglass fender flairs. Chin spoiler and visor, Also getting a collection of parts for the Aces EFI. Contimplating a shaker from a T/A for the hump. What do you think?
 

Attachments

  • Screenshot_20250708_183350_Chrome.webp
    Screenshot_20250708_183350_Chrome.webp
    141.6 KB · Views: 12
  • 20250707_165410.webp
    20250707_165410.webp
    2.1 MB · Views: 14
  • 20250707_144500.webp
    20250707_144500.webp
    1.4 MB · Views: 12
  • FB_IMG_1751162807976.webp
    FB_IMG_1751162807976.webp
    399.6 KB · Views: 15
  • Screenshot_20250708_183350_Chrome.webp
    Screenshot_20250708_183350_Chrome.webp
    141.6 KB · Views: 11
I took mine in for emissions (again). This actually started yesterday when I had it in to the garage for some carb adjustment. Jim, the mechanic, said it was VERY touchy, and by the time I got to the testing facility, it had changed and it failed again.

Back down there this morning and through a bunch of adjusting etc, Jim got the idle air fuel adjustments where they needed to be, but every time he would rev it a little, it would change when it came back down to idle. When he hooked a tach up to it and found that it was running about 100 RPMs higher than it was before the rev. He added an additional spring to the throttle and it stabilized the idle and the emissions.

Meanwhile, during all the starting and stopping sequences, the key cylinder decided to freeze up, so the engine could not be shut down. Good place for that to happen, it had been kind of wonky for some time. Jim ordered a new key cylinder and I went back down to emissions. It passed this time, no problem.

Back to the garage where Jim replaced the ignition cylinder and it worked better than I can remember it ever worked. I'm happy it happened there rather than at a gas stop or out on the road somewhere.

Always an adventure!
It sounds to me it is time to get the carb throttle shafts rebushed. Any play up or down or side to side?
 
  • Like
Reactions: Carl Stouffer
I took mine in for emissions (again). This actually started yesterday when I had it in to the garage for some carb adjustment. Jim, the mechanic, said it was VERY touchy, and by the time I got to the testing facility, it had changed and it failed again.

Back down there this morning and through a bunch of adjusting etc, Jim got the idle air fuel adjustments where they needed to be, but every time he would rev it a little, it would change when it came back down to idle. When he hooked a tach up to it and found that it was running about 100 RPMs higher than it was before the rev. He added an additional spring to the throttle and it stabilized the idle and the emissions.

Meanwhile, during all the starting and stopping sequences, the key cylinder decided to freeze up, so the engine could not be shut down. Good place for that to happen, it had been kind of wonky for some time. Jim ordered a new key cylinder and I went back down to emissions. It passed this time, no problem.

Back to the garage where Jim replaced the ignition cylinder and it worked better than I can remember it ever worked. I'm happy it happened there rather than at a gas stop or out on the road somewhere.

Always an adventure!


Any photos?
 
After nearly 50 years, the original body pads that separated the steel chassis from the aluminum body frame have been completely crushed. We listed the body just enough toreplace the pads with hockey pucks just as Jim Bonds recommends.
With a number of jacks, we lifted the body just enough off the chassis to remove the original pads and insert the new "puck" replacements.
I think that there are 24 of them. Only 4 required to be drilled for bolts.
They served to prevent galvanic corrosion between the aluminum body frame and the steel chassis.
At least the hard rubber pucks are a little flexible when they are not packed in ice before a practice or game.
Using the pucks is much easier than fabricating 24 custom pads.


View attachment 4A009EA8-AE36-4D34-AE10-6173F03FE3CF.MP4
 
We are installing a new FiTech fuel injection system along with the new 70 gal aluminum tank with new filters and a pair of electrical fuel pumps.
IMG_2001.webp
This is what the new Jim Bound's COOP 455 looked like with the old carb, distributer and spiderweb electrical wiringIMG_2086.webp.So far, the new FiTech is in place and the old wiring has been simplified and organized.
We have to fabricate a new throttle bracket (in the foreground) to make the FiTach throttle work in place of the carb.
IMG_2088.webp
Replacement Throttle Plate.
IMG_2831.webp
We have blocked off the old port for the old mechanical fuel pump in order to install a pair of FTach electrical fuel fuel pumps along side of each other. They will be wired so that only one of them can work at a time and in the event of a pump failure, the back up pump can be energized by throwing a single switch.
Redundancy.
Although the electrical power from the pump comes from the FiTech control system, these pumps draw 10 to 15 amps @ 12vdc by themselves. This is much more than the original gas pumps used.
According to FiTech, The FiTach unit draws 10-15 amps, the pump, 10-15 amps and the fan 30-40 amps. This is a maximum current draws of 70amps @ 12vdc. Can your alternator handle that along with the other 12vdc needs on your coach?
I have upgraded my alternator to a Balmar 160 amp, 12vdc alternator (red One) controlled by a very sophisticated WakeSpeed remote regulator that is programed to charge a battery bank of (10) BattleBorn 12v 100ah battereis (1,000ah).
I suspect that a lot of fuel injection failure or under performance issues are coming from a limited availab=ility of clean 12vdc current, especially when another device needed 12vdc power starts up. That might cause intermittent problems with the fuel injection system.
The separate DieHard Gold starting battery is charged by a Sterling 12v t battery to 12v battery charger. The DieHard provides 800 CCA to start the engine without drawing current from the FiTech.
 
Last edited:
Well, I had planned on wrapping up my engine gauges install, but I went outside and found a slight electrical anomaly, lol. I'm guessing rainwater got in and created a short, as there was nothing in the coach drawing power, aside from a clock and the battery tender. I run 20 amp service, just to keep the battery charged and occasionally, the ceiling fan. I plan on cutting out most of the old OEM cord and using a detachable cord I can store more easily in the coach.
 

Attachments

  • 1000023962.webp
    1000023962.webp
    512.5 KB · Views: 11
  • Screenshot (348).webp
    Screenshot (348).webp
    20.8 KB · Views: 11
  • Wow
Reactions: RvRev2 and Kendra
Replaced the passenger side windshield wiper (took some time to get the part ordered in), AND investigated the dash A/C. Fluid came out when I pressed the schrader valve, so I took the chance that it was just low on refrigerant. Charged it up with some Duracool (that I heard about on this site) and now it is cooling away. Too bad the air flow stinks!
 
Today I played with the Dash A/C. I had just got it charged up and running, but air flow was just about nil. I have a '76, so I pulled off that vent add-on in the center, under the dash (see attached pic). I took a peak in there. The little door that is supposed to channel all the air flow through that add-on vent wouldn't close on its own. I guess that original vacuum control system doesn't work anymore. So, I just crammed a block of wood in there to keep that little door shut. It worked. I can actually feel the air flowing now. It ain't stupid if it works, right?

I also used a trick someone on this site recommended. I just barely cracked open my driver's side window while driving down the road. Sure enough, it produced a vacuum that made that cold air coming out of that vent add-on flow right across my body. Thanks guys!

I've decided that, instead of trying to repair my 50 year old dash A/C system, I'll just add a second evaporator inside the cab. I'll either put it in the center, under the dash, or perhaps under the sofa behind the driver's seat. That will be a project for next year.
 

Attachments

  • 20241009_121617.webp
    20241009_121617.webp
    1.4 MB · Views: 5
  • Like
Reactions: pvfjr