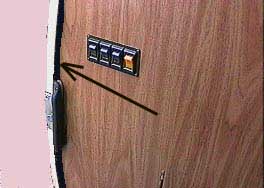
Door does not latch, loose

Guys,

I am about to tackle the door to get a smooth closing door.

I will take off the 1/8" from the mounting plate via a Bridgeport.

I was wondering how to remove the original pin and turn it on the latch. Did you guys grind the weld and reweld or just machine a new pin without the rubber inside the steel sleeve?

Thanks in advance and have a wonderful weekend,
Tom K.
 
Pin is welded on back side so you can grind off the grind and punch the pin out.
Bill Bramlett just replaced with a 1/2" pin and skipped the rubber. The outer 3/4" diameter was to keep the original rubber in place so if you go with a solid new pin, it wouldn't be necessary.
The plate is galvanized so you might want to grind off the surface before welding.
 
I alway find it interesting how there are differences with the parts from different year builds.My 78 pin had a loose fitting metal sleeve around the pin.I wonder when the change was made or was mine a fix by the PO? I did the machining without pulling the pin.Always something to learn about our couches.
 
Pin is welded on back side so you can grind off the grind and punch the pin out.
Bill Bramlett just replaced with a 1/2" pin and skipped the rubber. The outer 3/4" diameter was to keep the original rubber in place so if you go with a solid new pin, it wouldn't be necessary.
The plate is galvanized so you might want to grind off the surface before welding.
I alway find it interesting how there are differences with the parts from different year builds.My 78 pin had a loose fitting metal sleeve around the pin.I wonder when the change was made or was mine a fix by the PO? I did the machining without pulling the pin.Always something to learn about our couches.
I believe there was rubber between the post and the loose fitting sleeve. The rubber may have deperated and left the loose fitting ring To dangle around the post. I was going to squeeze my ring closed tight and tigwell the seem keeping the metal cool so as not to burn the rubber. I may try that first before grinding.The mountain plate and machining a new post.
 
  • Like
Reactions: Loin Lounge
I haven't carefully read this whole thread, so I may be posting something that has already been covered... but here goes...
The door pin latching mechanism has several springs which can crack or weaken over time. With a weak spring, the latch does not capture the pin properly.

The door latch is still available from Peterbuilt, PN 20-08229R. I got this PN from an Emery Stora post.


I recently opened my door, cleaned and lubricated both the latch and the handle assembly. The door latches tight every time now.

Door latch release lever.webp
 
Amazon has the same part #
20-08229R/dp/B0D2QVC548/ref=asc_df_B0D2QVC548?mcid=3709c1a8fed83fbfae277f4e88a82da6&hvocijid=16758175686763406400-B0D2QVC548-&hvexpln=73&tag=hyprod-20&linkCode=df0&hvadid=721245378154&hvpos=&hvnetw=g&hvrand=16758175686763406400&hvpone=&hvptwo=&hvqmt=&hvdev=c&hvdvcmdl=&hvlocint=&hvlocphy=9029261&hvtargid=pla-2281435176938&th=1
 
  • Like
Reactions: Loin Lounge
The problem that I am having is not that the door does not latch. It's how hard I have to slam the door to get it to latch. I've come across some coaches that it just lightly pushes shut and latches beautifully. It is my new quest is to get mine to function in the same manner. Simply do not have to slam the door.
 
Mine closes fine but doesn't seal well, particularly at the bottom 1/3. I've tried adjustment. It's a project for further down the line but I don't like it. Another symptom is the door open nag light is always going off.
BTW, are replacement door seals available?
 
Here is an adjustment that has never been mentioned that a friend told me.

Remove the door pins and set door to the side. Take a long straight rod that
will slide through the top hinge and see if it matches up with the bottom hinge.

If hinges are not inline, could this create a bind from middle age bulge.
 
Mine closes fine but doesn't seal well, particularly at the bottom 1/3. I've tried adjustment. It's a project for further down the line but I don't like it. Another symptom is the door open nag light is always going off.
BTW, are replacement door seals available?
Do you have a gap on the inside between the door jam and the cabinet. This is due to the middle age spread as the coach body expands out.


From the archives
https://www.gmcmotorhome.org/threads/middle-age-spread.1290/
 
To pull-in my "middle-age spread" gap, I used a turnbuckle from the door frame to a metal bracket on the back side of the wall. It's hidden and accessible through the refrigerator vent opening. Mine has been in place for about 15 years now.
 
I just inspected the cabinet joint and curve of the door and coach. When closed completely, the line looks great. The problem is just how hard I have to slam the door to engauge the second catch. It appears that there is no spread as of yet.

I just ordered the Peterbuilt latch and handle to add to the complete list of possible repairs to conduct regarding the door. I thinks if I get started I'll want to do it all and not wait for parts. I will report back.

Take care,
Tom K.
Tom,
FYI, the Peterbuilt door handle assembly needs a modification due to the way Peterbuilt positioned it's connecting rods (or cables). See the photos in the link below for an explanation of what needs to be done.

 
Do you have a gap on the inside between the door jam and the cabinet. This is due to the middle age spread as the coach body expands out.


From the archives
https://www.gmcmotorhome.org/threads/middle-age-spread.1290/
My cabinetry there had been replaced when I got the coach and I have replaced it since (along with the refrigerator). I thought about "middle-age spread" but then thought, "nah, that wouldn't happen", so will revisit that. I like RF_Burns idea and will consider that upon further inspection.

Thanks!
 
Since the day I bought our GMC, the door has closed hard with only catching the first latch. I thought I had done everything to the door to correct the issue, but slamming the door was the only way I could get it to close and hold at only the 1st latch. This thread gave me the impetus to try again. So with the help of Paul Doane who has helped himself and several others correct the issue, he started by putting a piece of paper between the door and the frame, closing the door and puling the paper out noting the resistance. We found the paper test to be quite tight at latch/striker plate. We started then by moving the striker plate toward the outside as far as it would go. Still would not go to the second catch. So, we took the door seal off. Using Lacquer thinner in a finger tip spray bottle, we easily pulled the whole seal off without damaging it. Without the door seal, the door closes easily to the second latch. What I then found out is that there are two styles of door seal. The original which is a pretty thin flat rubber seal and replacement seals that are much thicker and hollow to allow for compression sealing. So, at the hinge where there is a lot of space between the door and the door frame, I put the old full thickness seal back in, but for the latch side of the door, I cut the old seal in half down the length, removing the hollow, and then glued the seal in place with contact cement. Now the door closes to the second latch with a normal push. The hinge seal is a little tight, but I figure after a couple of months use, it will eventually get a compressed set allowing the door to close even easier. My striker needed to be adjusted as far outward as possible and centered up and down with the latch so that the both hooks of the latch center around the striker post. When I get home, (we are south for the winter) I am going to try the original door seal all around the door. I'm told that a original seal is much more expensive than replacement seals and may be why some of us have, because of price decided to try the replacement style, not knowing that it might be causing the slamming and only single latching.

So, that's my experience. Hope it helps someone.
 
  • Like
Reactions: pvfjr and Bhart
Larry,

Please keep us posted. I purchased a new replacement seal and that may be part of the problem.

I have the striker post adjusted all the way outbound as far as I can get it before the steel mounting plate extends beyond the door frame.

I was going to place the mount in the bridgeport and see if I could shave off an additional 1/8th inch, which would allow me to move the plate a little further out.

I have the new seal with the hollow center.

I also have a water leak at the top of the door which maybe related to the same issue.

I should be receiving Ithe drip rail for above the door tomorrow. I am hoping that would help with the leak at the top of the door.

Thank you for your input, I'll wait to hear back as well.

You and Lucy have safe travels and stay healthy.
 
Tom,
Just got off the phone with Jeff Sirum and got the old original style gasket/seal. He said it is about 3/16" thick and hollow. Won't get a chance to install it until week of Feb 24th. Will report then on how it works out.

That drip rail should take care of upper door leaks. Won't cure the leak but will keep a lot of the water off of the top door seal.

Be safe out there my friend.
 
Larry,

...

I have the striker post adjusted all the way outbound as far as I can get it before the steel mounting plate extends beyond the door frame.

I was going to place the mount in the bridgeport and see if I could shave off an additional 1/8th inch, which would allow me to move the plate a little further out.

...

Yes that is a required mod for most coaches. Trim the mounting plate and slot the screw holes to get the striker out just a little more, like 1/8" to 3/16"
I'm convinced this is a factory mistake on all coaches!