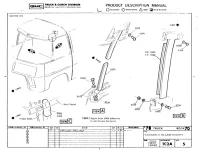
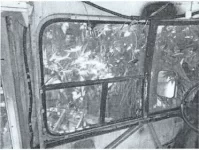
Have searched around and have had no luck finding a diagram showing how the front “A” frame cockpit windows are assembled or how to remove them. Id like to take them out to prep for repainting the coach and be able to clean them up inside and out before putting them back in. Have gotten the rear hatch and all other windows out with relative ease, but these are giving me a tough time. They are very leaky and covered with rtv from PO’s botched reseal attempts. Anyone taken these out before or have advice on how to do this?
Seeking advice for removing driver and passenger cabin toll windows
- Thread starter SpaceDrifter
- Start date
You are using an out of date browser. It may not display this or other websites correctly.
You should upgrade or use an alternative browser.
You should upgrade or use an alternative browser.
Last edited:
T McManus, thank you for such a quick response. This is exactly what I was looking for. I got the top and column brackets unbolted but still no play or movement. For the other windows I was able to knock around the perimiter with a putty knife and rubber mallet to get the windows free. But these front windows have recessed edges that Im not able to get under to pry / wedge. Do you know what the best place is to begin prying?Above the headliner and below the window under the side covers. Around the widow are plates with screws holding the window in place. Depending on how good the seal is you'll have to pry the windows out.
View attachment 8637
Success! Prying from the rear side of the window, was able to get it lifted and the rest followed fairly easy. Used a o-ring removal tool to scrap out as much butyl and various sealant from lord knows how many reseal attempts. Under the plastic cap was the original fiberglass insulation and the remains of a mouse nest made of paper towels.After you have the holders removed, pry from the inside out on the rear of the window. Use a small block of wood against the window frame.
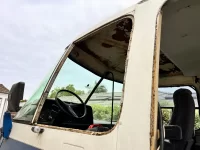
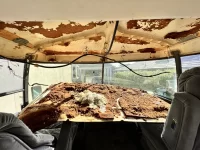
What was your process of removing the inside front cap? Mine won’t budge at the rear and I am thinking there must be clips holding it rearward. Does it slide forward toward the windshield?
Ed
Ed
What was your process of removing the inside front cap? Mine won’t budge at the rear and I am thinking there must be clips holding it rearward. Does it slide forward toward the windshield?
Ed
Hi Ed,
There is a row of three screws along the first aluminum crossmember holding the back of the front cap. On my coach they were hidden underneath the cardboard headliner / ceiling and I did not learn of them until after I ripped down the rest of the ceiling. You can see in the second pic the front cap broke off where these screws were, I ordered some 20 mesh stainless steel mesh and some ABS plastic welding sticks to reinforce and repair all of the caps. If yours is the original one piece ceiling, I cant think of a way to get to these screws without pulling the whole ceiling panel. If your cap is as brittle as mine, it broke off fairly easy from these screws. I have a wide wingspan and had difficulty getting it down in one piece. Having an extra set of hands would have been less risky.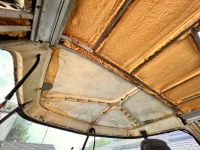
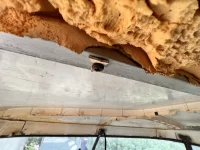
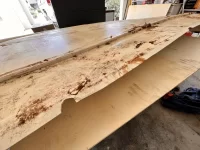
There is a row of three screws along the first aluminum crossmember holding the back of the front cap. On my coach they were hidden underneath the cardboard headliner / ceiling and I did not learn of them until after I ripped down the rest of the ceiling. You can see in the second pic the front cap broke off where these screws were, I ordered some 20 mesh stainless steel mesh and some ABS plastic welding sticks to reinforce and repair all of the caps. If yours is the original one piece ceiling, I cant think of a way to get to these screws without pulling the whole ceiling panel. If your cap is as brittle as mine, it broke off fairly easy from these screws. I have a wide wingspan and had difficulty getting it down in one piece. Having an extra set of hands would have been less risky.


Yes, my front cap is brittle like the dash. I would prefer to leave it alone but I have an outer front cap leak that I just cannot seem to pinpoint.Hi Ed,
There is a row of three screws along the first aluminum crossmember holding the back of the front cap. On my coach they were hidden underneath the cardboard headliner / ceiling and I did not learn of them until after I ripped down the rest of the ceiling. You can see in the second pic the front cap broke off where these screws were, I ordered some 20 mesh stainless steel mesh and some ABS plastic welding sticks to reinforce and repair all of the caps. If yours is the original one piece ceiling, I cant think of a way to get to these screws without pulling the whole ceiling panel. If your cap is as brittle as mine, it broke off fairly easy from these screws. I have a wide wingspan and had difficulty getting it down in one piece. Having an extra set of hands would have been less risky. View attachment 8734View attachment 8736View attachment 8737
Ok, so the plastic front cap has about 6-8” that slips under the cardboard ceiling panel at the rearward edge. That’s going to be impossible to remove at this point.
I didn't know what I was getting into when I started pulling the caps. Its turned into a full ceiling restoration at this point with everything removed from the roof. In the process of devising a slat ceiling with tapped holes into the crossmembers attached with machine screws if access is ever needed again.Yes, my front cap is brittle like the dash. I would prefer to leave it alone but I have an outer front cap leak that I just cannot seem to pinpoint.
Ok, so the plastic front cap has about 6-8” that slips under the cardboard ceiling panel at the rearward edge. That’s going to be impossible to remove at this point.
Have you removed and resealed the edge trim along the sides of the roof? The little end pieces are very prone to leaks. If your leak is appearing towards the back of the front cap on either the passenger or driver side, this could be a place to start to avoid removing the cap.Yes, my front cap is brittle like the dash. I would prefer to leave it alone but I have an outer front cap leak that I just cannot seem to pinpoint.
Ok, so the plastic front cap has about 6-8” that slips under the cardboard ceiling panel at the rearward edge. That’s going to be impossible to remove at this point.
Yes, I just finished removing/cleaning/resealing both side rails including the end caps but I still have a leak. I even tapped all of the screw holes and replaced with stainless screws.Have you removed and resealed the edge trim along the sides of the roof? The little end pieces are very prone to leaks. If your leak is appearing towards the back of the front cap on either the passenger or driver side, this could be a place to start to avoid removing the cap.
There was the remains of a broken antenna support through a large hole at the center of the roof at the front. It landed through the first aluminum crossmember at the front. It too was hidden underneath the cardboard headliner / where the front cap ends towards the back. Might be the culpritYes, I just finished removing/cleaning/resealing both side rails including the end caps but I still have a leak. I even tapped all of the screw holes and replaced with stainless screws.
There are 2 antenna holes on my roof - one on the front cap and the other on the aluminum roof and both are over the cab. I would like to get a wrench up there and loosen one of them but not sure what is underneath holding it up.There was the remains of a broken antenna support through a large hole at the center of the roof at the front. It landed through the first aluminum crossmember at the front. It too was hidden underneath the cardboard headliner / where the front cap ends towards the back. Might be the culprit
I tried everything to get it removed before finally pulling out the grinder with a cutoff wheel. Mine was on there very tight and when it finally broke free, it just spun in circles. Having someone on the inside holding it in place while someone is on the roof loosening it, it might be possible to get down. I was able to safely cut an X into the top (roof) side of the base, then hit it with a mallet and beater screw driver to collapse it inward on itself then it fell down into the cab. This was definitely a last resort option and could easily end up cutting the aluminum roof panel on accident if not careful.
Yes, my front cap is brittle like the dash. I would prefer to leave it alone but I have an outer front cap leak that I just cannot seem to pinpoint.
Ok, so the plastic front cap has about 6-8” that slips under the cardboard ceiling panel at the rearward edge. That’s going to be impossible to remove at this point.
Heritage Cruisers mentioned to me that they have a blower box which sits on your roof over one of the ceiling fans and slightly pressurizes your cabin. Then you walk around on the roof with soapy water and look for bubbles coming out of the various roof penetrations in order to find your leaks. That struck me as a particularly brilliant idea!
I was up on the roof this morning replacing the sealant around the fridge vent and decided to take a look at the two antenna mounts - one on the front cap and the other on the aluminum roof. From visual inspection, they both look sealed until I scraped the sealant around the antenna base on the front cap. I can physically twist that mount by hand which explains why even light marine layer (fog) mist starts a drip drip drip on both sides of the inside cap.
So, after cleaning up sealant around the front cap antenna mount base and rubber gasket, I noticed that one side of the rubber gasket is distorted and tucked underneath. Tightening the base just spins and spins so I squeezed some 3M 5200 Marine sealant around the base. Let’s see if that solves the problem.
Ed
Bingo, nice find. May your coach remain dry.I was up on the roof this morning replacing the sealant around the fridge vent and decided to take a look at the two antenna mounts - one on the front cap and the other on the aluminum roof. From visual inspection, they both look sealed until I scraped the sealant around the antenna base on the front cap. I can physically twist that mount by hand which explains why even light marine layer (fog) mist starts a drip drip drip on both sides of the inside cap.
So, after cleaning up sealant around the front cap antenna mount base and rubber gasket, I noticed that one side of the rubber gasket is distorted and tucked underneath. Tightening the base just spins and spins so I squeezed some 3M 5200 Marine sealant around the base. Let’s see if that solves the problem.
Ed
Mike posted this last week:
He also rebuilt his factory windows in other videos, if the new windows fall through I will rebuild mine thanks to his videos.
He also rebuilt his factory windows in other videos, if the new windows fall through I will rebuild mine thanks to his videos.

