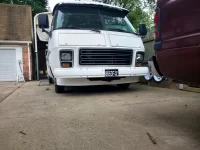
Front air dam install
- Thread starter Keith V
- Start date
You are using an out of date browser. It may not display this or other websites correctly.
You should upgrade or use an alternative browser.
You should upgrade or use an alternative browser.
Keith, I am not familiar with this product? Is it a scoop Is to help recover some of the air underneath the bumper? I have my trans and oil cooler under the bumper and would like to force ram air up through the system. I am just curious if it is an air dam or an air scoop?
Take care,
Tom K.
Take care,
Tom K.

I am not clear on the logic of improving cooling by blocking air flow on the highway. I think these air dams are really just a fashion accessory.
If you are having cooling issues up there in the frigid north you have some basic engine cooling issues that need to be repaired.
If you are having cooling issues up there in the frigid north you have some basic engine cooling issues that need to be repaired.
Keith,
After I had it mounted like you do in the picture, I glassed in two metal bars (Top & Bottom) on the back. Then glassed in the center. This gave the Air dam a better look but also gave me a place to mount a center support from behind. The thing is kind of wobbly without it.
After I had it mounted like you do in the picture, I glassed in two metal bars (Top & Bottom) on the back. Then glassed in the center. This gave the Air dam a better look but also gave me a place to mount a center support from behind. The thing is kind of wobbly without it.
Attachments
Tom,Keith,
After I had it mounted like you do in the picture, I glassed in two metal bars (Top & Bottom) on the back. Then glassed in the center. This gave the Air dam a better look but also gave me a place to mount a center support from behind. The thing is kind of wobbly without it.
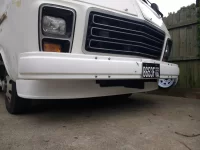
So you made it 1 piece, I was trying to decide on that. did yours meet in the middle? I have a good 1 inch gap between the two pieces.
I have two pieces of 1 inch angle ready to be bonded ( using panel adhesive ) to the back then I plan on bracing it to the radiator supports, should be nice and stiff.
Jeremy,
Air dams redirect airflow around the car/coach and up into the grill instead of under it. This lowers the air pressure under the car reducing lift, drag and effectively sucking air through the radiator. there's a reason all high performance cars have air dams in front and Semis have those big front bumpers
KeithTom,
So you made it 1 piece, I was trying to decide on that. did yours meet in the middle? I have a good 1 inch gap between the two pieces.
I have two pieces of 1 inch angle ready to be bonded ( using panel adhesive ) to the back then I plan on bracing it to the radiator supports, should be nice and stiff.
Jeremy,
Air dams redirect airflow around the car/coach and up into the grill instead of under it. This lowers the air pressure under the car reducing lift, drag and effectively sucking air through the radiator. there's a reason all high performance cars have air dams in front and Semis have those big front bumpers
Yes, I made it one piece and no it didn't meet in the middle. I used Fiber Glass to bond everything. When I filled the 1" center, I didn't have to worry about having different compounds not likening each other. Prep the surfaces to be bonded with 100 grit sandpaper. After the rear supports were cured, I used a wide piece of masking tape across the gap, (it will replicate the shape including the bottom lip) laid the damn on a table, front side down. Mixed up some resin and cut up some fiber mat to make a mixture similar to horsehair and poured, pushed that into the gap. Gave it 24hrs to cure, pulled off the tape, some surface sanding and ready to paint. I'm on the Blacklist if you want to talk.
Tom McManus,
Filling the gap is a pretty simple job IMHO, and there are multiple ways of doing it
I have a fair bit of fiberglass experience having repaired and painted an old corvette. Panel adhesive is better for gluing things like metal brackets since it gives a little and bonds to steel and glass better. It's how GM put things together.
I'll clean up and feather the joint from both sides using matt, then fill it with kitty hair to make it smooth, then bondo for final finish.

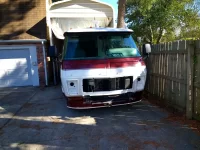
Some install pictures. The center support will be glued to the airdam and tied into the radiator support with a piece of angle and the gap tooth will be filled in. Might get bigger washers for the final install


Attachments

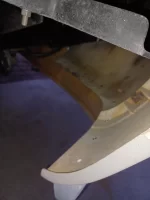
Looks like you pushed it out in the center to create an arrow shape to it. May be the angle of the photos!
The airdam is pretty much where it wants to be and matches the angle of the front of the coach, 160 degrees IIRC.
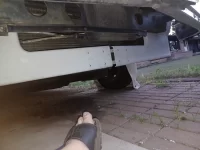
The the airdams center opening is about level with the bottom of the radiator, it should receive more air now. I do plan on adding ducting to control the airflow to the radiator from the opening. My trans cooler is visible there in the openingThe radiator extends below the bumper and I have installed an oil cooler and trans cooler to that area in from of the radiator. I wanted to direct air into this area to aid in cooling.
Last edited:


Oh Yes, they blow right at the offender!Keith,
And a great place to put HORNS!!
Matt
