Hi Folks,
My coach developed a serious oil leak over the past couple of years. At least part of the leak was coming from the front ridge of the block where it meets the intake manifold. The intake had never been removed from my 130k engine, so I was pretty sure there'd be some coked oil in the crossover area and a crack between the holes for the carburetor's secondary ports. The engine runs great, though, and it has plenty of vacuum and oil pressure, so it should have a lot of life left before a rebuild is needed.
This post details the intake removal, inspection and reinstallation with crossover block-off plates and conversion of the hot air choke (which uses the exhaust crossover) to an electronic equivalent. There's a parts list at the bottom of the post. For further background info about the need to block off the exhaust crossover, check out the following links:

 www.gmccoop.com
 www.gmccoop.com
 www.gmccoop.com
 www.gmccoop.com
Here's the "before" photo. The intake is pretty baked, but I'm happy that the PO installed Dick Paterson's Springfield Ignition distributor and wires:
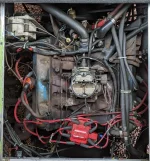
In general I followed the procedure for this job as described in the factory repair manual, so the first step was to disconnect the chassis and house batteries. I used a putty knife, rags, and a shop vac to clean things up as much as possible before cracking the engine open.
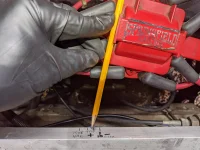
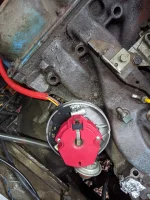
Before removing the distributor (not an absolute requirement, but it's really nice to have it out of the way), it's important to mark the position of the distributor and the rotor so you can reassemble it in the same position. When I was optimizing my timing a few months ago, I had made some marks on the back edge of the engine bay, so the distributor position mark was all set. The only additional marking I needed to do was for the position of the rotor:
The manifold is pretty heavy (about 60 pounds?), and the lifting position is awkward, so I attached some chain via the carb bolts to provide something to pull on. Once all the bolts were out I was able to break the seal by pushing a stiff 5-in-1 painter's tool into the rear seam between the block and the manifold and prying carefully. I was working in my driveway, and rodents have been known to hang out on top of the manifold, so I made sure to cover or plug all the holes in the engine. I pulled the intake as carefully as possible to avoid dislodging any coked oil "cookies":
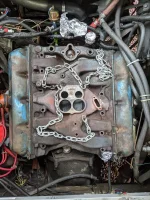
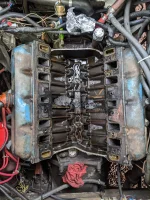
Sure enough, there was coked oil everywhere: On the "turkey tray" (i.e. intake gasket/valley pan combo), on the underside of the intake (not pictured), and even in the block valley. The rubber gaskets on the front and rear ridges were brittle and cracked, causing much oil leakage. I did a lot of careful cleaning, and changed the oil once the engine was up and running again at the conclusion of the project:
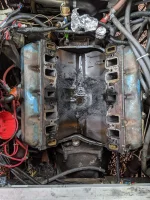
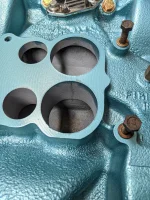
The intake went to the machine shop for hot tanking and magnafluxing. There was a crack (see photo), but it didn't extend into the floor of the manifold. With the crossover blocked, the crack shouldn't expand further. I went ahead and removed the valve covers, too, then cleaned everything up and painted the components. Note the chrome choke block-off plate at the top of the closeup photo. I didn't need one that fancy or expensive, but I had a hard time finding a plain one so I just bit the bullet:
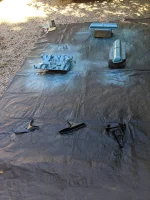
Before starting the reassembly it's a good idea to put in the locator stud (described below) and rehearse the reinstallation of the intake. When I did so, I realized I needed to temporarily remove the little tabs under some of the valve cover bolts. I also needed to temporarily flip the thermostat housing around if I was going to use it as a handle. Otherwise the thermostat bypass pipe and hose would interfere.
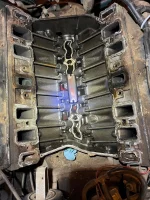
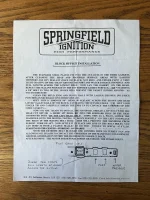
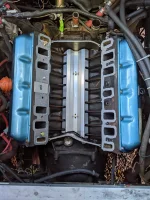
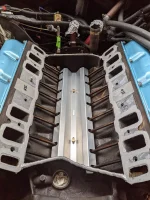
Now for the fun part, reassembly! This photo shows the new Mondello valley tray, which prevents hot oil from splashing onto the underside of the intake. If the engine ever bends a pushrod, it will also keep the associated lifter in its bore, thus maintaining oil pressure. The photo also shows the left gasket and block-off plate installed, and the Permatex Ultra Grey sealant in all the correct places on the right. There's also a dab of Permatex holding the block-off plate in place. The Paterson gaskets and block-off plates fit very well and they come with a detailed instruction sheet. Note the new grade 8 manifold bolts (not an absolute requirement but they're cheap) holding the gasket in position, and the homemade locator stud (bolt with the head cut off and a slot cut in it for a screwdriver blade) to help position the manifold fore-and-aft when installing. I let the sealant under the gaskets set up for a little while so that the gaskets wouldn't shift when the manifold went on:
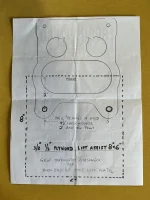
This photo shows the bead of Permatex along the front and rear ridges and around the ports on top of the gaskets. I didn't dimple the ridges or their mating surfaces on bottom of the manifold as some suggest -- Mr. Paterson says it's not necessary. I let the Permatex skin over for a half hour, then installed the manifold with the bolts finger tight and waited another half hour before torquing to 45 ft-lbs (Paterson recommendation, 5 ft-lbs greater than the repair manual spec). Paterson's instructions say to tighten the bolts from the inside out, whereas the repair manual is opposite. I went with the repair manual recommendation but I suspect it doesn't matter much. Paterson also recommends bolting a 6x8x.5 hunk of plywood to the two rear carb holes temporarily to use as a second handle when reinstalling the intake (not pictured):
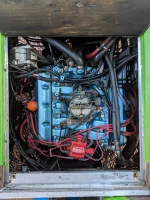
Looking good! Vacuum hoses replaced with heavy-duty silicone hoses, deteriorated split loom wiring covers replaced, electronic choke installed, unused vacuum ports plugged, metal line between carb and fuel pump replaced with insulated stainless-braid hose. The electronic choke uses a temp sensor attached to the right rear manifold bolt to control choke action. I think this is a better approach than just hooking up to a power source -- it's temperature based vs time based. I tapped into the Bat+ connection on the distributor for the positive connection to the electronic choke:
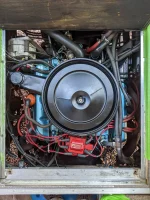
And it's done. The throttle seems more responsive, probably due to the air-fuel mixture being cooler. I'll bet gas mileage is a bit better, too. When I'm pulling on a hill, though, the engine drones a bit more noticeably, maybe because the crossover previously helped to smooth out the exhaust pulses. I had never realized how close the air cleaner is to the engine cover until I opened the hatch following a test drive and found that my newly-painted air cleaner had gotten dirty from contact with the round insulation section in the underside of the hatch. Although the intake oil leak problem was resolved, I found that the thermostat housing bolts were leaking a bit of coolant. The bolt holes go through to the coolant passage, so coolant was traveling up the threads and out. Putting a bit of Permatex on the bolt threads cured that issue:
Parts List:
Valve cover gaskets, PVT57490 Power Products Steel Core Valve Cover Gaskets, competitionproducts.com
Electronic choke, CU1121 electric choke conversion kit, mikescarb.com
Engine paint and primer, Oldsmobile Metallic Blue, hirschauto.com
Paterson intake gaskets and block-off plates, appliedgmc.com
Insulated fuel line, appliedgmc.com
Mondello valley tray, appliedgmc.com
Mondello choke block-off plate, mondelloperformance.com
Grade 8 zinc-plated intake bolts and washers, boltdepot.com (replaced all except for the two front studs; there are two different lengths)
Permatex Ultra Grey sealant
My coach developed a serious oil leak over the past couple of years. At least part of the leak was coming from the front ridge of the block where it meets the intake manifold. The intake had never been removed from my 130k engine, so I was pretty sure there'd be some coked oil in the crossover area and a crack between the holes for the carburetor's secondary ports. The engine runs great, though, and it has plenty of vacuum and oil pressure, so it should have a lot of life left before a rebuild is needed.
This post details the intake removal, inspection and reinstallation with crossover block-off plates and conversion of the hot air choke (which uses the exhaust crossover) to an electronic equivalent. There's a parts list at the bottom of the post. For further background info about the need to block off the exhaust crossover, check out the following links:
The New Co-op: Please, you MUST block your intake exhaust crossover ports! - Cooperative Motor Works
Jeff M., I had to delay your road test, an issue was uncovered on another coach that we had to work and the rest of you guy, take this to heart. If you have not addressed this, YOU are in harms way! So a couple came in with a real problem with their coach.The owner […]
www.gmccoop.com
Cracked Intake - Cooperative Motor Works
June 15, 2017 GMC Motorhome, Look, this intake thing is real! Mornin, look…….. I had some updating to do on a couple of projects around here but this came up yesterday that I think will make all of you pause who have not addressed this as yet. Now after I say what it is […]
www.gmccoop.com
GMC Motorhome; Don't fall through the crack....... - Cooperative Motor Works
Was gonna call this “Got Crack” but I felt that a bit too much. Yesterday I did a test drive in a coach preparing it to go home. The coach has been running great pulling it around the shop…..keeping it plugged in and all. As I pointed out before we really want to shake a […]
www.gmccoop.com
GMC Motorhome: Don't fall in the crack...page 2 - Cooperative Motor Works
So getting the intake out, this is an original…….non rebuilt motor. Othere than the outside looking about as grody as you can imagine, It was the carbon cookies……there were too many of them inside the “turkey tray” not to be building for 40 years. You can see the intake where I chipped off...
www.gmccoop.com
Here's the "before" photo. The intake is pretty baked, but I'm happy that the PO installed Dick Paterson's Springfield Ignition distributor and wires:
In general I followed the procedure for this job as described in the factory repair manual, so the first step was to disconnect the chassis and house batteries. I used a putty knife, rags, and a shop vac to clean things up as much as possible before cracking the engine open.
Before removing the distributor (not an absolute requirement, but it's really nice to have it out of the way), it's important to mark the position of the distributor and the rotor so you can reassemble it in the same position. When I was optimizing my timing a few months ago, I had made some marks on the back edge of the engine bay, so the distributor position mark was all set. The only additional marking I needed to do was for the position of the rotor:
The manifold is pretty heavy (about 60 pounds?), and the lifting position is awkward, so I attached some chain via the carb bolts to provide something to pull on. Once all the bolts were out I was able to break the seal by pushing a stiff 5-in-1 painter's tool into the rear seam between the block and the manifold and prying carefully. I was working in my driveway, and rodents have been known to hang out on top of the manifold, so I made sure to cover or plug all the holes in the engine. I pulled the intake as carefully as possible to avoid dislodging any coked oil "cookies":
Sure enough, there was coked oil everywhere: On the "turkey tray" (i.e. intake gasket/valley pan combo), on the underside of the intake (not pictured), and even in the block valley. The rubber gaskets on the front and rear ridges were brittle and cracked, causing much oil leakage. I did a lot of careful cleaning, and changed the oil once the engine was up and running again at the conclusion of the project:
The intake went to the machine shop for hot tanking and magnafluxing. There was a crack (see photo), but it didn't extend into the floor of the manifold. With the crossover blocked, the crack shouldn't expand further. I went ahead and removed the valve covers, too, then cleaned everything up and painted the components. Note the chrome choke block-off plate at the top of the closeup photo. I didn't need one that fancy or expensive, but I had a hard time finding a plain one so I just bit the bullet:
Before starting the reassembly it's a good idea to put in the locator stud (described below) and rehearse the reinstallation of the intake. When I did so, I realized I needed to temporarily remove the little tabs under some of the valve cover bolts. I also needed to temporarily flip the thermostat housing around if I was going to use it as a handle. Otherwise the thermostat bypass pipe and hose would interfere.
Now for the fun part, reassembly! This photo shows the new Mondello valley tray, which prevents hot oil from splashing onto the underside of the intake. If the engine ever bends a pushrod, it will also keep the associated lifter in its bore, thus maintaining oil pressure. The photo also shows the left gasket and block-off plate installed, and the Permatex Ultra Grey sealant in all the correct places on the right. There's also a dab of Permatex holding the block-off plate in place. The Paterson gaskets and block-off plates fit very well and they come with a detailed instruction sheet. Note the new grade 8 manifold bolts (not an absolute requirement but they're cheap) holding the gasket in position, and the homemade locator stud (bolt with the head cut off and a slot cut in it for a screwdriver blade) to help position the manifold fore-and-aft when installing. I let the sealant under the gaskets set up for a little while so that the gaskets wouldn't shift when the manifold went on:
This photo shows the bead of Permatex along the front and rear ridges and around the ports on top of the gaskets. I didn't dimple the ridges or their mating surfaces on bottom of the manifold as some suggest -- Mr. Paterson says it's not necessary. I let the Permatex skin over for a half hour, then installed the manifold with the bolts finger tight and waited another half hour before torquing to 45 ft-lbs (Paterson recommendation, 5 ft-lbs greater than the repair manual spec). Paterson's instructions say to tighten the bolts from the inside out, whereas the repair manual is opposite. I went with the repair manual recommendation but I suspect it doesn't matter much. Paterson also recommends bolting a 6x8x.5 hunk of plywood to the two rear carb holes temporarily to use as a second handle when reinstalling the intake (not pictured):
Looking good! Vacuum hoses replaced with heavy-duty silicone hoses, deteriorated split loom wiring covers replaced, electronic choke installed, unused vacuum ports plugged, metal line between carb and fuel pump replaced with insulated stainless-braid hose. The electronic choke uses a temp sensor attached to the right rear manifold bolt to control choke action. I think this is a better approach than just hooking up to a power source -- it's temperature based vs time based. I tapped into the Bat+ connection on the distributor for the positive connection to the electronic choke:
And it's done. The throttle seems more responsive, probably due to the air-fuel mixture being cooler. I'll bet gas mileage is a bit better, too. When I'm pulling on a hill, though, the engine drones a bit more noticeably, maybe because the crossover previously helped to smooth out the exhaust pulses. I had never realized how close the air cleaner is to the engine cover until I opened the hatch following a test drive and found that my newly-painted air cleaner had gotten dirty from contact with the round insulation section in the underside of the hatch. Although the intake oil leak problem was resolved, I found that the thermostat housing bolts were leaking a bit of coolant. The bolt holes go through to the coolant passage, so coolant was traveling up the threads and out. Putting a bit of Permatex on the bolt threads cured that issue:
Parts List:
Valve cover gaskets, PVT57490 Power Products Steel Core Valve Cover Gaskets, competitionproducts.com
Electronic choke, CU1121 electric choke conversion kit, mikescarb.com
Engine paint and primer, Oldsmobile Metallic Blue, hirschauto.com
Paterson intake gaskets and block-off plates, appliedgmc.com
Insulated fuel line, appliedgmc.com
Mondello valley tray, appliedgmc.com
Mondello choke block-off plate, mondelloperformance.com
Grade 8 zinc-plated intake bolts and washers, boltdepot.com (replaced all except for the two front studs; there are two different lengths)
Permatex Ultra Grey sealant
Last edited:


 ).
).