Advice on sealing body holes

Seeburg220

Active member
Oct 25, 2021
318
149
43
Berryville, VA
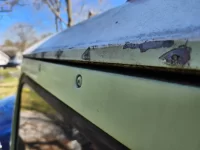
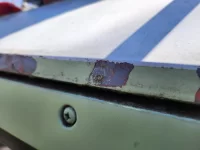
P.O. apparently had an awning on the rear window and removed it at some point, leaving a dozen holes in the edge of the top rear cap. They are leaking inside of the coach. I'm looking for ideas on how to seal these holes.

I assume the correct way is to sand and fill the holes with epoxy and sand and paint. I may do that down the road, but I'm not prepared this year to do any finish painting.
The holes appear too small for me to fill with any sort of sealant, unless I were to drill them out bigger.

Thoughts and ideas welcomed.
 

Attachments

  • 20240324_124558.webp
    20240324_124558.webp
    531.3 KB · Views: 10
  • 20240324_124556.webp
    20240324_124556.webp
    454.4 KB · Views: 9
I advise everyone who has one of these motorhomes to purchase a supply of West System 105 epoxy and either 206 slow hardener or 205 fast "PLUS" a set of West pumps. The epoxy is mixed in a 5 to 1 ration therefor you can purchase a 1 quart and half pint combination ....or ... a 1 gal and 1 quart combination. I use the latter because I do a lot of epoxy work and if you want to repair your wheel wells or radiator shroud you will need the 1 gallon. With this epoxy get yourself a container of cabosil to thicken the epoxy. You will need some 1" x 6 oz fiberglass tape. You can get this in short lengths or a roll... judge this by "do you have any other cracks to repair"? Get a few of those small metal handle "acid" brushes that hardware stores sell and a few small clean empty yoghurt type plastic containers to mix stuff in. A quart of lacquer thinner, some dispo gloves and a good 3M respirator. Clean with lacquer thinner. Sand. Lacquer thinner again. Mix epoxy. Paint the cleaned holes w mixed epoxy. Mix some cabosil into your epoxy (relatively thick or stiff mixture) fill the holes with a putty knife. Let cure and in the sun this stuff goes off fast(er) depending if you get the fast or slow. When set up, sand, use body cream from any body shop supplier - I prefer 3M glazing compound, use a plastic body putty smoothing spatula on the glazing putty, sand when cured, and admire your awesome job until you realize that now you have a paint job to do. Don't curse loud enough for the neighbors to hear like I do ;-)
 
May I add to Jessica's advice. For holes, the great Dale Ropp in a presentation at a GMCMI rally, advised taking ear plugs, soaking them in mixed epoxy, and shoving them into the holes, They will expand on the inside of the hole to create a positive bond and have enough on the inside if you want to drill for fasteners. I've used this method several times where screws have pulled out of the fiberglass body. JWID
 
  • Like
Reactions: werewilfs
May I add to Jessica's advice. For holes, the great Dale Ropp in a presentation at a GMCMI rally, advised taking ear plugs, soaking them in mixed epoxy, and shoving them into the holes, They will expand on the inside of the hole to create a positive bond and have enough on the inside if you want to drill for fasteners. I've used this method several times where screws have pulled out of the fiberglass body. JWID
That's a good method, thank you. I'm not sure it will work in my case, as the holes are very small, 1/8" I'm guessing. I will keep that in mind, though.
 
I advise everyone who has one of these motorhomes to purchase a supply of West System 105 epoxy and either 206 slow hardener or 205 fast "PLUS" a set of West pumps. The epoxy is mixed in a 5 to 1 ration therefor you can purchase a 1 quart and half pint combination ....or ... a 1 gal and 1 quart combination. I use the latter because I do a lot of epoxy work and if you want to repair your wheel wells or radiator shroud you will need the 1 gallon. With this epoxy get yourself a container of cabosil to thicken the epoxy. You will need some 1" x 6 oz fiberglass tape. You can get this in short lengths or a roll... judge this by "do you have any other cracks to repair"? Get a few of those small metal handle "acid" brushes that hardware stores sell and a few small clean empty yoghurt type plastic containers to mix stuff in. A quart of lacquer thinner, some dispo gloves and a good 3M respirator. Clean with lacquer thinner. Sand. Lacquer thinner again. Mix epoxy. Paint the cleaned holes w mixed epoxy. Mix some cabosil into your epoxy (relatively thick or stiff mixture) fill the holes with a putty knife. Let cure and in the sun this stuff goes off fast(er) depending if you get the fast or slow. When set up, sand, use body cream from any body shop supplier - I prefer 3M glazing compound, use a plastic body putty smoothing spatula on the glazing putty, sand when cured, and admire your awesome job until you realize that now you have a paint job to do. Don't curse loud enough for the neighbors to hear like I do ;-)
Thank you. I will keep this in mind when I go to repair and repaint the coach. I'm just looking for a temporary fix for now, to get me through a season or two.
 
For temporary sealing until it can be done right, aluminum tape works wonders. The foil protects the adhesive, and the foil won't break down from the elements like synthetics will.

I cut or punch out small circles and stick them down over holes. Just clean the area very well, and make sure there are no burrs sticking up. When applying the tape, rub/burnish it well for max adhesion.

For reference, I once took a roof rack off of a Subaru and patched the holes "temporarily" with aluminum tape. It actually blended in with the silver paint reasonably well, and it hasn't leaked in 15 years now, so I'm starting to question how temporary it is...

I did temporarily take the ladder off my Glenbrook until I can deal with the stripped/leaking holes. Aluminum tape has also kept that sealed off for 2 years now.
 
  • Like
Reactions: Seeburg220
May I add to Jessica's advice. For holes, the great Dale Ropp in a presentation at a GMCMI rally, advised taking ear plugs, soaking them in mixed epoxy, and shoving them into the holes, They will expand on the inside of the hole to create a positive bond and have enough on the inside if you want to drill for fasteners. I've used this method several times where screws have pulled out of the fiberglass body. JWID
Dale had said in his GMCMI epoxy seminar that the ear plugs have wax that slows the rebound after you squeeze them to give you time to get them into your ears, and that the ear plugs should be washed, rinsed and dried before impregnating them with the epoxy.

It's a great technique for patching holes. If the holes are too tiny I'd consider drilling them out larger to fit the plugs, as the plugs expand they mushroom and you'll end up with a wider and deeper solid solid plug. Particularly useful if you'll be trying to use those same holes for new fasteners. You can also cut the plugs down to the size you need.
 
  • Like
Reactions: Seeburg220
Dale had said in his GMCMI epoxy seminar that the ear plugs have wax that slows the rebound after you squeeze them to give you time to get them into your ears, and that the ear plugs should be washed, rinsed and dried before impregnating them with the epoxy.

It's a great technique for patching holes. If the holes are too tiny I'd consider drilling them out larger to fit the plugs, as the plugs expand they mushroom and you'll end up with a wider and deeper solid solid plug. Particularly useful if you'll be trying to use those same holes for new fasteners. You can also cut the plugs down to the size you need.
I actually just cooked a large batch of earplugs on the stove last night!
 
Dale had said in his GMCMI epoxy seminar that the ear plugs have wax that slows the rebound after you squeeze them to give you time to get them into your ears, and that the ear plugs should be washed, rinsed and dried before impregnating them with the epoxy.

It's a great technique for patching holes. If the holes are too tiny I'd consider drilling them out larger to fit the plugs, as the plugs expand they mushroom and you'll end up with a wider and deeper solid solid plug. Particularly useful if you'll be trying to use those same holes for new fasteners. You can also cut the plugs down to the size you need.
Thanks for that extra tip. I'd forgotten about that detail.
 
If you are looking for a rapid leak proofing in that area (rather than going with the epoxy methods) you could simply buy a narrow roll of eternabond tape and run a strip along the area. Moisten your fingers/gloves when handling the tape as it is impossible to work with otherwise - ultra sticky!
It will definitely seal the area BTW.
 
  • Like
Reactions: Seeburg220