View attachment 16894That Aluminum member is partially removed here using an oscillating saw. but......
View attachment 16895
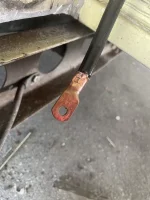
after i checked that battery cable, it fully rotated and was being held in place by the shrink tube. You can see that there is no crushing of the stranded tined wire, so this is a terrible connection.
View attachment 16897
While the lug looks as though it had been crimped it was only cursory and had zero mechanical strength and dubious electrical capability.
View attachment 16898
There was the same problem with the second lug I checked.
View attachment 16899
and the third.
I will have to check every lug in the coach now. It may be the source of intermittent problems or mysterious future issues.
I paid good money for this work but .........
View attachment 16902
This is the heavy duty crimping tool for battery sized cables. It is notes to use. It requires a lot of force. Sometimes, I have to tuen it sideways with one arm on the ground and the other one sticking up. I then have to step on the upright one to apply sufficient t force to crimp the lug to a battery cable.
View attachment 16900
Trimming the aluminum member likely eliminated the binding of the custom slide. It took me four days to pull it slide out with a lot of cursing.
A pre-existing hole in the chassis cross member was not used to eliminate the rotation of the battery slide. I plan to use a new bolt here and drill a second hole further back.
View attachment 16901
There is another diagonal chassis member on the right side. I plan to drill another hole here as well.
The battery slide will then be properly installed structurally as it should have been done in the first place.
I am beginning to think that I cannot trust anyone but me to work on my coach but sometimes I am not so sure about me.
Will I have to reinspect all of the work that was done by others when my coach was not next to my house?
How about the ones that were done by previous owners.
You should check all of your battery cables and try to rotate the lug. If it moves, even a little bit, you need to crimp it again or replace the lug.